
Product Manual


6
EasyCharge 1.1 and 4.3A – User Manual
BATTERY CHARGING
Charging can be stopped at any time by
disconnecting the mains plug from the wall socket.
CHARGING OUTSIDE A VEHICLE
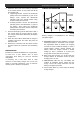
1 Disconnect all loads from the battery.
2 Connect the required cable assembly (either with
ring terminals or alligator clips) to the DC-
connector. Make sure the connection is secure.
3 Connect the POSITIVE (RED) lead to the
POSITIVE terminal (+ pole) of the battery. Then
connect the NEGATIVE (BLACK) lead to the
NEGATIVE terminal (– pole) of the battery.
4 Insert the mains plug into the wall socket. After a
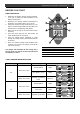
five second delay the charger starts to charge.
The charge status LEDs will indicate the battery
charge level.
5 When the 100% LED is illuminated the charge is
complete. The charger may remain connected to
wall socket and the battery for trickle charging. If
you want to stop charging, disconnect the mains
plug from the wall socket first.
6 Remove the NEGATIVE (BLACK) lead from the
battery pole, and then remove the POSITIVE
(RED) lead.
CHARGING LI-ION AFTER CUT OFF
When using the charger for Mastervolt MLS batteries
battery charge level LEDs may indicate that there is
no charge. Mastervolt MLS batteries are equipped
with an internal safety switch. When the safety switch
is triggered, the charger will not see a battery voltage
and does not start charging automatically. For more
information see the manual of the MLS battery.
To start charging, the 4.3A model has a manual start
function:
A. Follow steps 1 to 4 as listed above.
B. To start the charger, press the MODE button until
LED 6 blinks fast.
C. The charger will now start charging the MLS.
LED 6 will blink for 2 minutes.
D. After 2 minutes, LED 6 should stay on and the
charge level LEDs will indicate the battery charge
level. Continue with steps 5 and 6 listed above.
If LED 6 does not stay on, press the MODE
button again. If after the second attempt LED 6
still does not stay on, contact your installer.
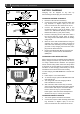
CHARGING INSIDE A VEHICLE
1 Turn off the ignition and switch off all loads.
2 Connect the required cable assembly (either with
ring terminals or alligator clips) to the DC-
connector. Make sure the connection is secure.
1
OFF
2
Click!
3
4
5
6