
Product Manual


EasyCharge 1.1 and 4.3A – User Manual
5
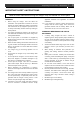
BEFORE YOU START
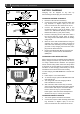
FIRST TIME SETUP
1 Determine the battery voltage and type (flooded,
Li-ion, gel or AGM) from the information of the
battery manufacturer.
2 Determine the average ambient temperature of
the battery: is it below of above 10°C / 50°F?
3 Select the required charge mode based on your
battery and the Charge mode selection table, and
determine the corresponding LED display.
4 Make sure the charger is not connected to mains
or battery.
5 Insert the mains plug into the wall socket. All
LEDs will illuminate for 2 seconds.
6 Press the MODE button repeatedly to scroll
through the charge modes until the desired mode
is selected.
7 Wait – the selected charge mode will blink. After
a period of 3 seconds, the charge mode will be
stored into memory.
The charger will remember the last setting of the
charge mode even after it has been disconnected
from battery or mains.
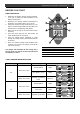
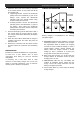
LED
Meaning
1
AC power present
2
Problem, see trouble shooting section
3
Charge status (25%, 50%, 75%, 100%).
4-7
See table Charge mode selection
TABLE CHARGE MODE SELECTION
Battery voltage
Temperature
Battery type
Charge mode LED
12V
Over 10°C / 50°F
Flooded (WET)
LED 4
Gel / AGM or Li-ion
LED 6
Below 10°C / 50°F
Flooded, gel, AGM or
Li-ion
LED 4+6
6V
Over 10°C / 50°F
Flooded (WET)
LED 5
Gel / AGM
LED 7
Below 10°C / 50°F
Flooded, gel or AGM
LED 5+7