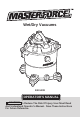
Wet/Dry Vacuums 240-5238 OPERATOR’S MANUAL CAUTION: To Reduce The Risk Of Injury, User Must Read And Understand Operator's Manual. Save These Instructions For Future Reference.
TABLE OF CONTENTS SECTION PAGE Safety Instructions & Warnings.......................................................................................................2 Double Insulation & Instructions......................................................................................................4 Extension Cords..............................................................................................................................4 Unpacking & Checking Carton Contents.............................
SAFETY INSTRUCTIONS & WARNINGS The purpose of safety symbols is to attract our attention to possible dangers. The safety symbols, and the explanations with them, deserve your careful attention and understanding. The symbol warnings do not by themselves eliminate any danger. The instructions and warnings they give are no substitutes for proper accident prevention measures.
SAFETY INSTRUCTIONS & WARNINGS IMPORTANT SAFETY INSTRUCTIONS FOR FUTURE REFERENCE Read and understand this operator's manual and all labels on the Wet/Dry Vacuum cleaner before operating. Safety is a combination of common sense, staying alert, and knowing how your vacuum works. Use this Wet/Dry Vac only as described in this manual. To reduce the risk of personal injury or damage to your Wet/Dry Vac, use only Masterforce TM recommended accessories.
DOUBLE INSULATION INSTRUCTIONS T h i s We t / D r y Va c i s d o u b l e - i n s u l a t e d , eliminating the need for a separate grounding system. Use only identical replacement parts. Read the instructions for Servicing DoubleInsulated Wet/Dry Vacs before servicing. Use this Wet/Dry Vac as described in this manual. Observe the following warnings that appear on the motor housing of your Wet/Dry Vac. DOUBLE INSULATED - GROUNDING NOT REQUIRED - WHEN SERVICING USE ONLY IDENTICAL REPLACEMENT PARTS.
UNPACKING & CHECKING CARTON CONTENTS Remove all contents from the box. Remove the power head and take out any contents inside the collection tank. Check each item against the carton contents list.
UNPACKING & CHECKING CARTON CONTENTS On-Off Switch Cord Wrap Handle Blower Port Power Head Accessory Storage Collection Tank Lid Latch Vaccum Port Collection Tank Accessory Storage Blower Release Button Caster Foot Caster Cord Hook Handle Drain Power Switch Cord Hook Blower Release Button Blower Adapter Blower Concentrator Nozzle Page 6
GENERAL ASSEMBLY INSTRUCTIONS WARNING: DO NOT PLUG POWER CORD INTO POWER OUTLET. MAKE SURE PLUG IS DISCONNECTED BEFORE ASSEMBLING THE WET/DRY VACUUM. UNPACKING YOUR WET/DRY VACUUM & GENERAL ASSEMBLY 4. Remove the contents from inside the collection tank. Make sure you have all contents as listed on page 5. (fig. 4) Fig. 4 1. Verify that the power cord is disconnected from the outlet. (fig. 1) Fig. 1 5.
GENERAL ASSEMBLY INSTRUCTIONS 7. For wet vacuum cleaning, install the supplied foam wet filter. (fig. 8) See page 17 for filter installation. Fig. 8 8. Place the power head back on the collection tank, aligning the top section with the latches, and snap into place. Keep in mind the power head should be positioned so that the blower port is in the rear. (fig. 9) Fig. 9 10. Choose the desired wands or accessories and push onto the hose. (fig. 11) Fig.
DRY VACUUM OPERATION DRY VACUUMING WARNING: B E S U R E T O R E A D , UNDERSTAND, AND APPLY INFORMATION, ENTITLED ‘SAFETY INSTRUCTIONS & WARNINGS’. DO NOT VACUUM IN AREAS WITH FLAMMABLE GASES, VAPORS, OR EXPLOSIVE DUSTS IN THE AIR. FLAMMABLE GASES OR VAPORS INCLUDE BUT ARE NOT LIMITED TO: LIGHTER FLUID, SOLVENT TYPE CLEANERS, OIL-BASED PAINTS, GASOLINE, ALCOHOL OR AEROSOL SPRAYS. EXPLOSIVE DUSTS INCLUDE BUT ARE NOT LIMITED TO: COAL, MAGNESIUM, GRAIN OR GUN POWDER.
DRY VACUUM OPERATION OPERATING INSTRUCTIONS: DRY VACUUMING 5. Insert the locking end of the hose into the vacuum port on the front of the tank and lock in place. Push the required attachment onto the free end of the hose or extension. (fig. 5) 7. Turn the motor on by flipping the switch to the ‘I’ ON position. (fig. 7) Fig. 7 Fig. 5 8. Once you have completed vacuuming, flip the switch to the ‘O’ OFF position and unplug the power cord from the outlet. O = OFF 6. Plug the power cord into the outlet.
LIQUID VACUUM OPERATION LIQUID VACUUMING WARNING: BE SURE TO READ, UNDERSTAND, AND APPLY INFORMATION, ENTITLED ‘SAFETY INSTRUCTIONS & WARNINGS’. DO NOT VACUUM IN AREAS W IT H F LAMMABLE GA SES, VAPO RS, OR EXPLOSIVE DUSTS IN THE AIR. FLAMMABLE GASES OR VAPORS INCLUDE BUT ARE NOT LIMITED TO: LIGHTER FLUID, SOLVENT TYPE CLEANERS, OILBASED PAINTS, GASOLINE, ALCOHOL, OR AEROSOL SPRAYS. EXPLOSIVE DUSTS INCLUDE BUT ARE NOT LIMITED TO: COAL, MAGNESIUM, GRAIN, OR GUN POWDER.
LIQUID VACUUM OPERATION 5. Turn the motor on by flipping the switch to the ‘I’ ON position. (fig. 5) Fig. 5 6. After use, empty the collection tank by unscrewing the drain cap. Drain liquids into a suitable receptacle or drain. Remember to refit the drain cap to the collection tank after draining collection tank. (fig. 6 & 7) Fig. 6 Fig.
BLOWER OPERATION This Wet/Dry Vac converts to a detachable blower that can be used for leaf blowing in yards, decks and patios. To use the detachable blower feature follow the instructions listed. WARNING: 3. Insert the adapter into the blower port and fit it the desired extension wands and or nozzles. (fig. 4 & 5) Fig. 4 ALWAYS WEAR SAFETY GOGGLES COMPLYING WITH ANSI Z87.1 (or in Canada, CSAZ94.3) BEFORE USING BLOWER.
MAINTENANCE WARNING: ALWAYS DISCONNECT THE PLUG FROM THE POWER OUTLET BEFORE REMOVING THE POWER HEAD FROM THE COLLECTION TANK. 4. Clear all dirt or debris from the collection tank and hose. (fig. 4) Fig. 4 1. Verify that the power cord is disconnected from the outlet. (fig. 1) Fig. 1 5. Clean the foam wet filter by washing it with water and mild soap. (fig. 5) Fig. 5 2. Disconnect the hose from the unit. (fig. 2) Fig. 2 6.
MAINTENANCE BLOWER INTAKE WARNING: ALWAYS DISCONNECT THE PLUG FROM THE POWER OUTLET BEFORE REMOVING THE POWER HEAD FROM THE COLLECTION TANK. 3. Remove the foam pad from the blower and clean the foam pad with soapy water and allow to dry. (fig. 3) Fig. 3 After using the blower, examine the bottom of the blower for debris and blockages and remove if found. To clean the foam pad of the intake: 1. Verify that the power cord is disconnected from the outlet. (fig. 1) Fig. 1 4. Check the foam pad for reuse.
INSTALLING & CLEANING CARTRIDGE FILTER Installing Cartridge Filter 1. Verify that the power cord is disconnected from the outlet. (fig. 1) Fig. 1 Removing and Cleaning Cartridge Filter 1. Unlock and remove the filter retainer by turning retainer handle counter clockwise. 2. Carefully hold and pull the cartridge filter up for removal. (fig. 6) Fig. 6 2. Remove lid and power head and place in upside down position. 3.
INSTALLING & CLEANING FOAM WET FILTER Installing Foam Wet Filter Cleaning Foam Wet Filter 1. Verify that the power cord is disconnected from the outlet. (fig. 1) 1. With the removed power head in an upside down position, carefully remove foam wet filter. (fig. 4) Fig. 1 Fig. 4 2. Remove power head and place in upside down position. Follow instructions to remove cartridge filter. 3. Carefully slide foam wet filter down over the filter cage making sure the cage is completely covered. (fig. 2 & 3) Fig.
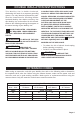
TROUBLESHOOTING WARNING: TO REDUCE THE RISK OF ELECTRIC SHOCK-UNPLUG BEFORE TROUBLESHOOTING. Symptom Vacuum will not operate. Dust comes out from motor cover. Reduced efficiency and motor/ speed vibration. Possible Causes Corrective Action 1) Check power supply – cord, 1) No power supply. breakers, fuses. 2) Unplug and check the power 2) Faulty power cord. cord. If damaged, have it repaired by a professional. 3) Collection tank full. 3) Empty collection tank.
EXPLODED VIEW & PARTS LIST Key Description 1 Power Head Assembly 2 Collection Tank Lid 3 Float 4 Filter Cage 5 Collection Tank 6 Vacuum Port Assembly 7 Drain Cap Assembly 8 Caster Foot Assembly 9 Hose 10 Blower Wand Page 19 Part # 551002142 551008115 551218102 551002112 551002110 551002111 551090104 551002116 Qty 1 1 1 1 1 1 1 4 1 1 Key Description 11 Blower Concentrator Nozzle 12 Blower Adapter 13 Crevice Tool 14 Floor Nozzle 15 Extension Wand 16 Cartridge Filter 17 Cartridge Filter Retainer 18 Foam W
NOTES Page 20
NOTES Page 21
Wet/Dry Vacuums WARRANTY 90-DAY MONEY BACK GUARANTEE This MASTERFORCE TM brand wet/dry vacuum carries our 90-Day Money Back Guarantee. If you are not completely satisfied with your MASTERFORCETM brand wet/ dry vacuum for any reason within ninety (90) days from the date of purchase, return the vacuum with your original receipt to any MENARDS® retail store, and we will provide you a refund - no questions asked.
© 2011 Menard, Inc.