
Use And Care Manual


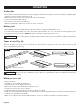

Push Stick Construction
Included Standard Push Stick
20°-30°
90°
15.7 in. (400 mm)
Notch to
prevent hand
from slipping
Cut here to push 1/2 in. wood
Cut here to push 3/4 in. wood
Drill hole for
hanging
Page 37
OPERATION
WARNING: Do not attempt to create a jig unless you are thoroughly familiar with table saw safety. Do not use any
jig that could result in pinching of a kerf or jamming of the workpiece between the jig and the blade. Incorrect setups may
cause kickback which could result in serious injury.
Jigs
Jigs may be created with a variety of special set-ups to control particular workpiece shapes for particular cuts. Guidance
on how to make specialized jigs can be found in woodworking magazines and other reference sources.
How to make a push stick (Fig. 20a-20b)
• In order to operate your table saw safely, you must use a
push stick whenever the size or shape of the workpiece
would otherwise cause your hands to be within 6 in.
(152 mm) of the saw blade or other cutter. A push stick is
included with this saw.
• No special wood is needed to make additional push-sticks
as long as it’s sturdy and long enough. A length of 15.7 in.
(400 mm) is recommended with a notch that ts against
the edge of the workpiece to prevent slipping. It’s a good
idea to have several push sticks of the same length 15.7
in. (400 mm) with different size notches for different
workpiece thicknesses.
• The shape can vary to suit your own needs as long as it
performs its intended function of keeping your hands
away from the blade.
FIG. 20a
FIG. 20b