
Use And Care Manual


Page 35
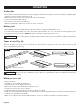
When ripping a narrow workpiece, it is necessary to attach
the sub fence assembly to the rip fence to prevent hands
from getting too close to the blade.
• Install rip fence (6) on position screws (63) or position
scews (65). (Refer to Fig. 8b on Page 26)
• Rotate the narrow fence (78) to vertical position.
• Pull up the locking lever (80) on the sub fence and remove
the sub fence (7) from the storage position (81) located on
the middle of left saw.
• Align the slot of sub fence (7) with the narrow fence (78),
and push the sub fence (7) down.
• Lock it in place by pushing down locking lever (80).
• Sub fence (7) can be mounted on left or right side of the
rip fence (6).
• When not in use, store the sub fence in storage position.
Use sub fence (for rip cutting narrow
workpiece) (Fig. 17c)
FIG. 17c
FIG. 17d
The miter gauge (2) provides accuracy in angled cuts. For
very close tolerances, test cut is recommended.
Miter gauge (Fig. 18)
FIG. 18
OPERATION
80
83
84
80
80
82
2
7
78
32
82
85
6
6
85
7
81
2
3
4
1
There are two miter gauge grooves, one on either side of
blade. When making a 90° cross cut, use either miter gauge
groove. When making a beveled cross cut (blade tilted in
relation to working table), miter gauge should be located in
groove on right so that blade is tilted away from miter gauge
and hands.
Using miter gauge
• Loosen lock knob (85).
• With miter gauge in miter gauge groove, rotate gauge until
desired angle on scale is reached.
• Retighten lock knob (85).
The adjustment knob allows smaller adjustments when
setting the rip fence.
• Unlock the fence rails locking lever (32).
• Slide the rip fence (6) close to the desired position.
• Slowly turn the adjustment knob (82) to set the rip fence
to desired position. Turn the adjustment knob clockwise
to extend the front and rear fence rails (83, 84) to right.
Turn the adjustment knob counter-clockwise to extend
the front and rear fence rails (83, 84) to left.
• Lock the fence rails locking lever (32).
Adjustment knob (Fig. 17d)
2
2
1
3
2
2
3
4
1
3