
Use And Care Manual


Page 33
77
34
75
76
76
75
45
a
36
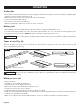
FIG. 14
FIG. 15
ASSEMBLY
WARNING: To reduce the risk of injury, be sure
switch is in the OFF position before plugging machine in.
Switch assembly and overload reset
switch (Fig. 14)
Changing blade depth (Fig. 15)
Changing blade angle (bevel) (Fig. 16)
• Press the green “I”-Button (75) to turn on the saw.
• Press the switch paddle (76) to turn off the saw.
• The saw will automatically shut down when in a power
failure, restart the machine by pressing the green "I" button
on the switch assembly .
• The saw is equipped with the overload reset switch (77)
to prevent the saw from overload damage. The saw will
automatically shut off if the machine is overloaded while
cutting or has low voltage. Wait for the motor to cool down
for at least ve minutes. And press the overload reset
switch button to resume the overload switch. After the
motor has cooled down, press the green “I”-button on the
switch assembly to restart saw.
Blade depth should be set so that outer points of blade (45)
are higher than workpiece by approximately 1/8 in. to 1/4 in.
and bottom of gullets (a) are below top surface of workpiece.
1
2
CAUTION: A 90° cut has a 0° bevel and a 45° cut
has a 45° bevel.
CAUTION: If bevel indicator is not at zero when
saw blade is at 0°, see the section “Adjusting bevel
indicator”.
• Loosen the bevel locking lever (36) counter-clockwise.
• Adjust bevel angle by rst pushing height/bevel adjusting
handwheel (35) all the way to the left.
• Holding height/bevel adjusting handwheel, slide bevel
indicator to the right to increase angle of blade (45)
(bringing it closer to 45° from the tabletop). Holding
height/bevel adjusting handwheel, slide bevel indicator to
the left to decrease the angle (bringing blade closer to
90° from the tabletop).
• Make sure blade (45) is at desired angle. Tighten bevel
adjusting lever (36) clockwise.
• Turn the bevel locking lever (36) clockwise to tighten
it securely.
• Raise blade (45) by turning height adjusting knob (34) on
the height/bevel adjusting handwheel clockwise. Lower
blade by turning height adjusting knob (34) counter-clockwise.
• Make sure blade (45) is at proper height.
3
1
2
35
45
36
FIG. 16
1
4
3
2