
Use And Care Manual


Page 12
WARNING: To avoid electrical hazards, re hazards,
or damage to the tool, use proper circuit protection.
WARNING: Do not use blades rated less than the
speed of this tool. Failure to heed this warning could result
in personal injury.
WARNING: Keep the extension cord clear of the
working area. Positon the cord so that it will not get caught
on lumber, tools, or other obstructions while you are working
with a power tool. Failure to do so can result in serious
personal injury.
WARNING: Check extension cords before each
use. If damaged replace immediately. Never use tool with
a damaged cord since touching the damaged area could
cause electrical shock resulting in serious injury.
Use a separate electrical circuit for power tools. This circuit
must not be less than #14 wire with a 15 Amp time delayed
fuse, and should be protected with a time delayed fuse.
Before connecting the tool to the power line, make sure the
switch is in the OFF position and the electric current is rated
the same as the current stamped on the motor’s nameplate.
Running at a lower voltage will damage the motor.
The safe use of this product requires an understanding of
the information on the tool and in this operator’s manual as
well as a knowledge of the project you are attempting.
Before use of this product, familiarize yourself with all
operating features and safety rules.
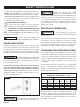
GLOSSARY OF TERMS
• Anti-kickback Pawls: Kickback is a hazard in which the
workpiece is thrown back toward the operator. The teeth
on the anti-kickback pawls point away from the workpiece.
If the workpiece should be pulled back toward the operator,
the teeth dig into the wood to help prevent or reduce the
possibility of kickback.
• Bevel Scale: The easy-to-read scale on the front of the
cabinet shows the exact blade angle.
• Blade: For maximum performance, it is recommended
that you use 10 in. blade provided with your saw. The
blade is raised and lowered with the height/bevel adjusting
handwheel. Bevel angles are locked with the bevel locking
lever.
of the blade.
• Height/Bevel Adjusting Handwheel: Located on the
front of the cabinet, this handwheel is used to lower and
raise the blade for adjustments or blade replacement. The
handwheel also makes the adjustment for bevel angles
easy.
• Fence Rails Locking Lever: The lever under worktable
surface on the right of the saw releases the fence rails or
locks it in place.
• Adjusting Knob: This knob is under the worktable surface
on the front of the saw. Turn it clockwise will slide the
fence rails to right. Turn it counter-clockwise will slide
fence rails to left.
• Outfeed Support: The outfeed support at the back of the
tool gives the operator additional support when cutting
long workpieces.
• Miter Gauge: The miter gauge aligns the wood for a cross
cut. The easy-to-read indicator shows the exact angle for
a miter cut.
• Miter Gauge Grooves: The miter gauge rides in these
grooves on either side of the blade.
• Front Rail: Provides support for the front fence rail and
rip fence.
• Rip Fence with a Narrow Fence: A sturdy metal fence
guides the workpiece and It can be xed on three positions
of the fence rail with rip fence locking knobs secure in
place. The narrow fence can support a workpiece that
extends beyond the working table.
• Scale: Located on the front rail, the easy-to-read scale
provides precise measurements for rip cuts.
• Riving Knife: A metal piece, slightly thinner than the saw
blade, which helps keep the kerf open and prevent
kickback.
• Overload Reset Switch: The saw is equipped with an
overload reset switch to prevent the saw from overload
damage. The saw will automatically shut off if the machine
experiences overloaded cutting or low voltage. Wait for
the motor to cool down for at least ve minutes. Press
the overload reset switch button to reset the overload
switch. After the motor has cooled down, press the green
“I”-button on the switch assembly to restart the saw.
• Arbor: The shaft on which a blade or cutting tool is
mounted.
• Working Table: Surface where the workpiece rests while
performing a cutting operation.
• Kerf: The material removed by the blade in a through-cut,
or the slot produced by the blade in a non-through or partial
cut.
• Push Stick: A push stick should be used for narrow ripping
operations when work piece 6 in. (152 mm) wide or less.
This aids in helping to keep the operator’s hands well away
• Blade Guard: Always keep the guard down over the blade
for through-sawing cuts.
• Bevel Locking Lever: This lever under the worktable
surface on the front of the cabinet, locks the angle setting
SAFETY INSTRUCTIONS