56" Tool Hutch Actual product may differ slightly from image shown EACH UNIT SOLD SEPERATELY Hutch Model #: 245-1965/245-1973/245-1977 OPERATOR’S MANUAL CAUTION: To Reduce The Risk Of Injury, User Must Read And Understand Operator’s Manual. Save These Instructions For Future Reference.
TABLE OF CONTENTS Safety Symbols.......................................................................... 2 Safety Instructions...................................................................... 3 Parts List.................................................................................... 4 Assembly and Operation............................................................ 5 Maintenance and Safety.............................................................
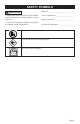
SAFETY SYMBOLS Model #:_________________________________ CAUTION: 1. Read and follow all safety and assembly instructions before using this product for the first time. 2. Fill in the following information and retain the manual for future reference: Place of purchase:________________________ Date of purchase:________________________ Receipt # of purchase:____________________ Do not allow children near the unit. Lock the door before moving the unit. Do not lift unit by yourself.
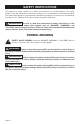
SAFETY INSTRUCTIONS The purpose of safety symbols is to attract your attention to possible dangers. The safety symbols, and the explanations with them, deserve your careful attention and understanding. The symbol warnings do not by themselves eliminate any danger. The instructions and warnings they give are no substitute for proper accident prevention measures.
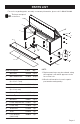
PARTS LIST For service regarding parts, assembly or warranty information, please call: 1-800-459-4409. The keys are taped to the door. 13 3 1 2 2 3 12 8 10 9 4 5 11 6 7 Ref# Description Part# Qty 1 Gas Strut 303149 2 pcs 2 M8 x 20 Hex Bolt 321024 10 pcs 3 Washer (8 x 22 x 1.
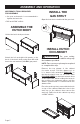
ASSEMBLY AND OPERATION NECESSARY TOOLS REQUIRED FOR ASSEMBLY • An open end wrench is recommended to tighten the hex bolts. • Drill and 25/64" drill bit INSTALL THE GAS STRUT Open the hutch door and install the gas strut. ASSEMBLE THE HUTCH BODY Unfold the hutch body as shown. INSTALL HUTCH ON CABINET Attach the left and right side panels to the back of the hutch body using three M8 x 20 hex bolts and washers (#324002) per panel.
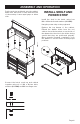
ASSEMBLY AND OPERATION Put the work top and hutch onto the cabinet. Make sure the hutch is flush with the back of the worktop. Leave equal gaps on either side. INSTALL SHELF AND POWER STRIP Install the shelf in the hutch using four M8 x 20 hex bolts and washers (#324002). Hang the power strip on the pegboard. Replace the top drawer of the cabinet. Extend the drawer slides from the tool cabinet.
MAINTENANCE AND SAFETY MAINTENANCE Periodically clean the hutch front, trim, and other surfaces with mild detergent and water. Grease and oil can be removed with most standard cleaning fluids. For safety, use a nonflammable cleaning fluid. SAFETY WARNING: Close and lock the hutch before moving this product. WARNING: DO NOT stand or lean on this product. WARNING: DO NOT mount this product on a truck bed or any other moving object. This may cause personal injury or product damage.
MAINTENANCE AND SAFETY • Connect the equipment into an outlet on a circuit different from that to which the receiver is connected. • Consult the dealer or an experienced radio/TV technician for help.
NOTES Page 9
56" Tool Hutch LIMITED LIFETIME WARRANTY MASTERFORCE® Tool Hutches have been manufactured to the highest standards of quality and workmanship and are warranted to be free from defects in materials and workmanship under normal use for the lifetime that you own the product. If any part of the product is found to be defective during normal use, the defective product or part will be replaced at our discretion.
©2020 Menard, Inc.