
Installation Instructions
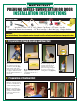

PREHUNG SINGLE-SWING EXTERIOR DOOR
a
)
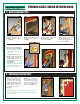
Apply a triple bead of Silicone
caulking to the sub-floor of the rough
opening
(
fig.7
)
.
e
)
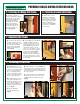
Open the door and plumb the hinge
side of the unit with a 6’ level
(
fig.11
)
.
NOTE: A door that is installed “Out of Plumb”
is the most common reason for a door unit
to leak air or water.
f
)
Place shims behind the top hinge
(
fig.12
)
and tack the unit into place by
removing one hinge screw from the top
hinge and installing a 2-½" wood screw
through the top hinge and into the rough
opening
(
fig.13
)
.
NOTE: We recommend the use of screws when
installing your prehung unit. Screws allow you
the opportunity for easy removal if adjustments
need to be made to the installation.
a
)
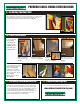
Moving the door frame as little
as possible, carefully close the door
unit. Once the door is closed, begin
shimming the door unit. Place shims
behind the middle and lower hinge
locations and each of the three
corresponding strike locations.
(
fig.14
)
.
NOTE: An even margin across the top of the header and down the strike side of the door
will ensure that the door unit is square in the opening. Uneven margins will result in the
door unit being out of square.
b
)
Shim the door unit until the
margin between the door and the
head jamb is even and the margin
between the door and the strike
jamb is even. The margin should
equal about 1/8"
(
fig.15
)
.
b
)
Apply a second bead of caulking
around the perimeter of the door
sill
(
fig.8
)
.
c
)
Apply a bead of caulking around
the backside perimeter of the
door’s brickmould
(
fig.9
)
.
d
)
Using two people, set the sill into
the rough opening. Center the
frame into the opening and tip the
unit into place
(
fig.10
)
.
3
)
Setting the Door Unit
4
)
Shimming the Door Unit
g. 7
g. 11
g. 8
g. 13g. 12
g. 9
g. 14
g. 10
g. 15