
Installation Instructions

2
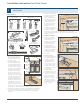
COMPLETE INSTALLATION
For fo
ur door
congurations, mount an
aligner as shown on the
back side of each lead door.
For best operational
performance and aesthetic
appeal, install the door
knob in the center of the
middle rail of the lead
door(s) (panel without
pivot hardware). The
knob, however, can also
be installed in any other
location on the lead door if
desired. Drill a hole slightly
smaller than the screw and
attach knob.
Note: Unless drilling the knob attachment hole close to an edge
on a
hollow core door, it will likely be in a hollow part of the door. This does
not cause problems and the door material is sufciently strong if the screw
is snug but not over tightened.
Back side
of door
Aligner Aligner
Back side
of door
Knob
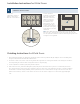
Installation Instructions for Bifold Doors
1. Before applying first finishing coat, lightly block sand with the grain all surfaces by hand with 400 grit sandpaper.
Remove all handling marks,
raise grain, scuffs, burnishes and other undesirable blemishes.
2. Clean the door with a clean, lint-free cloth, removing all dust and foreign debris. For cleaning use denatured alcohol making sure all residue is
removed by turning the cloth often while cleaning. Allow the door to dry thoroughly.
3. Seal an un-primed door slab with a good quality water-based primer.
4. Paint all sides of the door, jamb and moulding with a good-quality exterior water-based 100% acrylic latex or solvent-based paint. Interior
door or trim paint may be used on interior doors and interior surfaces of exterior doors. Spray applications work best. To simulate a traditional
stile and rail door look when using a paintbrush, paint the panels first, then across all the rails from one edge of the door to the other. Then
paint the stiles from the top of the door to the bottom. The door can also be rolled for a stipple look. For best results, apply multiple light
coats.
Finishing Instructions for Bifold Doors