
Installation Instructions


WOOD CLAD SLIDING PATIO DOOR
Apply a minimum of two coats of paint, varnish, or sealer to all exposed wood surfaces as directed by the manufacturer of the finish materials. Avoid applying sealers to
any vinyl or non-wood parts.
For proper handling and disposal of construction waste materials please consult your local building codes. Additional disposal recommendations can be found on the EPA
website at www.epa.com
11
)
Finishing the Door Unit
13
)
Troubleshooting Help
10
)
Apply Casing
Apply casing around
the interior perimeter
of the door unit as
desired
(
fig.37
)
.
Note:
Be careful of
the nail placement.
The inner trim
perimeter of the
door unit is 1/2"
thick. Nailing through
this outer edge may
lead to nails in your
operating door unit
(
fig.38
)
.
NO NAILS
g. 37 g. 38
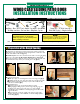
8
)
Installing the Lockset
9
)
Insulating the Door Unit
g. 31
g. 36
g. 32 g. 33 g. 35g. 34
a
)
Insert the latching lever and apply the
interior side of the lockset
(
fig.31-32
)
.
b
) Using the two screws provided, insert
the screws into the holes on the interior
side of the lockset
(
fig.33
)
.
c
) Install the lockset by placing the
exterior side of the handle on the
exterior face of the door and attaching it
using the two Phillips screws and a #2
Phillips screw driver
(
fig.34-35
)
.
d
) Check operation of the handle set.
Note:
The latch will not engage unless
the safety pin is depressed.
Insulate the perimeter
of the door unit by
inserting fiberglass
blanket insulation
between the door
frame and the rough
opening around the
perimeter of the door
(
fig.36
)
.
12
)
Disposal of Waste Materials
Questions or Concerns: For guest assistance contact MASTERCRAFT
®
by sending an email to:
For more information, including troubleshooting help and videos, please visit:
MastercraftDoorHelp@MidwestManufacturing.com
www.MidwestManufacturing.com