
Installation Instructions


WOOD CLAD SLIDING PATIO DOOR
5
)
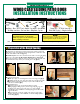
Sealing the Door Unit
6
)
Fastening the Shims
7
)
Adjusting the Rollers
g. 26
g. 25
g. 23
g. 27
g. 29
g. 24
g. 28
g. 30
a
) Apply flashing tape over the
side flanges by cutting two pieces
of flashing tape 4" longer than
the height of the nailing flange.
The tape should extend 2" above
the door and 2" below the door.
All nail heads should be covered
by the tape
(
fig.23
)
.
b
) Cut a third piece of flashing
tape for the header. It should be
cut so that it extends at least 1"
beyond the edge of the two
flashing tapes applied in the
previous step
(
fig.24
)
.
a
) Double check the inside strike jamb for plumb
.
b
) Place two sets of shims directly behind the top and bottom
strike screw locations
.
c
) Remove the two outer 1" screws from the strike plate and
replace them with (2) 3" screws provided
(
fig.27
)
.
d
) Fasten the remaining fixed shim locations by
pre-drilling ¹⁄8" holes through the frame
.
Note:
To hide
the screw head, hold back the weatherstrip and drill behind it.
e
) Install a #8 x 2½" fastener through the frame and shim
and into the stud wall. Repeat for each shim location
(
fig.28
)
.
a
) To adjust the alignment of the active door there are two sets of
adjustable rollers.
b
) Begin by removing the roller caps from the bottom of the active
door
(
fig.29
).
This should be done using a large flat head screw
driver turning counter clockwise
.
c
) Inside the adjustment hole there will be a phillips adjustment screw
or a flat adjustment screw depending on the door unit type. Adjust the
rollers up or down until the margin between the edge of the door and
the strike jamb is even
(
fig.30
)
.
d
) Re-apply the caps when the adjustments are complete
c
) Fold the water barrier over the flashing tape
(
fig.25
)
.
d
)
Cut two pieces of flashing tape at least 1” longer than the
diagonal cuts in the water barrier. Apply them over the diagonal
cuts, overlaping the top corners of the nailing fin
(
fig.26
)
.