
Installation Instructions


WOOD CLAD SLIDING PATIO DOOR
2
)
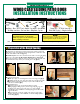
Preparation of the Door Unit
g. 13g. 12g. 11
3
)
Setting the Door Unit
4
)
Shimming the Door Unit
g. 14
g. 19
g. 15
g. 20
g. 16
g. 21
g. 18
g. 22
g. 17
a
) Remove the door handles from the
door unit. The door unit cannot be
installed until they are removed
(
fig.11
)
.
b
) Cut the cardboard to remove the
bracing board from the bottom of the
door
(
fig.12
)
.
c
) Remove the cable tie holding the
active door closed
(
fig.13
)
.
d
) Remove any other packaging materials
from the door unit at this time.
a
) Apply a triple bead of Sili-
cone caulking to the sub-floor of
the rough opening
(
fig.14
)
.
b
) Apply a bead of caulking
around the perimeter of the
rough opening
(
fig.15
)
.
c
) Using two people, set the sill
into the rough opening. Center
the frame into the opening and
tip the unit into place
(
fig.16
)
.
d
) Once the unit is centered in
the rough opening, install (1) 2"
roofing nail in the first nailing
hole on each upper corner of
the nailing fin
(
fig.17
)
. Note:
A pry bar may be used to move
the door unit from left to right
in order to center it in the
opening
(
fig.18
)
.
a
) Measure diagonally
across the door unit to
determine if the door unit
is square. From corner
to corner the measure-
ment should be the same.
Move the sill as necessary
to square the door unit
(
fig.19
)
.
b
) Once the door unit
is square, install one 2"
roofing nail into the bottom hole of each of the two
door flanges
(
fig.20
)
.
c
) Apply shims to the strike and fixed side of the
door until the jambs are plumb
(
fig.21
)
.
d
) Check the frame using a level to ensure they are
straight and then apply roofing nails into the re-
maining nail holes. Repeat for both sides
(
fig.22
)
and the header.