
Installation Instructions


a
)
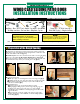
Clean the floor area around the door opening. If necessary, scrape off mortar or plaster spills.
Double check the rough opening dimensions. The rough opening should be ½" wider and ¼" taller
than the outside dimension of the frame
(
fig.1-3
)
.
b
)
Critical Step:
Make sure the floor is flat and level. If the sub-floor is not level it will adversely
affect the rest of the installation.
Do Not Continue Until The Floor Is Level!
(
fig.4
)
c
)
Check the rough opening for plumb and square. Check both walls for plumb and all four corners
for square. Make the necessary corrections prior to installing the door unit
(
fig.5-6
)
.
d
)
Cut the water resistive barrier.
d1
)
Make (2) 45 degree, 6" cuts extending from the corners of the rough opening
(
fig.7
).
d2
)
Following the front edge of the opening, cut the barrier across the length of the header.
d3
)
Fold the water resistive barrier up and tape it in place. It will be folded back down
at the end of the installation
(
fig.8
).
e
)
Apply Sill flashing tape by:
e1
)
Cutting one piece of tape 12" longer than the width of the opening.
e2
)
Begin applying the flashing tape 6" up from the rough opening floor on one end
and hanging over the exterior side ½". At the corner cut a 1" wide tab
(
fig.9
).
Repeat through the other side.
Note:
Press the flashing firmly against the water resistant
barrier and the subfloor.
e3
)
If necessary apply a second strip of flashing to the inside of the rough opening
overlapping the first strip by at least 1".
Note:
Do not extend the flashing beyond the
interior framing
(
fig.10
).
Doc #QMP-WI-040 Rev. A Date: 5/14 Owner: Quality Manager
WOOD CLAD SLIDING PATIO DOOR
INSTALLATION INSTRUCTIONS
REQUIRED TOOLS ADDITIONAL MATERIALS NEEDED
Flashing Tape
• 2½" Wood Screws Qty: 9
Wood Shims (2 pkgs.) • Fiberglass Insulation
Safety Glasses • Gloves • 48"-72" Level • Hammer • Tape Measure • Screw Gun/Drill
#2 Phillips Screw Driver •
Flat Screw Driver • Utility Knife • Pry Bar
1
)
Preparation of the Rough Opening
g. 1
g. 9
g. 3
g. 2
g. 10
g. 7
g. 5 g. 6
g. 8
g. 4
Note: These instructions are recommended installation methods and not a substitute for local building codes. Please consult your local building codes prior to any door installation.
WARNING
Door Units Are Heavy! Use an adequate
number of people to set the unit and prevent
injuries or damage to the door.
NOTICE
Buildings constructed prior to 1978 may contain lead paint which
could be disturbed during door replacement. For more information,
on proper management of lead paint, visit www.epa.gov/lead