
Installation Instructions


a
)
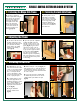
Clean the floor area around the
door opening. If necessary, scrape
off mortar or plaster spills
(
fig.1
)
.
Double check the rough opening
dimensions. The rough opening should
be roughly ½" taller and ¾" wider
than the outside frame dimensions of
the door unit.
a
)
Remove all packaging materials
from the door unit. This includes all
cardboard and banding materials.
b
)
Remove the installation plug
(
fig.5
)
or shipping nails
(
fig.6
)
from the door unit. These will not
be able to be removed once the
unit is installed.
b
)
Make sure the floor is level
(
fig.2
)
. If the sub-floor is not level
it will adversely affect the rest of
the installation.
c
)
Check the opening for plumb
and square. Check both walls for
plumb and all four corners for
square in the rough opening. Make
the necessary corrections prior to
installing the door unit
(
fig.3&4
)
.
SINGLE-SWING EXTERIOR DOOR SYSTEM
INSTALLATION INSTRUCTIONS
REQUIRED TOOLS
Safety Glasses • Gloves • 48"-72" Level • Hammer • Tape Measure • 24" Square • Screw Gun
Exterior Caulk
(Paintable Silicone Recommended) • 2-½" Wood Screws Qty: 6 • Wood Shims (1pkg.) • Fiberglass Insulation
1
)
Preparation of Rough Opening and Door Unit
2
)
Preparation of the Door Unit
g. 1
g. 2 g. 3
g. 5
g. 4
g. 6
OR
WARNING
Door Units Are Heavy! Use an adequate number of people to set the unit and prevent injuries or damage to the door.
Note: These instructions are recommended installation methods and not a substitute for local building codes. Please consult your local building
codes prior to any door installation.