
Installation Instructions


a
)
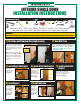
Set the bottom of the door unit into the rough
opening and tip the top of the unit into place
(
fig.12
)
. Looking at the top hinge, center the
middle notch on the door hanger directly in line
with the plumb line drawn in Step 7
(
fig.13
)
.
Once the notch and the plumb line are in
alignment, run one of the supplied 1-5/8" screws
through the long slot in the hanger and into the
stud wall
(
fig.14
)
.
b
)
Repeat this process for the next two hinge
locations making sure to align the same notch
from the remaining two clips with the plumb line.
Run one screw into each of the hangers.
8
)
Set Door Into Rough Opening and Secure Hinge Side
9
)
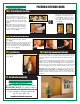
Securing Strike Side
10
)
Secure Exterior Side Hangers
11
)
Install Shims
12
)
Secure and Finish Shims
g. 13 g. 14
g. 15
g. 20
g. 23
g. 24
g. 25
g. 16
g. 21 g. 22
g. 12
a
)
Starting with the top door hanger on
the strike side, check the margin between
the door and the strike jamb. The margin
should equal 1/8"
(
fig.15
)
. Adjust the
jamb accordingly by loosening the screws
on the door hangers and slide the door
unit in or out until the margins are even.
Once the margin is even, run one
1-5/8" screw through the center of
the door hanger slot.
(
fig.16
)
.
b
)
Repeat this process for the remaining
two door hangers on the strike side.
a
)
Next, using a hammer, tap the six door
hangers on the exterior side of the door back
to their original position so that they are tight
against the wall surface
(
fig.20 & 21
)
.
b
)
Run one 1-5/8" screw into each of the six
door hanger locations
(
fig.22
)
.
Place shims directly behind each of the
three hinge locations. Keep the shims as
flat as possible during the installation
in order to prevent twist on the jambs
(
fig.23
)
.
Note: Door units are heavy. If this
step is not performed, the door slab
may sag in the opening over time.
Position shims to keep them as flat
as possible
a
)
Remove one hinge
screw from each of the
hinges on the hinge jamb.
Replace the screws using
one 2-1/2" construction
screw for each hinge. The
screw should pass through
the hinge shims and into
the rough opening stud
(
fig.24
)
.
b
)
Use a hammer to
remove all excess shim
material and recheck
margins
(
fig.25
)
.
1/8"
13
)
Remove Door Clip
g. 26 g. 27
a
)
Remove the door clip by grasping the piece in the
center of the bore hole and pulling towards the hinges
(
fig.26
)
.
b
)
In the event the door clip seems stuck, use a pair
of pliers to firmly grasp the piece in the center of the
bore
(
fig.27
)
.
g. 28
c
)
To remove the clip, you will need to open the door,
and pull the clip out of the cross bore (fig. 28).