INSTRUCTION MANUAL 20V max* LITHIUM-ION BATTERY CHARGER 054-3126-6
If any parts are missing or damaged, or if you have any questions, please call our toll-free helpline at 1-800-689-9928. Read and understand this instruction manual thoroughly before using the product. It contains important information for your safety as well as operating and maintenance advice. Keep this instruction manual for future use. Should this product be passed on to a third party, then this instruction manual must be included.
SAFETY GUIDELINES 4–8 DESCRIPTION 9 OPERATING INSTRUCTIONS 10–12 MAINTENANCE 13 TROUBLESHOOTING 14 PARTS LIST 15 WARRANTY 16–17 20V max* LITHIUM-ION BATTERY CHARGER - 054-3126-6 TABLE OF CONTENTS TECHNICAL SPECIFICATIONS 2
TECHNICAL SPECIFICATIONS 3 CHARGER INPUT 120V ~ 60Hz 45W CHARGING TIMES FOR BATTERIES 054-3124-0: 054-3125-8: CHARGER WEIGHT 1 lb (0.
WARNING! Safety symbols in this Instruction Manual are used to flag possible dangers. The safety symbols and their explanations require your full understanding. The safety warnings do not, by themselves, eliminate any danger, nor are they substitutes for proper accident prevention measures. WARNING! This Safety Alert Symbol indicates caution, warning, or danger. Failure to obey a safety warning can result in serious injury to yourself or others.
5 Work area safety SAFETY GUIDELINES • Keep the work area clean and well lit. Cluttered or dark areas invite accidents. • Do not operate power tools in explosive atmospheres, such as in the presence of flammable liquids, gases or dust. Power tools create sparks, which may ignite the dust or fumes. • Keep children and bystanders away while operating a power tool. Distractions can cause you to lose control. Electrical safety • Power tool plugs must match the outlet. Never modify the plug in any way.
• Dress properly. Do not wear loose clothing or jewelry. Keep your hair, clothing and gloves away from moving parts. Loose clothes, jewelry or long hair can be caught in moving parts. • If devices are provided for the connection of dust extraction and collection facilities, ensure that these are connected and properly used. Use of these devices can reduce dust-related hazards. Power tool use and care • Do not force the power tool. Use the correct power tool for your application.
SAFETY GUIDELINES 7 • Under abusive conditions, liquid may be ejected from the battery. Avoid contact. If contact occurs, flush with water. If liquid comes into contact with the eyes, seek medical help. Liquid ejected from the battery may cause irritation or burns. Service • Have your power tool serviced by a qualified repair person using only identical replacement parts. This will ensure that the safety of the power tool is maintained.
• Do not abuse the cord or charger. Never use the cord to carry the charger. Do not pull the charger cord to disconnect the plug from a receptacle. Damage to the cord or charger could occur and create an electric shock hazard. Replace damaged cords immediately. • Make sure that the cord is located so that it will not be stepped on or tripped over, come in contact with sharp edges or moving parts, or otherwise be subjected to damage or stress.
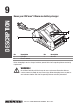
Know your 20V max* lithium-ion battery charger DESCRIPTION 9 2 3 No. 1 2 1 Description LED lights Electric contacts No. 3 Description Air vents Before attempting to use the charger, familiarize yourself with all of its operating features and safety requirements. WARNING! Do not allow familiarity with the charger to cause carelessness. Remember that one careless moment is enough to cause severe injury.
When to charge the battery pack The Lithium-Ion battery pack can be charged at any time and will not develop a “memory” when charged after only a partial discharge. It is not necessary to run down the battery pack charge before recharging. Remove the battery pack from the tool and recharge it when it is convenient for you and your job. • You can “top-off” your battery pack’s charge before starting a big job or a long period of use.
OPERATING INSTRUCTIONS 11 LED functions of charger (fig 2) LED Indicator Battery Pack Red LED Green LED Action Temperature Hot/Cold battery On Off Fast charge will begin when battery returns to between 5-40°C (41-104°F) Defective Defective Flashing Off Battery pack or charger is defective Charging Charging Off Flashing Charging Charged Fully charged Off On Charging is complete Charging a hot battery pack If the battery pack is above the normal temperature range, the red LED will i
Battery full After the battery is fully charged, the green LED light on the charger will be on and the red LED light will be off. NOTICE: The battery pack will fully charge, but will not overcharge, if left on the charger. NOTICE: Charger may warm with several continuous charge cycles. This is part of the normal operation of the charge. Always charge in a well-ventilated area.
MAINTENANCE 13 WARNING! To ensure safety and reliability, all repairs should be performed by a qualified service technician. WARNING! When servicing, use only identical replacement parts. The use of any other parts may create a hazard or cause damage to the product. WARNING! To avoid serious personal injury, always remove the battery pack from the tool when cleaning it or performing any maintenance.
14 The battery pack isn’t charging POSSIBLE CAUSES The battery pack is not connected to the charger SOLUTIONS Attach the battery pack to the charger again If the problem remains unsolved after performing the checks described above, call the tollfree helpline at 1-800-689-9928.
Exploded view PARTS LIST 15 No. 1 2 3 4 5 Part No. 3125529000 2823639000 3125527000 5610012000 5610016000 Description Drive Bracket Wiring Harness Assembly Upper Housing Tapping Screw Tapping Screw No. 6 7 8 9 10 Part No. 4890750000 4890721000 3125528000 5610218000 4810002000 If any parts are missing or damaged, or if you have any questions, please call the Toll-free Helpline, at 1-800-689-9928.
This Mastercraft product is guaranteed for two (2) years from the date of original retail purchase against defects in materials and workmanship, except for the following components a) Component A: Batteries, chargers and carrying case, which are guaranteed for a period of 2 years from the date of original retail purchase against defects in workmanship and materials; b) Component B: Accessories, which are guaranteed for a period of 1-year from the date of original retail purchase against defects in workmansh
WARRANTY 17 f) this warranty will not apply to any product that was sold to the original purchaser as a reconditioned or refurbished product (unless otherwise specified in writing); g) this warranty will not apply to any product or part thereof if any part from another manufacturer is installed therein or any repairs or alterations have been made or attempted by unauthorized persons; h) this warranty will not apply to normal deterioration of the exterior finish, including but not limited to scratches, d
INSTRUCTION MANUAL 20V max* (1.
If any parts are missing or damaged, or if you have any questions, please call our toll-free helpline at 1-800-689-9928. Read and understand this instruction manual thoroughly before using the product. It contains important information for your safety as well as operating and maintenance advice. Keep this instruction manual for future use. Should this product be passed on to a third party, then this instruction manual must be included. 20V max* LITHIUM-ION 1.
3 SAFETY GUIDELINES 4–6 DESCRIPTION 7 OPERATING INSTRUCTIONS 8–10 MAINTENANCE 11–12 PARTS LIST 13 WARRANTY 14–15 20V max* LITHIUM-ION 1.
TECHNICAL SPECIFICATIONS 3 BATTERY TYPE Lithium-lon BATTERY PACK VOLTAGE 20V max* DC CAPACITY 1.3 Ah CHARGE TIME 60 min. BATTERY PACK WEIGHT 15 oz (0.43 kg) BATTERY CHARGER 054-3126-6 5331 *Maximum battery voltage without workload; with workload nominal voltage is 18V. 20V max* LITHIUM-ION 1.
Know your tool To operate this tool, carefully read this Instruction Manual and all labels affixed to the battery pack before using. Keep this Instruction Manual available for future reference. Important This tool should only be serviced by a qualified service technician. For more information, call the toll-free helpline, at 1-800-689-9928. Read all instructions thoroughly Safety guidelines for power tools WARNING! Read all safety warnings and all instructions.
SAFETY GUIDELINES 5 Electrical Safety • Avoid body contact with earthed or grounded surfaces, such as pipes, radiators, ranges and refrigerators. There is an increased risk of electric shock if your body is earthed or grounded. • Do not expose power tools to rain or wet conditions. Water entering a power tool will increase the risk of electric shock. Battery Tool Use And Care • Recharge only with the charger specified by the manufacturer.
USE THIS BATTERY PACK ONLY WITH THE CHARGER LISTED. BATTERY PACK CHARGER 054-3124-0 054-3126-6/5331 • Know your power tool. Read the Instruction Manual carefully. Learn the tool’s applications and limitations, as well as the specific potential hazards related to this tool. Following this rule will reduce the risk of electric shock, fire, or serious injury. • Do not place the battery near fire or heat. This will reduce the risk of explosion and possible injury.
Know your lithium-ion rechargeable battery DESCRIPTION 7 1 2 3 No. 1 2 Description Electrical Contacts Battery-Release Button No. 3 Description Fuel Gauge Before using this product, familiarize yourself with all operating features and safety rules. 20V max* LITHIUM-ION 1.
Fuel gauge 80-100% Charge 60-79% Charge 40-59% Charge 20-39% Charge Under 20% Charge Completely Discharged This Lithium-Ion battery pack is equipped with a Fuel Gauge, which displays the remaining charge of the battery pack. Press the Fuel Gauge button to display the LED lights. The LED lights will stay lit for approximately 4 seconds. NOTE: The Fuel Gauge can be used when the battery pack is attached to or removed from the tool.
OPERATING INSTRUCTIONS 9 Battery protection To protect the battery pack from damage and prolong its life, the battery pack’s circuitry will turn off the battery pack if it becomes overloaded or if the temperature becomes too high during use. This may happen in extremely high torque, binding and stalling situations. The battery pack will begin normal operation when it cools down. The Fuel Gauge will display four flashing LED lights if the circuitry detects a momentary overload.
How to charge the battery pack NOTE: This Lithium-Ion battery pack is shipped partially charged. Before using it the first time, fully charge the battery pack. A fully discharged battery pack will charge about 60 minutes in a surrounding temperature between 0°C (32° F) and 40°C (104° F). 1. Charge the Lithium-Ion battery pack with the correct charger (Mastercraft 054-3126-6, 5331). 2. Connect the charger to a power supply. 3.
MAINTENANCE 11 WARNING! To ensure safety and reliability, all repairs should be performed by a qualified service technician. WARNING! When servicing, use only identical replacement parts. The use of any other parts may create a hazard or cause damage to the product. WARNING! To avoid serious personal injury, always remove the battery pack from the tool when cleaning or performing any maintenance.
To preserve natural resources, please recycle or dispose of batteries properly. This product contains lithium-ion batteries. Provincial or municipal laws may prohibit disposal of Lithium-Ion batteries in ordinary trash. Consult your local waste authority for information regarding available recycling and/or disposal options. WARNING! pon removal of the battery pack for disposal or recycling, cover the battery pack’s U terminals with heavy-duty adhesive tape.
Exploded view PARTS LIST 13 No. 01 02 03 04 05 06 Part No. 2770231000 3121038000 3126204000 3126465000 3126466000 3126467000 Description Battery Assembly Rubber Stick Plate Power Pack Cover Power Pack Housing Battery-Release Button No. 07 08 09 10 11 12 Part No.
This Mastercraft product is guaranteed two (2) years from the date of original retail purchase against defects in materials and workmanship. Subject to the conditions and limitations described below, this product, if returned to us with proof of purchase within the stated warranty period, and if covered under this warranty, will be repaired or replaced (with the same model, or one of equal value or specification), at our option.
WARRANTY 15 h) This warranty will not apply to normal deterioration of the exterior finish, including but not limited to scratches, dents, paint chips, or to any corrosion or discolouring by heat, abrasive and chemical cleaners; i) This warranty will not apply to component parts sold by and identified as the product of another company, which shall be covered under the product manufacturer’s warranty. Additional limitations This warranty applies only to the original purchaser and may not be transferred.