
User manual

Masterclock RC 500 User Manual – v2014.01.01
12
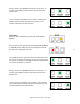
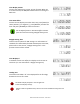
COUNT TO TIME
Select the “Count to Time” mode by pressing and holding
the [DOWN] button for 2 seconds. The [DOWN] button
should begin to steadily flash.
Enter the end real time of the count up by pressing the
[HOUR], [MINUTE] and/or [SECOND] buttons. With each
corresponding button pressed, the digit on the display
will increment. Enter the Real Time that you want to the
display to count-down toward in a 24 hour timescale.
(e.g.: if the current time is 1:05pm and you want to
count-down towards 1:30pm program the unit to 13:30.
At the end of the routine, the [DOWN] button will
continue to flash indicating the RC500 is currently in
Count to Time mode.
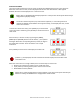
Press the [START] button to send a command to the
remote display and start the Count to Time. The display
will show the running count to time displaying the count-
down or remaining hours, minutes, and seconds until the
preprogrammed real time. The preprogrammed real
time may reference local or UTC or whatever “real time”
was programmed into the RC500 prior to the
initialization of the count time.
You cannot freeze the Count to Time routine.
To abandon the existing Count to Time, press [DOWN]
again.
To release the display device, press [CLOCK].
RC500 will auto adjust for Daylight Savings Time and
Leap seconds. Therefore, if the RC500 is counting down
towards a time between 0200 and 0259 on the first
morning of Daylight Savings Time, the count will
advance 24 hours to the first “available” time of 02**;
because that time does not exist on that morning.
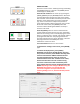
The Count to Time feature will automatically count
down towards the next real time programmed into the
RC500. Depending on the settings in WinDiscovery, the
RC500 will then perform a Count-end flash and
commence a negative count upwards from zero
removing leading zeros. Or, will then infinitely flash all
zeros.