
Installation Guide

2
My Controller isn’t Functioning Correctly:
Do This First:
• Reset your controller:
• STEP 1: Power OFF your cooking device.
• STEP 2: Unplug your cooking device from the wall.
• STEP 3: Wait 5 minutes, plug it back in.
• STEP 4: Your controller is reset - check to see if the problem persists.
• Update your App:
• Make sure your App is updated on your smartphone. If there is an App update, install the new version now.
• Update your controller:
• Make sure you are running the most current Firmware version.
• To check for the most current rmware version please refer to: https://www.masterbuilt.com/pages/app-device-requirements
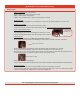
• Check your temperature sensor:
• Power OFF your cooking device.
• Your temperature sensor may not be plugged in correctly, or it is dirty.
• Remove the temperature sensor, clean the plug with a cloth, reconnect.
• Visual Inspection:
• Power OFF your cooking device. Make sure your device is not hot.
• Check all of the wire connections for visual damage. Check the fan, controller, and switch connections.
• Check the controller for visual damage or water penetration. Water can damage your controller.
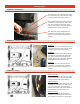
• Check the fan for visual damage. Are there any cracks or damages in the fan or fan housing?
• Check for debris in fan. You may need to remove the fan cover to remove any debris that has gotten into the fan.
To remove the fan cover, remove the 4 screws in the corners of the fan shroud.
• Check the switches for visual damage.
• If any components have failed visual inspection, they should be replaced. Contact Masterbuilt Customer Service.
• Check the wall plug:
• Make sure the breaker or GFCI is not tripped. Make sure the unit is plugged into the wall.
• If you are using an extension cord, make sure it is an outdoor grounding -type 3- wire cord, marked with the sux
“W” and with the statement, “Suitable for Use with Outdoor Appliances”.
For wiring diagram, please proceed to the following page...
Temperature
Sensor Plug
This is a wire connection
Remove these 4 screws