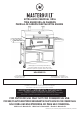
EXTRA LARGE CHARCOAL GRILL TRÈS GRAND GRIL AU CHARBON PARRILLA DE CARBÓN VEGETAL EXTRA GRANDE Manual applies to the following model number(s) Ce manuel s’applique au numéro de modèle suivant El manual se aplica a los siguientes números de modelos MB20040919 Your model number Votre numéro de modèle Su número de modelo Mfg. Date - Serial Number Date de fabrication – Numéro de série Fecha de fabricación - Número de serie These numbers are located on the rating label of the unit.
WARNING • This manual contains important information necessary for the proper assembly and safe use of the appliance. • Read and follow all warnings and instructions before assembling and using the appliance. • Keep this manual for future reference. • WARNING! Do not use spirit or petrol for lighting or re-lighting! Use only firelighters complying to EN 1860-3! Failure to follow these instructions could result in fire, explosion or burn hazard which could cause property damage, personal injury, or death.
WARNINGS AND IMPORTANT SAFEGUARDS • Do not use grill on wooden or flammable surfaces. • Keep grill clear and free from combustible materials such as gasoline and other flammable vapours and liquids. • Do not leave grill unattended. • Keep children and pets away from grill at all times. Do NOT allow children to use grill. Close supervision is necessary when children or pets are in the area where grill is being used.
AVERTISSEMENT • Ce manuel contient des informations qui sont nécessaires pour une utilisation sûre et appropriée de cet appareil. • Lisez et suivez la totalité des avertissements et des instructions fournis avant d’assembler et d’utiliser l’appareil. • Conservez ce manuel pour référence ultérieure.
AVERTISSEMENTS ET MISES EN GARDE IMPORTANTES ou la pierre. Il est possible qu’une surface asphaltée ne convienne pas. • Le gril DOIT être posé sur le sol. Ne pas poser le gril sur une table ou un comptoir. NE PAS déplacer le gril sur des surfaces inégales.• Ne pas utiliser le gril sur une surface en bois ou inflammable. • Gardez le gril à distance et libre de tout matériau combustible comme l’essence ou tout autre liquide ou gaz inflammable. • Ne pas laisser le gril sans surveillance.
ADVERTENCIA • Este manual contiene información importante necesaria para el correcto ensamblaje y uso seguro del aparato. • Lea y siga todas las advertencias e instrucciones antes de ensamblar y usar el aparato. • Conserve este manual para referencia en el futuro.
ADVERTENCIAS Y SALVAGUARDAS IMPORTANTES por superficies desniveladas. • No use la parrilla en superficies de madera o inflamables. • Mantenga la parrilla despejada y libre de materiales combustibles, como gasolina y otros vapores y líquidos inflamables. • No deje la parrilla desatendida. • Mantenga a los niños y mascotas lejos de parrilla en todo momento. NO permita que los niños usen la parrilla. Es necesaria una supervisión cercana cuando haya niños o mascotas en el área donde se usa la parrilla.
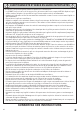
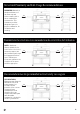
Structural Proximity and Safe Usage Recommendations REMINDER: Maintain a minimum distance of 3m from rear and sides to walls, rails or other combustible construction. This clearance provides adequate space for proper combustion, air circulation and venting. 3m 3m 3m Proximité avec les structures et recommandations de sécurité lors de l’utilisation RAPPEL : Gardez une distance minimale de 3 m entre l’arrière et les côtés et 3 m un mur, une rampe ou une autre installation quelconque.
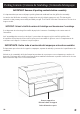
Packing Contents | Contenu de l’emballage | Contenido del empaque IMPORTANT: Remove all packing contents before assembly. It is important that you remove all paper, packing foam and cardboard from the grill before assembly. Located on the lid/firebox assembly is a support bar used for shipping purposes only. This bar must be removed so that you may successfully assemble your grill. The location of this bar is shown here. The bar is no longer needed.
Hardware List | Liste de quincaillerie | Lista de accesorios N M B A C E D F O G P K H I J L K Qty Qté Cant. Description Description Descripción Qty Qté Cant.
Hardware List | Liste de quincaillerie | Lista de accesorios • • • • • • BEFORE ASSEMBLY READ ALL INSTRUCTIONS CAREFULLY. Assemble on a clean flat surface. Tools needed: 20.32 cm long Phillips head screwdriver, pliers or adjustable wrench Approximate assembly time: 45 minutes Actual product may differ from picture shown. It is possible that some assembly steps have been completed in the factory. STOP • • • • • • DO NOT RETURN TO RETAILER for assembly assistance, missing or damaged parts.
Parts List | Liste des pièces | Lista de partes 29 12 1 32 30 2 13 31 14 3 15 33 34 16 4 17 35 18 5 6 36 7 6 19 8 38 39 24 20 9 37 25 40 22 21 10 41 42 23 11 26 Actual product may differ from picture shown.
Parts List | Liste des pièces | Lista de partes 29 12 1 32 30 2 13 31 14 3 15 33 34 16 4 17 35 18 5 6 36 7 6 19 8 38 39 24 20 9 37 25 40 22 21 10 41 42 23 11 26 Le produit réel peut différer de l’illustration.
Parts List | Liste des pièces | Lista de partes 29 12 1 30 2 13 31 14 3 15 33 34 16 4 17 35 18 5 6 36 7 6 19 8 38 25 40 22 21 10 39 24 20 9 37 41 42 23 11 26 El producto real puede ser distinto de la imagen mostrada. 43 44 27 28 Ítem # Cant.
Assembly | Assemblage | Ensamblaje K 1 K P P K X2 P X2 24 25 20 22 21 23 Note: Do not fully tighten screws until step 15 is complete. Remarque : Ne serrez pas complètement les vis avant d’avoir effectué l’étape 15. Nota: No ajuste totalmente los tornillos hasta completar el Paso 15.
Assembly | Assemblage | Ensamblaje 3 K X4 Note: Do not fully tighten screws until step 15 is complete. Remarque : Ne serrez pas complètement les vis avant d’avoir effectué l’étape 15. Nota: No ajuste totalmente los tornillos 24 hasta completar el Paso 15. K 37 K 25 K K 4 K X4 Note: Do not fully tighten screws until step 15 is complete. Remarque : Ne serrez pas complètement les vis avant d’avoir effectué l’étape 15. Nota: No ajuste totalmente los tornillos has- 21 ta completar el Paso 15.
Assembly | Assemblage | Ensamblaje Note: Do not fully tighten screws until step 15 is complete. Remarque : Ne serrez pas complètement les vis avant 5 d’avoir effectué l’étape 15. Nota: No ajuste totalmente los tornillos hasta completar el K X4 Paso 15. M X2 N X2 20 22 43 K K K K 28 N N 27 M M 6 K X8 44 22 21 20 K 44 K K K K 23 K K Repeat on right side Recommencez du côté opposé Repita del lado opuesto. Note: Do not fully tighten screws until step 15 is complete.
Assembly | Assemblage | Ensamblaje 7 40 7a 40 40 41 42 42 7b 41 42 41 26 26 Note: Do not fully tighten screws until step 15 is complete. Remarque : Ne serrez pas complètement les vis avant 8 d’avoir effectué l’étape 15. Nota: No ajuste totalmente los tornillos hasta completar el K X4 Paso 15.
Assembly | Assemblage | Ensamblaje 9 K X8 K 42 K 39 38 K K 38 K K 39 41 10 G X4 36 G G 35 G 36 20 G
Assembly | Assemblage | Ensamblaje 11 F X8 F F F F F F F F 33 K K 12 K K K X14 K K K K Repeat on opposite side Recommencez du côté opposé Repita del lado opuesto. 19 To avoid personal injury and damage to grill, have someone help you lift the lid/firebox assembly and place onto the cart. Your helper should hold the lid/firebox assembly steady until all screws are installed.
Assembly | Assemblage | Ensamblaje 5 13 4 4 K X4 3 K K K K Wing Nut Washer Écrou à oreilles Rondelle Tuerca mariposa Arandela 14 K X6 H X6 K K 2 H H 2 H H H 1 H 2 22 K
Assembly | Assemblage | Ensamblaje 15 K X4 17 K K 17 K K 17 D 16 K X2 17 21 17 8 D X1 Left Front Leg Pied avant gauche C C X1 Pata izquierda delantera 7 K I 8 K 23
Assembly | Assemblage | Ensamblaje 17 K X4 8 9 7 Note: After completing step 17, fully tighten screws from steps 1, 3, 4,5,6, 8 and 12. 18 Remarque : Après avoir terminé l’étape 17, serrez complètement les vis des étapes 1, 3, 6 et 12. O X8 Nota: Luego de completar el paso 17, ajuste totalmente los tornillos de los pasos 1, 3, 4, 5, 6, 8 y 12.
Assembly | Assemblage | Ensamblaje 19 K X4 17 K K K K 20 E X2 B X2 32 To avoid personal injury and damage to grill, have someone help you position the charcoal door into the hinges and hold it steady until hinge and cotter are installed. Pour éviter de vous blesser et d’endommager le gril, demandez à une autre personne de vous aider à positionner la porte pour le charbon sur les charnières et de bien la tenir jusqu’à ce que la charnière et la goupille fendue soient installées.
Assembly | Assemblage | Ensamblaje 21 L L X2 J J X2 29 30 31 13 22 F 15 F X4 F B X2 A X2 12 F 16 14 Flat side up Côté plat vers le haut Lado plano hacia arriba F A A 12 12 12 15 Slanted edge up Côté incliné vers le haut 16 B B 26 16 Borde inclinado hacia arriba
Assembly | Assemblage | Ensamblaje 12 23 34 Operating Instructions | Mode d’emploi | Instrucciones de operación PRE-SEASONING YOUR GRILL Pre-seasoning will rid your grill of chemicals and oils left over by the manufacturing process allowing them to burn off. PRE-SEASON GRILL PRIOR TO FIRST USE. 1. Using a napkin or cloth, rub a light coat of cooking oil on cooking grate, charcoal tray, inside grill lid and firebox. 2. Raise the cooking grate, open the charcoal door and open air dampers. 3.
Operating Instructions | Mode d’emploi | Instrucciones de operación APPRÊTAGE DE VOTRE GRIL L’apprêtage de votre gril permettra d’éliminer les produits chimiques et les huiles laissés par le processus de fabrication en les laissant brûler. APPRÊTEZ LE GRIL AVANT LA PREMIÈRE UTILISATION. 1. À l’aide d’un essuie-tout ou d’un chiffon, frottez une mince couche d’huile à cuisson sur la grille de cuisson, le plateau à charbon, l’intérieur du couvercle et le foyer. 2.
Operating Instructions | Mode d’emploi | Instrucciones de operación LIGHTING YOUR GRILL 1. Raise the cooking grate, open the charcoal door and open air Fig. A Dump charcoal into dampers. charcoal tray as 2. Stack/place up to 1.8kg of charcoal on charcoal tray. Stack charcoal shown here. in a pyramid. Use only charcoal as fuel. Do not use any other fuel source. 3. Close charcoal door. 4. Add lighter fluid following directions on fluid container.
Operating Instructions | Mode d’emploi | Instrucciones de operación ALLUMAGE DU GRIL 1. Soulevez la grille de cuisson, ouvrez la porte pour le charbon et ouvrez Fig. A Versez le charbon dans les clapets à air. le plateau à charbon, de 2. Empilez jusqu’à 1,8 kg de charbon sur le plateau à charbon. Empilez le la façon illustrée ici. charbon en pyramide. N’utilisez que du charbon comme combustible. N’utilisez aucune autre source de combustible. 3. Fermez la porte pour le charbon. 4.
Operating Instructions | Mode d’emploi | Instrucciones de operación ENCENDIDO DE LA PARRILLA 1. Eleve la rejilla de cocción, abra la puerta del carbón vegetal y Fig. A abras los reguladores de aire. Vierta el carbón vegetal en la bandeja para el carbón vegetal 2. Apile/coloque hasta 1.8 kg de carbón vegetal en la rejilla para como se muestra aquí. carbón. Coloque el carbón como en una pirámide. Use solamente carbón vegetal como combustible. No use ninguna otra fuente combustible. 3.
Grilling Guide BEEF SIZE GRILLING TIME INTERNAL TEMP 3-4 min./side Med. rare 60°C 4-5 min./side Med. 70°C Steaks 2cm thick Kabobs 2.5cm cubes 3-4 min./side 60°-70°C Hamburger patties 12mm thick 3-4 min./side Med. 70°C Roast, rolled rump 1.8-2.7kg 18-22 min./.45kg 60°-70°C Sirloin tip 1.5-1.8kg 20-25 min./.45kg 60°-70°C Cut in 1-rib portions 10 min./side Med. 70°C Half, 0.9-1.3kg 10-12 min./side Med. rare 60°C Whole, 1.8-2.7kg 12-15 min./side Med.
Guide de cuisson au gril BŒUF DIMENSIONS DURÉE DE CUISSON TEMP. INTERNE 3 à 4 min/côté À point 60 °C 4 à 5 min/côté Moyen 70 °C Steaks 2 cm d’épaisseur Brochettes Cubes de 2,5 cm 3 à 4 min/côté 60°-70 °C 12 mm d’épaisseur 3 à 4 min/côté Moyen 70 °C Rôti de croupe roulé 1,8-2,7 kg 18-22 min / 0,45 kg 60°-70 °C Pointe de surlonge 1,5-1,8 kg 20-25 min / 0,45 kg 60°-70 °C Coupées en portion d’une côte 10 min/côté Moyen 70 °C Moitié, 0,9-1.
Guía para cocinar a la parrilla CARNE DE RES Bistecs TAMAÑO 2 cm de grosor TIEMPO DE COCCIÓN TEMP INTERNA 3 a 4 min./lado Medio crudo 60° C 4 a 5 min./lado A medio cocer 70°C Brochetas Cubos de 2.5 cm 3 a 4 min./lado 60°-70°C Hamburguesas 12mm de grosor 3 a 4 min./lado A medio cocer 70°C Asado, cuadril enrollado 1.8-2.7kg 18-22 min./.45 kg 60°-70°C Punta de lomo 1.5-1.8kg 20-25 min./.45 kg 60°-70°C Cortar en porciones de 1 costilla 10 min./lado A medio cocer 70°C Mitad, 0.9-1.
Masterbuilt 2-Year Limited Guarantee/Warranty WHAT IS NOT COVERED: These guarantees are based on normal and reasonable domestic use and good maintenance of the product.
Garantie limitée de 2 ans de Masterbuilt CE QUI N’EST PAS COUVERT : Ces garanties sont fondées sur une utilisation domestique normale et raisonnable et sur un bon entretien du produit.
Garantía limitada por 2 años de Masterbuilt QUÉ COSAS NO ESTÁN CUBIERTAS: Las presentes garantías se basan en el uso doméstico normal y razonable, y buen mantenimiento del producto.
Rest assured, we’re here to help. Soyez certain que nous sommes ici pour aider. Tenga por seguro que estamos aquí para ayudarle. Customer Service Service à la clientèle Servicio de atención al cliente masterbuilt.com/contact Masterbuilt Manufacturing, LLC 1 Masterbuilt Court | Columbus, GA | 31907 @masterbuilt 1.800.489.1581 masterbuilt.