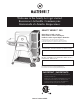
Welcome to the family. Let’s get started. Bienvenue à la famille. Commençons. Bienvenido a la familia. Empecemos. GRAVITY SERIES™ 560 Digital Charcoal Grill + Smoker Gril au charbon + Fumoir numériques Parrilla de carbón vegetal digital + Ahumador Manual applies to the following model number(s) Le manuel s’applique aux numéros de modèle suivants El manual se aplica a los siguientes números de modelo MB20040220 Your model number | Votre numéro de modèle | Su número de modelo Mfg.
WARNING • This manual contains important information necessary for the proper assembly and safe use of the appliance. • Read and follow all warnings and instructions before assembling and using the appliance. • Keep this manual for future reference. Failure to follow these instructions could result in fire, explosion or burn hazard which could cause property damage, personal injury, or death.
WARNINGS AND IMPORTANT SAFEGUARDS • Do not leave grill unattended. • Keep children and pets away from grill at all times. Do NOT allow children to use grill. Close supervision is necessary when children or pets are in the area where grill is being used. • Do NOT allow anyone to conduct activities around grill during or following its use until it has cooled. • Never use glass, plastic, or ceramic cookware in grill. Never place empty cookware in grill while in use. • Never move grill when in use.
WARNINGS AND IMPORTANT SAFEGUARDS • If an extension cord is used: 1) The marked electrical rating of the extension cord should be at least as great as the electrical rating of the appliance; and 2) the cord should be arranged so that it will not drape over the counter top or tabletop where it can be pulled by children or tripped over unintentionally. • The extension cord must be a grounding-type 3-wire cord.
Structural Proximity and Safe Usage Recommendations REMINDER: Maintain a minimum distance of 10 feet from rear, sides and top of grill to overhead construction, walls, rails or other combustible construction. This clearance provides adequate space for proper combustion, air circulation and venting.
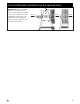
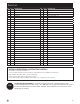
Parts Diagram | Diagramme des pieces | Diagrama de partes 29 1 30 31 32 2 33 2 34 4 35 3 36 6 5 8 9 13 7 37 10 38 41 12 36 39 13 43 11 44 40 42 45 15 54 14 47 46 16 35 21 50 48 17 18 49 20 19 24 52 13 22 23 24 25 26 27 28 6 53 51
Parts List NO. QTY. DESCRIPTION NO. QTY.
Liste des pieces NO. QTY. DESCRIPTION NO. QTY.
Lista de partes NO. QTY. DESCRIPTION NO. QTY.
Hardware | Quincaillerie | Accesorios 10 KEY QTY. A 36 M6x15 Screw DESCRIPTION B 8 M4x10 Screw C 2 M5x12 Screw D 12 M6 Hex Nut KEY QTY. A 36 M6x15 Screw DESCRIPTION B 8 M4x10 Screw C 2 M5x12 Screw D 12 M6 Hex Nut KEY QTY.
Assembly | Assemblage | Ensamblaje 1 Remove bottom tray and all components from inside of grill before beginning assembly. 16 2 Keep hopper lid closed and latched for remainder of assembly.
Assembly | Assemblage | Ensamblaje 3 Lay grill on it’s back on a protective surface to avoid scratches. HINT: Use several pieces of double-sided tape to hold hopper gasket in place. 35 4 A X2 A Partially install screws, then slide notches in leading edge of bottom hopper under screw heads. Do not fully tighten screws. A Leading edge of bottom hopper.
Assembly | Assemblage | Ensamblaje 5 A X3 A A Fully tighten all five hopper screws. A 50 6 A X3 21 A A A Do not fully tighten screws.
Assembly | Assemblage | Ensamblaje 7 A A A A X6 17 18 A A A Do not fully tighten screws. 8 A A A D X6 D D X6 A D D A D Do not fully tighten screws.
Assembly | Assemblage | Ensamblaje Fully tighten all leg and bottom shelf screws/nuts at this time. 9 22 A A A A X5 A D X2 D A D 10 23 24 26 Hold flat section of axle with adjustable wrench. 24 Tighten lock nut with 19mm socket wrench.
Assembly | Assemblage | Ensamblaje 11 A 50 X1 A Stand grill upright and lock both casters for stability.
Assembly | Assemblage | Ensamblaje 13 D X4 Tab through slot. Tab through slot. D D 20 D D Large hole toward front of grill.
Assembly | Assemblage | Ensamblaje 15 Loosen top heat shield screws. Slide bottom heat shield UNDER top heat shield. Tighten after lower screws (B) are installed. 16 B X2 51 Outer flange fits BEHIND rim of hopper opening.
Assembly | Assemblage | Ensamblaje 17 B Loosen top heat shield screws. Slide bottom heat shield UNDER top heat shield. Tighten after lower screws (B) are installed. X2 46 Outer flange fits BEHIND rim of hopper opening.
Assembly | Assemblage | Ensamblaje 19 47 20 41 42 20
Assembly | Assemblage | Ensamblaje 21 30 31 7 6 22 3 5 A X2 5 Remove hex nut and washer from temperature gauge.
Assembly | Assemblage | Ensamblaje 23 C Install screws (C) halfway. X2 8 C 8 C Insert screw head through holes in grill wall. Tighten from outside of grill. 24 Install screws (A) halfway into grill side wall. Place shelf over screw heads, then tighten screws. A X4 A Remove screws from tool hangers (54) to install onto side shelf.
Assembly | Assemblage | Ensamblaje 25 15 26 Insert screw heads on bottom of heat manifold (11) into manifold support. Slide manifold toward hopper. Tighten screws beneath manifold.
Assembly | Assemblage | Ensamblaje 27 16 28 2 24
Assembly | Assemblage | Ensamblaje 29 1 19 30 Power cord 25
Assembly | Assemblage | Ensamblaje 31 Meat Probe Four meat probe jacks.
Operating Instructions ASSEMBLY IS DONE. LET’S HAVE SOME FUN! START-UP 1. REMOVE heat intake and air intake slides. 2. Open hopper lid and hopper ash door. • There is a safety switch at each of these doors that will prevent the fan from running when these doors are opened. • If charcoal remains from a previous cook, shake the charcoal grate to ensure all ash falls through to the ash tray. • Discard any ash from the ash tray. 3. Fill hopper with charcoal. • • • • Approximately 16 lbs. of charcoal briquets.
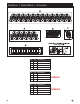
Operating Instructions CONTROL PANEL Meat Probe Jacks Power ON/Off Controller: 1. Press button to power controller ON. 2. Press and hold button to power controller OFF. Set Temperature: 1. Press button. 2. Turn knob to desired temperature. 3. Press button again to set temperature. Set Time: • Countdown Timer 1. Press button. 2. Turn knob to desired hours. 3. Press button to set hours. 4. Turn knob to desired minutes. 5. Press button to set minutes. The timer will start. 6.
Operating Instructions BLUETOOTH Pairing Grill with Smart Device(s):: 1. Download the Masterbuilt app from the Apple App Store or Google Play Store onto your smart device(s). For more information go to masterbuilt.com/pages/app-device-requirements. 2. Once the download is complete, open the Masterbuilt app and follow the instruction for pairing your Bluetooth grill and smart device(s). This device complies with Part 15 of the FCC Rules. Operation is subject to the following two conditions: 1.
Operating Instructions PRE-SEASONING Pre-seasoning will rid your grill of chemicals and oils left over by the manufacturing process, allowing them to burn off. PRE-SEASON GRILL PRIOR TO FIRST USE. 1. Using a napkin or cloth, rub a light coat of cooking oil on cooking grates, charcoal grate and the inside of the grill lid and body. 2. Fill the hopper with charcoal approximately 1/4–1/2 full. 3. Start grill following the START-UP instructions and set the temperature to 600°F (315°C). 4.
Operating Instructions CLEANING AND STORAGE ALWAYS MAKE SURE GRILL IS COOL TO THE TOUCH BEFORE CLEANING AND STORING. • Inpect hardware and assembled parts on a regular basis to ensure grill is in safe working condition. • Clean grill and cooking/smoking grates with mild dish detergent. Wipe outside of grill with a damp rag. DO NOT use oven cleaner or other cleaning agents. Make sure to dry thoroughly.
Troubleshooting SYMPTOM CAUSE POSSIBLE SOLUTION Controller not ON. Power not ON. Press the power button on the controller. Plug controller into power supply and power supply into wall outlet. Check wall outlet circuit breaker and reset if tripped. Call Masterbuilt Customer Service. Once the set temperature is reached the fan will turn off. Once the temperature falls below the set temperature the fan will restart. The fan will continue adjusting itself automatically to mainatin the set temperature.
Masterbuilt 1-Year Limited Warranty Masterbuilt warrants its products to be free from defects in material and workmanship under proper assembly, normal use and recommended care for 1 year from the date of original retail purchase. The Masterbuilt warranty does not cover paint finish as it may burn off during normal use. The Masterbuilt warranty does not cover rust. Masterbuilt requires proof of purchase for warranty claim, such as a receipt.
Garantie limitée de 1 an de Masterbuilt Masterbuilt garantit que ses produits sont exempts de défauts de matériel et de fabrication pendant un an à partir de la date d’achat d’origine s’ils sont assemblés de la manière appropriée, utilisés normalement et entretenus de la façon recommandée. La garantie de Masterbuilt ne couvre pas la finition de peinture, car elle peut brûler au cours d’un usage normal. La garantie de Masterbuilt ne couvre pas la rouille.
Garantía limitada por 1 año de Masterbuilt Masterbuilt garantiza que sus productos no presentan defectos de fabricación, ni de material ni de la mano de obra, si se los ensambla correctamente, se los utiliza de forma normal y se los cuida según las recomendaciones, durante un período de 1 año a partir de la fecha de compra original. La garantía de Masterbuilt no cubre el acabado de la pintura ya que puede salirse durante el uso normal. La garantía de Masterbuilt no cubre la oxidación.
Rest assured, we’re here to help. Rassurez-vous, nous sommes là pour vous aider. Tenga la seguridad de que estamos aquí para ayudarle. Customer Service Service à la clientèle Servicio de atención al cliente masterbuilt.com/contact Masterbuilt Manufacturing, LLC 1 Masterbuilt Court | Columbus, GA | 31907 @masterbuilt 1.800.489.1581 masterbuilt.