
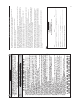
Instructions / Assembly
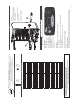
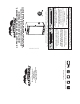


How to use wood chip loader:
• Before starting unit, place 1/2 cup of wood chips in chip loader.
• Never use more than 1/2 cup of wood chips at a time. Never use wood chunks or wood pellets.
• Insert wood chip loader into smoker. Wood chips should be level with top rim of wood chip loader.
• Turn handle clockwise in direction of arrow mark on smoker to unload wood. Wood will drop into
wood chip tray. Turn handle counterclockwise, to the upright position, and leave wood chip loader
in place.
• Check wood chip tray periodically to see if wood has burned down by removing wood chip loader and
looking into smoker through hole. Add more chips as needed.
• Wood chip loader must be pulled out completely from smoker when checking wood chip level.
Adding more wood during smoking process:
• Pull wood chip loader from smoker.
• Place wood chips in wood chip loader and insert into smoker.
• Turn handle clockwise in direction of arrow mark on smoker to unload wood. Wood will drop into wood
chip tray.
• Temperature may spike brieÀ y after wood is added. It will stabilize after a short time. Do not adjust
temperature setting.
Caution:
• Keep smoker door closed when adding wood chips.
• Wood chip loader will be HOT even if handle is not.
• Never use wood pellets.
11
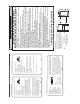
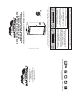
HOW TO USE WOOD CHIP LOADER
PRE-SEASON INSTRUCTIONS
PRE-SEASON SMOKER PRIOR TO FIRST USE.
Some smoke may appear during this time, this is normal.
1. Make sure water pan is in place with NO WATER.
2. Set temperature to 275°F (135°C) and run unit for 3 hours.
3. To complete pre-seasoning, during last 45 minutes, add 1/2 cup of wood chips in chip loader and unload
wood chips into the wood chip tray. This amount is equal to the contents of a ¿ lled chip loader.
4. Shut down and allow to cool.
NOTE: Never add more than 1/2 cup (1 ¿ lled chip loader) at a time. Additional chips should not be
added until any previously added chips have ceased generating smoke.
CAUTION
When door is opened a À are up may occur. Should wood chips À are up, immediately close
door, wait for wood chips to burn down then open door again. Do not spray with water.
4
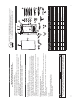
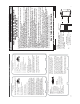
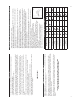
LISTA DE PARTES
1
2
5
3
7
8
4
9
10
11
15
16
17
18
19
12
20
22
21
14
13
6
NO DEVUELVA AL ESTABLECIMIENTO MINORISTA
para solicitar asistencia en el montaje de la
unidad, o para reclamar partes faltantes o dañadas.
Llame al: Departamento de Servicio al Cliente de MASTERBUILT al:
1-800-489-1581
Tenga a la mano los números de modelo y serie cuando llame.
Estos números se ubican en la etiqueta plateada en la parte posterior de la unidad.
¡PARE!
NO. DE
PARTE
CAN-
TIDAD
DESCRIPCIÓN NO. DE
PARTE
CANTI-
DAD
DESCRIPCIÓN
1 1 Cuerpo del ahumador 12 1 Bandeja de grasa
2 1 Panel de control 13 1 Resistencia
3 4 Rejilla ahumadora 14 1 Carcasa para trozos de madera
41DeÀ ector de goteo 15 1 Regulador de aire
5 4 Soportes de la rejilla 16 1 Puerta del ahumador
6 1 Seguro de la puerta 17 1 Asa de la puerta
7 1 Tazón de agua 18 2 Patas delanteras
8 1 Bandeja de trozos de madera 19 2 Abrazadera de la bandeja de
grasa
9 1 Bandeja de goteo 20 2 Panel lateral
10 2 Pata ajustable con tornillos 21 2 Bisagra de la puerta
11 1 Cargador de trozos de madera 22 1 Carcasa del panel de control