
User Guide

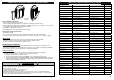

11
NO/Nº/
NO
QTY/QTÉ./
CANT.
DESCRIPTION
DESCRIPCIÓN DESCRIPCIÓN
1
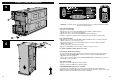
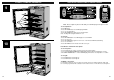
1 Smoker Body
Bâti du fumoir Cuerpo del ahumador
2
1 Control Panel
Panneau de commande Panel de control
3
1 Rear Handle
Poignée arrière Asa posterior
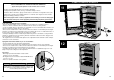
4
4 Smoking Rack
Grille de fumage Rejilla para ahumar
5
1 Drip Defl ector
Défl ecteur de gouttes Defl ector de goteo
6
4 Rack Supports
Supports des grilles Soportes de la rejilla
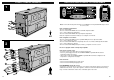
7
1 Door Latch
Loquet de porte Seguro de la puerta
8
1 Water Bowl
Cuvette d’eau Tazón de agua
9
1 Wood Chip Tray
Bac à copeaux de bois Bandeja de trozos de madera
10
1 Drip Pan
Plateau ramasse-gouttes Bandeja de goteo
11
2 Adjustable Screw Leg
Pied réglable avec vis Pata ajustable con tornillos
12
1 Wood Chip Loader
Chargeur à copeaux de bois Cargador de trozos de madera
13
1 Grease Tray
Bac à graisse Bandeja de grasa
14
2 Wheel
Roulette Ruedas
15
1 Element
Élément Elemente
16
1 Wood Chip Housing
Boîtier pour copeaux de bois Carcasa de trozos de madera
17
1 Meat Probe
Thermomètre à viande Sonda de carne
18
1 Air Damper
Clapet à air Regulador de aire
19
1 Door w/ Window
Porte avec hublot Puerta con ventana
20
1 Door Handle
Poignée de porte Asa de la puerta
21
1 Front Foot (R)
Pied avant
(R)
Pata frontales
(R)
22
2 Grease Tray Bracket
Support du bac à graisse Abrazadera de la bandeja de grasa
23
1 Side Panel (R)
Panneau latéral
(R)
Panel lateral
(R)
24
2 Door Hinge
Charnière de porte Bisagra de la puerta
25
1 Control Panel Housing
Boîtier du panneau de commande Carcasa del panel de control
26
1 LED Light
Voyant à DEL Luz LED
27
1 Remote Control
Télécommande Control remoto
28
1 Front Foot (L)
Pied avant
(L)
Pata frontales
(L)
29
1 Side Panel (L)
Panneau latéral
(L)
Panel lateral
(L)
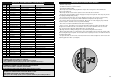
PARTS LIST, LISTE DES PIÈCES, LISTA DE PARTES
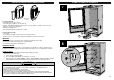
• BEFORE ASSEMBLY READ ALL INSTRUCTIONS CAREFULLY.
• ASSEMBLE UNIT ON A CLEAN, FLAT SURFACE.
• TOOLS NEEDED: Adjustable Wrench, Phillips Head Screwdriver
** It is possible that some assembly steps have been completed in the factory. **
• AVANT L’ASSEMBLAGE, LIRE ATTENTIVEMENT TOUTES LES INSTRUCTIONS.
• ASSEMBLER L’APPAREIL SUR UNE SURFACE PLANE ET PROPRE.
• OUTILS NÉCESSAIRES : TOURNEVIS CRUCIFORME.
**Il est possible que certaines étapes d’assemblage aient été effectuées en usine.**
• ANTES DEL ENSAMBLAJE LEA TODAS LAS INSTRUCCIONES CUIDADOSAMENTE.
• ENSAMBLE LA UNIDAD EN UNA SUPERFICIE LIMPIA Y PLANA.
• HERRAMIENTA NECESARIA: DESTORNILLADOR EN CRUZ.
**Algunos pasos del ensamblaje pueden ya estar completados debido a un preens amblaje en fábrica.**
• Maximum temperature setting is 275°F (135°C).
• Do NOT move unit across uneven surfaces.
• Rear handle is NOT for lifting.
• Wood chip loader and wood chip tray MUST be in place when using smoker. This minimizes the
chance of wood fl are ups.
• Wood chips must be used in order to produce smoke and create the smoke fl avor.
• Check grease tray often during cooking. Empty grease tray before it gets full. Grease tray may need to
be emptied periodically during cooking.
• Do not open smoker door unless necessary. Opening smoker door causes heat to escape and may
cause wood to fl are up. Closing the door will re-stabilize the temperature and stop fl are up.
• Do not leave old wood ashes in the wood chip tray. Once ashes are cold, empty tray. Tray should be
cleaned out prior to, and after each use to prevent ash buildup.
• Glass in door is tempered and will not break under normal operation.
• This is a smoker. There will be a lot of smoke produced when using wood chips. Smoke will escape
through seams and turn the inside of smoker black. This is normal. To minimize smoke loss around
door, door latch can be adjusted to further tighten door seal against body.
• Opening smoker door during cooking process may extend cooking time due to heat loss.
• When outside temperature is cooler than 65°F (18°C) and/or altitude is above 3,500 feet (1067m), addi-
tional cooking time may be required. To insure that meat is completely cooked use a meat thermometer to
test internal temperature.
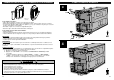
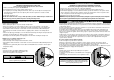
• To adjust door latch, loosen hex nut on door latch. Turn hook clockwise to tighten as shown. Secure hex
nut fi rmly against door latch. (see diagram)
IMPORTANT FACTS ABOUT USING SMOKER
28