40” DIGITAL ELECTRIC SMOKER MODEL G2ESU40W 20075615 FUMOIR ÉLECTRIQUE NUMÉRIQUE DE 40 PO MODÈLE G2ESU40W 20075615 Masterbuilt Manufacturing, Inc. 1 Masterbuilt Ct. Columbus, GA 31907 Customer Service 1-800-489-1581 Service à la clientèle 1-800-489-1581 Servicio de atención al cliente 1-800-489-1581 www.masterbuilt.com AHUMADOR ELÉCTRICO DE 40” MODELO G2ESU40W 20075615 Manual Code: 9807150072 160518-GH THIS PRODUCT IS FOR OUTDOOR USE ONLY.
WARNING This manual contains important information necessary for the proper assembly and safe use of the appliance. Read and follow all warnings and instructions before assembling and using the appliance. Follow all warnings and instructions when using the appliance. Keep this manual for future reference. CARBON MONOXIDE HAZARD Burning wood chips gives off carbon monoxide, which has no odor and can cause death. DO NOT burn wood chips inside homes, vehicles, tents, garages or any enclosed areas.
GARANTIE LIMITÉE Masterbuilt garantit ses produits contre tout vice de fabrication et de matériaux si leurs pièces sont assemblées comme il se doit et si l’appareil est utilisé dans des conditions normales, si son entretien est effectué selon les recommandations du fabricant, pour une période de 90 jours à partir de la date d’achat initiale. Cette garantie de Masterbuilt ne couvre pas la finition de peinture, car elle risque de brûler lors de toute utilisation normale de l’appareil.
GENERAL WARNINGS AND SAFETY INFORMATION WARNINGS & IMPORTANT SAFEGUARDS CONTINUED FROM PAGE 2 • • • • • • CAUTION - To reduce the risk of electric shock, keep extension cord connection dry and off the ground. Do not let cord hang on or touch hot surfaces. Do not place on or near a hot gas or electric burner, or in a heated oven. Fuel, such as charcoal briquettes or heat pellets, are not to be used in electric smoker. To disconnect, turn control panel “OFF” then remove plug from outlet.
RECIPES, RECETTES, RECETAS SMOKED TURKEY DINDE FUMÉE PAVO AHUMADO 6 à 8 personnes Rinde de 6 a 8 porciones Servings for 6-8 INGRÉDIENTS : INGREDIENTS: Turkey 10 - 14 lbs (4.5-6.3 kgs) Salt 1 tbs Sugar 2 tbs Cinnamon 1-2 tsps Apple (cored, peeled, and quartered) 1 average Onion (quartered) 2 medium Celery stalks with leaves 4 stalks SUGGESTED WOOD FOR SMOKING: AVERTISSEMENT 4,5-6,3 kg (10 - 14 lb) de dinde 1 c. à s. de sel 2 c. à s.
AVERTISSEMENTS ET INFORMATIONS RELATIVES À LA SÉCURITÉ GÉNÉRAUX AVERTISSEMENTS ET INFORMATIONS RELATIVES À LA SÉCURITÉ SUITE DE LA PAGE 4 • Conservez un extincteur accessible à tout moment pendant le fonctionnement de l’appareil. • Avant toute utilisation, vérifiez la totalité des écrous, des vis et des boulons afin de vous assurer qu’ils sont bien serrés.
ADVERTENCIA DE LA FCC Este dispositivo cumple con la Parte 15 de las Reglas de la FCC. La operación está sujeta a las siguientes dos condiciones: (1) este dispositivo no puede causar interferencias dañinas y (2) este dispositivo debe aceptar cualquier interferencia recibida, incluyendo la interferencia que pueda causar una operación no deseada.
ADVERTENCIA Este manual contiene información importante que es necesaria para el ensamblaje correcto y el uso seguro de la unidad. Lea y siga todas las advertencias e instrucciones antes de ensamblar y usar la unidad. Siga todas las advertencias e instrucciones cuando use la unidad. Conserve este manual para referencia en el futuro. PELIGRO DE MONÓXIDO DE CARBONO Quemar trozos de madera produce monóxido de carbono, el cual no tiene olor y puede causar la muerte.
HOW TO CLEAN SMOKER For rack supports, racks, water bowl and drip pan use a mild dish detergent. Rinse and dry thoroughly. For wood chip tray and wood chip loader, clean frequently to remove ash build up, residue and dust. Dispose of cold ashes by placing them in aluminum foil, soaking with water and discarding in a non-combustible container. For the interior, glass in door, meat probe, and exterior of smoker simply wipe down with a damp cloth. Do not use a cleaning agent. Make sure to dry thoroughly.
INFORMACIÓN DE SEGURIDAD Y ADVERTENCIAS GENERALES ADVERTENCIAS Y SALVAGUARDAS IMPORTANTES QUE VIENEN DE LA PÁGINA 8 • PRECAUCIÓN: Para reducir el riesgo de descarga eléctrica, mantenga la conexión del cable de extensión seca y lejos del suelo. • No deje que el cable cuelgue o que toque superficies calientes. • No lo coloque en o cerca a un quemador eléctrico/de gas caliente o en un horno caliente. • El combustible, como las briquetas de carbón o perlas de calor, no deben usarse en el ahumador eléctrico.
RENSEIGNEMENTS IMPORTANTS CONCERNANT L’UTILISATION DU FUMOIR DO NOT RETURN TO RETAILER For Assembly Assistance, Missing or Damaged Parts Call: MASTERBUILT Customer Service at 1-800-489-1581. Please have Model Number and Serial Number available when calling. These numbers are located on the silver label on the back of unit. STOP! • Le réglage de température maximal est de 135 °C (275 °F). • Ne PAS déplacer l’appareil sur des surfaces inégales.
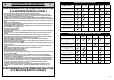
PARTS LIST, LISTE DES PIÈCES, LISTA DE PARTES NO/Nº/ QTY/QTÉ./ NO CANT.
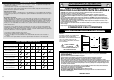
CÓMO USAR EL PANEL DE CONTROL Y EL CONTROL REMOTO PARTS LIST, LISTE DES PIÈCES, LISTA DE PARTES REPLACEMENT PART *Baterías no incluidas Para reemplazar las baterías: • Deslice el clip a la izquiera para retirar. • Presione la lengüeta hacia abajo en la cubierta de la batería y tire hacia afuera. • Instale 2 baterías alcalinas “AAA”. Verifique los símbolos de positivo (+) y negativo (-) en el estuche y en la batería, para asegurar una instalación apropiada. • Reemplace la cubierta de la batería.
ASSEMBLY, ASSEMBLAGE, ENSAMBLAJE CÓMO USAR EL PANEL DE CONTROL Y EL CONTROL REMOTO 1 B Nota: La luz solar directa puede interferir con la habilidad de leer la pantalla LED, bloquee la luz de ser necesario. B 22 B B B x4 Para configurar la temperatura: •Presione el botón ON. •Presione el botón SET TEMP una vez, la luz LED empezará a titilar. •Use +/- para configurar la temperatura. •Presione el botón SET TEMP otra vez para fijar la temperatura.
COMMENT UTILISER LE PANNEAU DE COMMANDE ET LA TÉLÉCOMMANDE ASSEMBLY, ASSEMBLAGE, ENSAMBLAJE 3 11 23 (R) B B B B Piles non fournies Pour remplacer les piles : • Faites glisser l’agrafe de ceinture vers la droite pour l’enlever • Enfoncez la languette du couvercle du compartiment à piles, puis tirez pour enlever le couvercle • Insérez 2 piles alcalines AAA. Vérifiez les symboles (+) et (-) sur le boîtier et les piles pour s’assurer qu’elles sont installées correctement.
ASSEMBLY, ASSEMBLAGE, ENSAMBLAJE COMMENT UTILISER LE PANNEAU DE COMMANDE ET LA TÉLÉCOMMANDE 5 11 Remarque : La lumière directe du soleil peut empêcher de lire correctement l’afficheur à DEL; au besoin, bloquez la lumière. Pour régler la température : • Appuyez sur le bouton ON. • Appuyez une fois sur le bouton SET TEMP; l’afficheur à DEL se mettra à clignoter. • Utilisez les boutons +/- pour régler la température. • Appuyez de nouveau sur le bouton SET TEMP pour fixer la température.
ASSEMBLY, ASSEMBLAGE, ENSAMBLAJE HOW TO USE CONTROL PANEL & REMOTE CONTROL 7 *Batteries not included To replace batteries: • Slide belt clip to the left to remove. • Press tab down on battery cover and pull out. • Install 2 “AAA” Alkaline batteries. Check positive (+) and negative (-) symbols, on the case and battery, to ensure proper installation. • Replace the battery cover. • Remove batteries before storing remote control. To test frequency range: • Turn unit on.
ASSEMBLY, ASSEMBLAGE, ENSAMBLAJE HOW TO USE CONTROL PANEL & REMOTE CONTROL 9 4 Note: Direct sunlight may interfere with ability to read LED display, block light if needed. To set temperature: •Press ON button. •Press SET TEMP button once-LED display will blink. •Use +/- to set temperature. •Press SET TEMP button again to lock in temperature. Note: Heating will not begin until timer is set. To set timer: •Press SET TIME button once-LED display for hours will blink. •Use +/- to set hours.
ASSEMBLY, ASSEMBLAGE, ENSAMBLAJE INSTRUCCIONES DE PRE-SAZONADO SAZONE PREVIAMENTE EL AHUMADOR ANTES DEL PRIMER USO. Algo de humo puede aparecer en este momento, esto es normal. 1. Asegúrese que la bandeja de agua esté en su ligar y SIN AGUA. 2. Configure la temperatura a 275°F (135°C) y encienda la unidad por 3 horas. 3. Durante los últimos 45 minutos, agregue 1/2 taza de trozos de madera en el cargador de trozos para completar el pre-sazonado.
PRE-SEASON INSTRUCTIONS PRE-SEASON SMOKER PRIOR TO FIRST USE. Some smoke may appear during this time, this is normal. 1. Make sure water pan is in place with NO WATER. 2. Set temperature to 275°F (135°C) and run unit for 3 hours. 3. To complete pre-seasoning, during last 45 minutes, add ½ cup of wood chips in wood chip loader and unload wood chips into the wood chip tray. This amount is equal to the contents of a filled wood chip loader. 4. Shut down and allow to cool.