
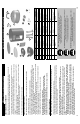
Instructions / Assembly
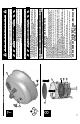

CHARCOAL SMOKER OPERATION
PRE-SEASON SMOKER
Curing your smoker will rid the unit of chemicals and oils left over by the manufacturing process allowing them to
burn off. Pre-season smoker prior to fi rst use.
1. Using a napkin or cloth, rub a light coat of cooking oil on smoking racks and inside of access door and lid.
Make sure water bowl is in place with NO WATER.
2. Fill charcoal bowl with up to 8lbs (3.6kgs) of charcoal and light. Close access door and lid.
3. Let the smoker burn for about 30 minutes. Make sure temperature gets up to 400°F (204°C).
4. Allow unit to COOL COMPLETELY.
5. Reapply light coat of cooking oil on smoking racks and inside of access door and lid.
6. Relight smoker and burn the oil for 20 minutes.
• Cure your smoker periodically to prevent excessive rust.
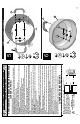
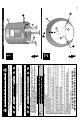
CHARCOAL SMOKING
Note: Be sure to remove smoking racks and water bowl before lighting charcoal.
1. Position charcoal bowl in place.
3. Fill charcoal bowl with up to 8lbs (3.6kgs) of charcoal. Stack briquets in a pyramid.
4. Add lighter fl uid following directions on fl uid container. Before lighting, place lighter fl uid at least 25 ft (8m)
away from unit. Do not lean into unit when lighting charcoal. Light charcoal. LEAVE LID AND ACCESS
DOOR OPEN.
5. In about 15 minutes, fl ames will die out and briquets will begin to ash over. Once the briquets are completely
ashed over, spread briquets in a single layer.
6. Insert water bowl. Pour 1 inch of water, juice or vinegar into water bowl. This will add fl avor and moisture to
food and prevent it from drying out.
7. Insert smoking racks into smoker. Position food in center.
• Never use gasoline to light charcoal.
• Overfi lling charcoal bowl can cause serious injury and damage the unit.
• Never add additional lighter fl uid once charcoal has ignited.
• Hot coals should not be left unattended.
• Unit is HOT. Use protective gloves and long, sturdy cooking utensils.
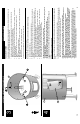
USING WOOD CHIPS
Note: Wait for briquets to ash over before adding any wood chips.
1. Pre-soak wood chips in water for at least 30 minutes.
2. With protective gloves on, open side access door and place1 cup (0.24L) of wood chips in charcoal bowl,
using access door as chute. Never use more than 1 cup (0.24L) of wood chips at a time. Never use
wood chunks.
• Wood chips must be used in order to produce smoke and create the smoke fl avor.
• Food needs to be in the center of smoking racks. This allows food drippings to go into the water bowl.
• This is a smoker. There will be a lot of smoke produced when using wood chips. Smoke will escape
through seams and turn the inside of smoker black. This is normal.
• Do not open smoker lid and/or access door unless necessary. Opening smoker lid and/or access door
causes heat to escape and may cause wood to fl are up. Closing the lid and/or access door will
re-stabilize the temperature and stop fl are up.
• When lid and/or access door is opened, sometimes a fl are up may occur. Should wood chips fl are up
immediately close lid and/or access door, wait for wood chips to burn down then open lid and/or
access door again.
• Do not leave old wood or charcoal ashes in the charcoal bowl. Charcoal bowl should be cleaned out
prior to each use to prevent ash buildup.
3
16
Masterbuilt warrants its products to be free from defects in material and workmanship under proper assembly,
normal use and recommended care for 90 days from the date of original retail purchase.
Masterbuilt warranty does not cover paint finish as it may burn off during normal use.
Masterbuilt warranty does not cover rust of the unit.
Masterbuilt requires reasonable proof of purchase for warranty claims and suggests that you keep your receipt. Upon
the expiration of such warranty, all such liability shall terminate.
Within the stated warranty period, Masterbuilt, at its discretion, shall repair or replace defective components free of
charge with owner being responsible for shipping. Should Masterbuilt require return of component(s) in question for
inspection Masterbuilt will be responsible for shipping charges to return requested item.
This warranty excludes property damage sustained due to misuse, abuse, accident, damage arising out of
transportation, or damage incurred by commercial use of this product.
This expressed warranty is the sole warranty given by Masterbuilt and is in lieu of all other warranties, expressed or
implied including implied warranty, merchantability, or fitness for a particular purpose.
Neither Masterbuilt nor the retail establishment selling this product, has authority to make any warranties or to
promise remedies in addition to or inconsistent with those stated above.
Masterbuilt’s maximum liability, in any event, shall not exceed the purchase price of the product paid by the original
consumer/ purchaser. Some states do not allow the exclusion or limitation of incidental or consequential damages.
In such a case, the above limitations or exclusions may not be applicable.
California residents only: Not withstanding this limitation of warranty, the following specific restrictions apply; if
service, repair, or replacement of the product is not commercially practical, the retailer selling the product or
Masterbuilt will refund the purchase price paid for the product, less the amount directly attributable to use by the
original buyer prior to the discovery of the nonconformity. Owner may take the product to the retail establishment
selling this product in order to obtain performance under warranty.
This expressed warranty gives you specific legal rights, and you may also have other rights which vary from
state to state.
Go Online www.masterbuilt.com
or complete and return to
Attn: Warranty Registration
Masterbuilt Mfg., Inc.
1 Masterbuilt Court - Columbus, GA 31907
Name: ___________________________ Address :_________________________ City:________________
State/Province: ________ Postal Code: ________________ Phone Number: (_____) - ____________
E-mail Address:_______________________________________
*Model Number: ____________________ *Serial Number: ____________________
Purchase Date: _____- ______-_______ Place of Purchase: ____________________________________
*Model Number and Serial Number are located on silver label on back of unit.
LIMITED WARRANTY INFORMATION