
Instructions / Assembly


INSTALL BASE CABINETS
Before beginning the cabinet installation, you will need to
apply the finished flush-fit end panel(s) to the side(s) of the
cabinet(s) that will be exposed to the room. Refer to the
instructions provided with the flush fit end panels.
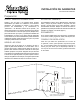
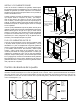
When starting the installation process, it is very important to
start your installation from a corner wall and work out. If the
wall is not straight, you may need to use a filler and scribe
it to the wall’s shape (Figure 2). Fillers may also be used to
accommodate wall to wall installations where the cabinets do
not fit exactly.
Once you have identified the starting point, take the first
cabinet and shim it to the previously established level line.
Drill pilot holes at the stud location, through the back rail and
into the studs. Then securely fasten the cabinet to the wall,
using #8 x 2
1
⁄2 in. screws and appropriate anchors (Do Not
Nail). Make sure the cabinet remains square and level after
wall attachment.
ATTACH CABINETS TOGETHER
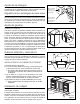
Once you have securely fastened the starting cabinet to the
wall, line up the front of the cabinets and use “C” clamps to
simply join the next cabinet to it. Place the “C” clamps on the
adjoining stiles and carefully clamp the two together. Carefully
line up the top and shim the bottom of the cabinets. Now drill
a pilot hole using a 1/8 in. drill bit, through the adjoining stiles.
Once done, draw the two together, use two #8 x 2 in. wood
screws (Figure 3).
Continue installing the remaining base cabinets in the same
manner. After joining all of your base cabinets together, verify
all cabinets are level and secure each cabinet to the wall.
Shims
Shim
Wall
3" Filler. Trim
to desired size
and shape
Block
Wall
Block
Filler
Figure 2
Installation
spacer
Scrap
blocks
1/8 in.
diameter
Stiles
Figure 3
Figure 4
Figure 5
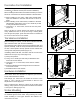
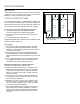
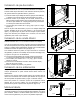
Changing the Door Swing
Because some installations require a cabinet door to open in the opposite direction, it may be necessary to switch the
hinges from one side of the cabinet to the other. You must first remove the door by unscrewing the hinges from the face
frame. Then using a
3
⁄32 in. diameter drill bit, drill holes
3
⁄4 in. deep on the other side of the face frame. Rotate the door
180 degrees and screw the hinge onto the opposite side of the face frame (Figures 4 and 5).
Face
frame
Face
frame
3/32 in.
diameter
drill bit