
Installation Guide

2-PIECE LINEN ASSEMBLY
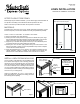
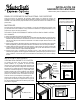
The linen with drawers and linen with doors are 2-piece units
that require assembly prior to installation. The upper unit has
four attachment brackets (provided in parts bag) that need
to be installed at the bottom interior of the unit. Install the
brackets on the upper unit before placing on top of the base.
Pre-drilling pilot holes will ease the seating of the screws
(Figure 5).
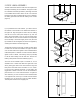
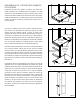
If you purchased a linen with drawers, you need to remove
the drawers to have access to the attachment brackets on
the upper unit. Align the upper and lower units, first making
sure the front of the linens (face frame) line up, then the
sides. (The overall width of one unit may be slightly larger
than the other unit. This is normal and does not compromise
the functionality or structural integrity of the units.) Once the
top and bottom units are aligned, secure the two together by
screwing the brackets to the base (Figure 6).
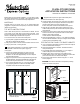
The flush-fit end panel comes with one side moulding piece
to install over the seam line between the upper and lower
units. If a side of the linen is against a wall or cabinet DO NOT
install these pieces on that side. If a side of the linen IS NOT
against a wall or cabinet, use finishing nails (not provided)
to nail the side moulding over the seam line. Three to four
finishing nails per side should be sufficient (Figure 7).
Your linen can be installed as part of a cabinet run, or as a
standalone unit. In either case, fasten the upper linen to the
wall by drilling pilot holes at the stud location through the
back panel. Then fasten to the wall with #12 x 3 in. screws.
If your linen sits in between the studs, you will need to use
toggle bolts to fasten to the wall. It is not recommended to
place the linen in a corner where the back is not against a
wall. However, if your linen is used in a corner where the back
is not against a wall, secure your unit with furniture restraint
hardware, such as wall anchor rings and cable restraints.
This will prevent the linen from toppling over.
Upper Unit
Side Panel
of Base Unit
Brackets
Bottom Panel
of Upper Unit
Drawer openings
(front)
Figure 5
Brackets
Bottom Panel
of Upper Unit
Figure 6
Figure 7