
Installation Guide
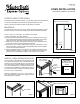

Before beginning the cabinet installation, you will need to apply
the flush-fit end panels to the side(s) of the cabinets that will be
exposed to the room. Just follow the simple steps below.
MATERIALS
Finished flush-fit end panel and a roll of double-sided tape
(suggested 1 roll per flush-fit end panel) or construction adhesive.
(Neither are provided.)
TOE NOTCH INSTRUCTIONS
Note: If flush-fit end panel is on the left side of cabinet, the toe
notch will be on the right edge of the flush-fit end panel. If the
flush-fit end panel is for the right side of the cabinet, the toe notch
will be on the left edge of the flush-fit end panel.
To cut the toe notch out of the flush-fit end panel:
a) Lay the panel up against the cabinet side to be covered and
align all four edges with the cabinet.
b) Using a pencil, draw a line to mark the location of the toe notch
c) Using a power saw, cut along the line.
1
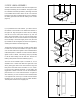
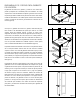
Apply double-sided tape or construction adhesive to the
backside of the flush-fit end panel. (Figure 1).
If using tape:
a) Cut the roll of double sided tape into strips. Cut tape
strips to the lengths and quantities listed on the tape
template. You will need approximately one roll of tape for
each flush-fit end panel.
b) Apply the tape to the flush-fit end panel following the tape
template diagram. Tape strips applied along the edges of
the flush-fit end panel should be ¼ in. from the edge.
c) As you apply each tape strip, run your finger along the
strip, applying pressure to make sure the tape makes
complete contact with the flush-fit end panel.
2
Apply flush-fit end panel to upper cabinet side panel
a) Remove the backer from each tape strip.
b) Holding the flush-fit end panel at an angle from the cabinet
side panel, align the front edge of the flush-fit end panel to
the face frame. Make sure the entire edge of the
flush-fit end panel is seated inside the face frame groove.
c) Align the top of the flush-fit end panel with the top of the
cabinet side panel and press the flush-fit end panel against
the side panel.
d) Working from front to back, apply pressure along the entire
surface of the flush-fit end panel to make sure each tape/
adhesive strip makes complete
contact with the cabinet side panel.
e) Allow the tape/adhesive to cure for 1 hour before proceeding
with the cabinet installation. Clamps or weights can be added
to secure panel until adhesive dries.
DECORATIVE END PANEL FOR BASE CABINETS
a) If you purchased a decorative end panel, a flush-fit end panel
must be installed first. See step 2.
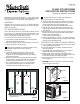
b) Remove the cabinet door or drawers. This allows access to
clamp the end panel.
c) Pre-drill eight holes around perimeter (1 in. from edge) of
cabinet side panel from the inside (Figure 2).
d) Measure down
1
⁄4 in. from the top of the cabinet on the
outside. Make a pencil mark. Align top edge of end panel with
pencil mark and secure to cabinet with clamps.
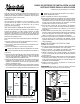
e) Secure the end panel to the cabinet using #6 x 1 in. wood
screws (Figure 3).
CAUTION: Never secure decorative end panel by inserting
screws into center of the panel.
NOTE: Tape/adhesive should be applied ¼ in. from edges
of flush-fit end panel.
Tape/
adhesive
Tape/
adhesive
Tape/
adhesive
Tape/
adhesive
LEFT
SIDE
LEFT
SIDE
Figure 1
Figure 3
Decorative
End Panel
Figure 2
Pilot holes
Face frame
3
⁄
16
in. diameter drill bit
Side
Panel
U180218A
Rev. 03-15
FLUSH-FIT END PANEL
APPLICATION INSTRUCTIONS
Hardware for installation not included.