
Installation Guide


LINEN INSTALLATION
Hardware for installation not included.
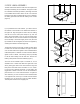
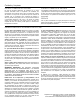
APPLY FLUSH-FIT END PANEL TO CABINET SIDE PANEL
a) Remove the backer from each tape strip.
b) Holding the flush-fit end panel at an angle from the cabinet side panel, align
the front edge of the flush-fit end panel to the face frame. Make sure the entire
edge of the flush-fit end panel is seated inside the face frame groove.
c) Align the top of the flush-fit end panel with the top of the cabinet side panel
and press the flush-fit end panel against the side panel.
d) Working from front to back, apply pressure along the entire surface of the
flush-fit end panel to make sure each tape/adhesive strip makes complete
contact with the cabinet side panel.
e) Allow the tape/adhesive to cure for at least 1 hour before proceeding with the
cabinet installation. Clamps or weights can be added to secure panel until
adhesive dries. Check adhesive manufacturer’s instructions for cure time.
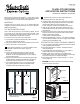
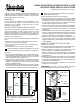
INSTALL LINEN CROWN MOULDING
Crown moulding, sold separately, can be installed on the
linen cabinet. The length of crown moulding pieces will
need to be cut from the full-length piece. You will need to
miter the pieces to fit the linen. Please see Figures 2 and
3 on how to install the crown moulding to the cabinet. If
your linen will be installed with a side against a wall it is
not necessary to attach moulding to the side against the
wall. Cut to fit your wall (Figure 4).
Options for attachment: #6 x 3/4 in. wood screws or
brad nails (neither are provided). Pre-drilling pilot holes
first will help prevent splitting.
Figure 3
Side moulding
Left side
moulding
Use #8 x 7/8 in.
screw
(not provided)
Use either white
glue or carpenter’s
glue (not provided)
Front moulding
ATTACH RIGHT AND LEFT
SIDE MOULDINGS
Note: Make sure to align
side mouldings with front
moulding.
TOP VIEW
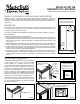
Figure 4
Wall
Front moulding straight cut to fit to wall
Cabinet
Wall
FRONT VIEW
Figure 2
Front moulding
ATTACH FRONT MOULDING
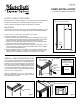
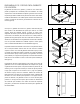
UPPER FLUSH-FIT END PANEL
Before beginning the cabinet installation, you will need to apply the finished flush-fit
end panels to the side(s) of the cabinet that will be exposed to the room.
Refer to Instructions provided with flush-fit end panels for the base.
MATERIALS
Finished flush-fit end panel and a roll of double-sided tape (suggested 1 roll per
flush-fit end panel) or construction adhesive or white glue (neither are provided).
Figure 1
NOTE: Tape/adhesive should be applied ¼ in.
from edges of flush-fit end panel.
Tape/
adhesive
Tape/
adhesive
U180216A
Rev. 03-15