EnvisionTouch Intuitive mobile app with predesigned controls for your Philips Dynalite System User Guide Version 1.
November 11, 2013 Background Philips Dynalite is a highly specialized company whose principal occupation is to provide ‘cutting edge’ solutions for lighting control. Our achievements have been recognized worldwide and Philips Dynalite is generally the system of choice for projects involving integration with third-party vendor’s equipment and for large-scale applications. Philips Dynalite’s philosophy is to provide the best solution possible for each and every project. This is the key to our success.
November 11, 2013 Contents EnvisionTouch 3 Introduction 3 Running EnvisionTouch 3 Requirements 4 EnvisionTouch controls 5 Project Settings 6 Tablet Control Page Examples 7 Exporting the project file from EnvisionProject 8 Step 1 8 Step 2 9 Step 3 10 Step 4 15 Step 5 16 Step 6 17 Step 7 19 EnvisionTouch 3 Introduction
About this guide Guide Overview This guide is designed to assist in the configuration of Dynalite control devices. A working knowledge of Apple iOS and Google Android devices is required to effectively use this document. For more information on Dynalite commissioning processes, consult the EnvisionProject Quickstart Guide or EnvisionProject Training Guide. Disclaimer These instructions have been prepared by Philips Dynalite and provide information on Philips Dynalite products for use by registered owners.
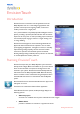
EnvisionTouch Introduction EnvisionTouch is an innovative control application from the Philips Dynalite team. It is a self-configuring application that provides control options for lighting, HVAC, curtains and ancillary services from a single point.
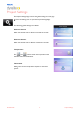
The information icon provides information about the EnvisionTouch app including the version number, setup requirements and support links. Add a new Project 1. Touch to open the Create Project Page 2. Enter a name for your control system 3. Enter the IP address of the 100BT Gateway 4. Press 5. The project is now listed on the Projects Page 6.
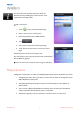
EnvisionTouch controls Based on the system design, control pages may include one or more of the following controls: Presets Presets recall a preset scene for a specific Area. Default Presets are High (100%), Medium (70%), Low (40%) and OFF for all channels in the Area On/Off The and buttons provide channel switching. Brightness Slider changes the brightness level of a channel (0 to 100%). Hue Slider changes the color for a multicolored lighting channel.
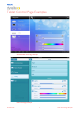
Project Settings The Project Settings Page controls the global settings for each page. Touch the Settings icon to open the Project Settings Page. The following global settings are available: Fader for Presets Slider sets the fade time for Preset commands in seconds Fader for Devices Slider sets the fade time for Device commands in seconds Temperature The and buttons switch the temperature units between Celsius and Fahrenheit. Thermostat Sliding ruler sets the temperature setpoint for the entire system.
Tablet Control Page Examples Android tablet control page example iPad control page example EnvisionTouch 7 Tablet Control Page Examples
Exporting the project file from EnvisionProject This procedure describes the steps for exporting the logical configuration information from the EnvisionProject commissioning software, and saving it as an xml file into the 100BT Ethernet Gateway. This information is then used for the control display on your Android or iOS device. Step 1 Configure 100BT: 1. Open EnvisionProject job and connect to the network 2. In Network View select the 100BT device 3.
Step 2 It is recommended to make a backup copy of the project file before making changes to the logical folder structure that will be exported to the xml file. This enables you to customize the content of the xml file to make the pages in the app display only the info that is required. Make a copy the EP project. 1. Open the EnvisionProject job 2. Click the File menu and Select Save As… 3. Enter name for the backup project 4.
Step 3 Create EnvisionTouch Folders: 1. Open the EnvisionProject job 2. Click on Logical View 3. Create a folder with the name “EnvisionTouch” 4. Create subfolders where you can place your Areas/Channels 5. Click and drag to move all the Areas/Channels under the subfolders 6. Only add logical information (channels, presets, areas etc.) that you want displayed in EnvisionTouch 7. Enter the reserved wording into the Name Property and/or Description Property on the Area Properties Page.
Reserved Area Wording Table Icon (iOS) EnvisionTouch Icon (Android) 11 if description is if name contains GenericRoom Kitchen kitchen or other LivingRoom living or lounge HomeTheatre theatre MasterBed "master bed" Bed bed BathRoom bath or shower DiningRoom dining Basement basement or storage Garden garden or yard Pond pond or fish or fountain Kids Corner kids or rumpus Exporting the project file from EnvisionProject
Icon (iOS) EnvisionTouch Icon (Android) 12 if description is if name contains Garage garage Office office or study Entrance/Lobby entrance or lobby Attic attic Sauna sauna or spa Gym gym Bar bar Exporting the project file from EnvisionProject
Reserved Channel Wording Table Icon (iOS) Icon (Android) if description is if name is if name contains Aircon AC aircon or "air con" Audio audio sound Blinds blind or curtain Computer PC or Mac Fan fan or fans Foxtel foxtel Garage "garage door" or "roller door" IRCom infra Lamp bedsides lamp Light piano or ensuite light Music music Projector EnvisionTouch computer 13 screen projector Exporting the project file from EnvisionProject
Icon (iOS) Icon (Android) if description is if name is Security TV if name contains security TV television Spot "spot lights" or "halogen" Wall wall Cove cove Channel Type Table Icon (iOS) EnvisionTouch Icon (Android) Icon Name If Channel type is RGB 13, 14, 15 (3 channels with same name) Fan 8 IRCom Warm White/Cool White 14 Exporting the project file from EnvisionProject
Step 4 Export Logical data: 1. From the File Menu select Export > Logical Data…. 2. In the Export Logical Data dialog box check the Export all logical data and XML file options. 3. Click the OK button. 4. Enter the name Project.xml 5. Click the Save button. Warning: the file must be called Project.xml in order for the file to work. The xml file size must be under 64K.
Step 5 Install Lantronix DeviceInstaller™ software: 1. Connect your PC to the 100BT via: a. Wireless router or b. Ethernet cable. 2. Download DeviceInstaller from the Lantronix site. http://www.lantronix.com/device-networking/utilities-tools/device-installer.html 3. Save it to a folder on your PC. 4. Run the setup.exe. 5. Select the language for the application and press the OK button. 6. Click the Install button. 7. Click the Start button to download required components, if applicable. 8.
10. Click the Next button to accept the installation folder. 11. Click the Next button to confirm installation. 12. Click the Close button. 13. Click the OK button. Step 6 Run Lantronix DeviceInstaller: 1. Click the Next button to confirm installation. 2. Run the Lantronix 3. Click DeviceInstaller application Search to locate the 100BT on the network 4.
EnvisionTouch 18 Exporting the project file from EnvisionProject
Step 7 Run Device Upgrade Wizard: 1. Click Upgrade 2. Check Create a custom installation by specifying individual files (Typical) 3. Click the Next button in the Device Upgrade Wizard 4. Click the Next button in the Device Upgrade Wizard 5. Check Install Files individually 6.
Note: The file size must be under 64K. 7. Click the Add Files button 8. Select the Project.xml file and click the Open button 9. Click the Next button in the Device Upgrade Wizard. 10. Click the Next button (Partition #1 should have the project file).
11. Click the Next button in the Device Upgrade Wizard (No Change). 12. Click the Close button Project.xml is successfully saved into the Philips Dynalite 100BT Ethernet Gateway device.
© 2012 Koninklijke Philips Electronics N.V. All rights reserved. Philips International B.V.