REVOLT 800.825.5397 A BRAND OF MASTER MANUFACTURING 800.825.5397 INSTRUCTIONS FOR ASSEMBLY, 1 OPERATION, SERVICING & STORAGE RECHARGEABLE MASTER GARDENER www.MASTER-MFG.
TABLE OF CONTENTS SPRAYER COMPONENTS . . . . . . . . . . . . . . . . . . . . . . . . . . . . . . . . . . . . . . . . . . . . . . . . . . 4 SPRAYER ASSEMBLY . . . . . . . . . . . . . . . . . . . . . . . . . . . . . . . . . . . . . . . . . . . . . . . . . . 6 IMPORTANT SAFETY . . . . . . . . . . . . . . . . . . . . . . . . . . . . . . . . . . . . . . . . . . . . . . . . . . 12 GENERAL CHEMICAL . . . . . . . . . . . . . . . . . . . . . . . . . . . . . . . . . . . . . . . . . . . . . . . . . .
800.825.5397 3 WARRANTY Sprayers sold shall be warranted from defects in workmanship and material when used within the service and scope for which they were designed for a period of two years from date of purchase. Warranty covers replacement parts ONLY. Contact our Spraying Division for warranty parts at 800.825.5397. DO NOT RETURN PRODUCT TO YOUR DISTRIBUTOR/DEALER. Please have original proof of purchase, model number of sprayer and part number of part from illustrated parts breakdown in this manual.
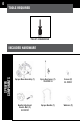
TOOLS REQUIRED PHILLIPS SCREWDRIVER SPRAYER COMPONENTS INCLUDED HARDWARE Sprayer Base Assembly (1) Spray Gun Lance (1) SG-4200-18 Screws (2) 33-100137 Handle Adjustment Knob & Bolt (2) 33-100157 Sprayer Handle (1) Washers (2)
800.825.5397 IMPORTANT NOTE: THE REVOLT BATTERY PACK IS NOT CHARGED PRIOR TO SHIPPING. IT WILL REQUIRE APPROXIMATELY FOUR HOURS TO FULLY CHARGE WITH THE INCLUDED REVOLT BATTERY CHARGER.
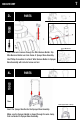
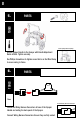
PARTS TOOLS 1. NOTE: The Revolt Series Battery Pack is not charged out of the carton and requires four hours to fully charge. None Charging Revolt Battery Pack Connect Battery Charger to the open hole on top of Revolt Battery Pack. Plug the Battery Charger into an appropriate outlet. PARTS TOOLS 2. NOTE: Confirm that the Deflector Nozzle orifice is facing down. If not, unthread nozzle nut to allow for adjusting nozzle. Tighten nozzle nut.
800.825.5397 PARTS TOOLS 3. Secures Wire Harness Insert loose wire harness through the Wire Harness Holder. Slip Wire Harness Holder over tube frame of Sprayer Base Assembly. Use Phillips Screwdriver to attach Wire Harness Holder to Sprayer Base Assembly with included screw and nut. PARTS TOOLS 4. None Installs Sprayer Handle on Sprayer Insert the Sprayer Handle into the Sprayer Base Assembly.
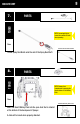
PARTS TOOLS 5. Secures Sprayer Handle to Sprayer Secure Sprayer Handle to the Sprayer with Handle Adjustment Knobs & Bolts. Tighten securely. Use Phillips Screwdriver to tighten screw that is on the Wire Clamp to secure wiring to frame. PARTS TOOLS 6. None Connects Battery Dock to Power Switch Locate the Wiring Harness Connectors at base of the Sprayer Handle and exiting the back panel of the Sprayer. Connect Wiring Harness Connectors. Ensure they are fully seated.
800.825.5397 PARTS TOOLS 7. NOTE: Screw hand tight to ensure there will be no leaks when operating. None Connects Spray Gun Shaft to Handle Thread Spray Gun Nozzle onto the end of the Spray Gun Shaft. PARTS TOOLS 8. NOTE: Remove from compartment by pressing the release button on the Battery Pack. None Installs Revolt Battery Pack in Dock Insert the Revolt Battery Pack into the open dock that is situated at the bottom of the back panel of Sprayer. A click will be heard when properly attached.
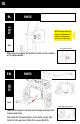
PARTS TOOLS 9. NOTE: The Power Switch will light up on the ON position. If it doesn’t, the Battery Pack will need to be fully charged. None Turns On Power to Sprayer When ready for spraying, flip the Power Switch on that is located on the Sprayer Handle. PARTS TOOLS 10. None Installs Trailer Tongue on Sprayer Attach Trailer Tongue to the back-end of Sprayer and align holes between both items. Insert Hitch Pin into open holes to secure Trailer Tongue.
800.825.5397 PARTS TOOLS 11. None Allows for Broadcast Spraying To convert over to broadcast spraying, turn the Back Panel Valve Switch from Off to On.
SAVE THESE INSTRUCTIONS WARNING Read and understand all instructions. Failure to follow all instructions listed below, may result in electric shock, fire and/or serious personal injury. • Before Using The Battery Pack & Charger: Read this operator’s manual and all labels on the battery pack. • Caution: To reduce risk of injury, ONLY CHARGE REVOLT BATTERY PACK WITH REVOLT SERIES CHARGERS. Other types of batteries may burst causing personal injury and damage.
800.825.5397 OPERATION - IMPORTANT SAFETY INFORMATION Now that you have assembled your sprayer, there is some important safety and health information you need to know with regard to handling and spraying chemicals. TAKE NOTE! THIS SAFETY ALERT SYMBOL FOUND THROUGHOUT THIS SECTION IS USED TO CALL YOUR ATTENTION TO INSTRUCTIONS INVOLVING YOUR PERSONAL SAFETY AND THE SAFETY OF OTHERS. FAILURE TO FOLLOW THESE INSTRUCTIONS CAN RESULT IN PROPERTY DAMAGE, INJURY OR DEATH.
BEFORE SPRAYING • Sprayer Prep: ALWAYS inspect and prepare the sprayer before use according to the directions provided in this manual. • Keep Sprayer Off: Do not turn power on to the sprayer until ready to spray in order to avoid unintentional spray release. • Broadcast Nozzle Down: Make sure the broadcast nozzle is oriented to spray straight down before starting the sprayer. • Wind Speed: NEVER spray when wind exceeds 4 MPH in order to minimize spray drift.
800.825.5397 AFTER SPRAYING • Clean Sprayer: ALWAYS clean the sprayer immediately after use according to the directions provided in this manual. • Decontaminate: ALWAYS decontaminate yourself immediately after you are finished with spraying and handling chemicals. Wash all exposed areas of the body with soap and water. Remove and launder clothing. • Chemical Disposal & Storage: ALWAYS dispose or store remaining chemicals properly as recommended on the chemical label.
PREPARING SPRAYER • Review Safety Information: Review safety information in this manual and manufacturer chemical label before use. • Sprayer Attachment: Ensure the sprayer is securely attached to a vehicle if using trailer hitch for spraying. • Empty Tank: Ensure the sprayer has been thoroughly flushed and drained of all residual chemical prior to uses. • Inspect & Test: Inspect the tank and components for any cracks or leaks. Replace any damaged parts.
800.825.5397 USING SPRAYER (CONTINUED) • Broadcast Valve Switch: Close broadcast valve switch to prevent accidental spray release. • Turn On Power: Flip on power switch that is located on the sprayer handle. SPOT SPRAYING • Spot Spraying: To spot spray, pull the gun trigger. Make sure nozzle of gun is pointed towards vegetation in need of spraying. • Adjustable Nozzle: Twist the spray nozzle to adjust from a straight stream to wide pattern mist.
OPERATION - CLEANING, DECONTAMINATING & STORAGE When done using the sprayer, it is always important to clean the sprayer and decontaminate yourself. Do not store the sprayer with chemicals in the tank, as it is unsafe and could also result in damage. WARNING Clean-up and decontamination procedures must be followed after each use. Improper equipment clean-up and disposal of chemicals can result in dangerous chemical exposure to humans and the environment, as well as equipment damage.
800.825.5397 SPRAYER STORAGE Prepare the sprayer for end-of-season storage by running RV anti-freeze through the system. This will keep internal parts lubricated, protect against corrosion, and keep the unit from freezing. IMPORTANT NOTE: ALLOWING YOUR SPRAYER TO FREEZE, WITHOUT TAKING PROPER WINTERIZATION STEPS, VOIDS YOUR WARRANTY. WARNING The sprayer will be damaged if it freezes. Protect the sprayer from freezing during storage by following instructions below.
TROUBLESHOOTING Here you will find solutions for some of the most common issues users have with sprayers.
800.825.5397 BREAKDOWN - TANK ASSEMBLY ID 1 2 3 4 5 6 7 8 9 10 11 12 13 14 15 16 17 18 19 20 21 22 23 24 25 26 27 PART # 8027 33-100176 DF3.
BREAKDOWN - POWER ASSEMBLY ID 28 29 30 31 32 33 34 35 36 37 38 39 PART # REVOLT-144-B-CSK 33-100203 N/A N/A 33-100200 33-103196 N/A N/A N/A DESCRIPTION Revolt Battery Wiring Metal Clip Self-Tapping Screws Base Plate Switch Bracket Type Switch - LED Button Card Holder Teeth Tapping Screw Head Screws Back Panel Revolt Battery Dock QTY 1 1 1 7 1 1 1 1 1 3 1 1
800.825.5397 BREAKDOWN - FRAME ASSEMBLY ID 39 40 41 42 43 44 45 46 47 48 49 PART # 33-100158 DESCRIPTION Frame Handle (Only Available As Entire Frame) QTY 1 33-100157 Handle Adjustment Knobs & Bolts 2 33-100155 Axel Nut & Washer 2 TWA12x1.75-1/2 33-100158 33-100160 33-100156 33-100158 N/A 12" Wheels Lower Frame (Only Available As Entire Frame) Bolts - 1.
FOLLOW ALL WARNINGS IN THIS MANUAL, FAILURE 24PLEASE TO DO SO COULD RESULT IN PROPERTY DAMAGE & INJURY. 800.825.5397 Manual: REVMAS-M 800.825.