
Installation Guide


To change from a square to radiused corner face plate, pry off the existing face plate and then attach the new one. Face
plates have a ferrule that is slightly swaged to hold it in place. Use a small screwdriver or chisel to make prying easier, then
swage the new face plate in place.
If changing to a drive-in bolt, pry off the existing face plate. Then:
•Spreadtheoatingsleeveandmoveitawayfromthebackplate
•Pushinonthebackplateandturncounter-clockwise,thenpulloff
•Placetheroundfaceplateonthebolt
•Movetheoatingsleeveforward
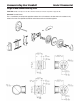
Below is the exploded view of the cylinder/dial assembly. You will find instructions for decoding an existing combination and
for encoding a new combination immediately after the exploded view. Two parts below are critical to lock operation: Item 4,
the fly- PKG50994 and Item 12, the disruptor spring – PKG50998. Component parts are available.
Deadbolt Information (continued) Grade 2 Residential
10
1. Cylinder Tailpiece – PKG 50975
2. Dial
3. Drive Cam
4. Fly – PKG50994
5. Anti-friction Spacer –PKG 50993
6. Combination Disk 2 – PKG 50991
7. Combination Disk 3 – PKG 50992
8. Dual Fence Ring –PKG 57385
9. Wave Washer – PKG 50996
10. Cam –PKG 51000
11. Trim Hub
12. Disrupter Spring – PKG 50998
13. Dial Ring Screws – PKG 51003
14. Baffle Plate
15. Baffle Plate Screws –PKG 57384