
User Guide


ASSEMBLY INSTRUCTIONS
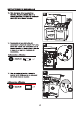
4ˊ Remove the 2 screws securing the
access panel located at the back of the
main body (A) with the Phillips
screwdriver (DD).
Hardware Used
x 1
5ˊ Using the 23 x 24 mm wrench (EE),
remove the hex nut from the faucet (E)
and set aside.
Hardware Used
23 x 24 mm Wrench x 1
6. Insert the faucet (E) into the round
hole on the surface of the main body (A).
EE
Access Panel
Screw
Hex Nut
Phillips Head
Screwdriver
DD
Destornillador
3KLOOLSV
Tornillo
3DQHOGHDFFHVR
7XHUFDKH[DJRQDO
Aditamentos utilizados
Aditamentos utilizados
INSTRUCCIONES DE ENSAMBLAJE
4. Retire los 2 tornillos que aseguran el
SDQHOGHDFFHVRXELFDGRVHQODSDUWH
SRVWHULRUGHOFXHUSRSULQFLSDO$FRQHO
GHVWRUQLOODGRU3KLOOLSV''
&RQXQDOODYHGH[PP((
VDTXHODWXHUFDKH[DJRQDOGHOJULIR(\
FROyTXHODDSDUWH
,QVHUWHHOJULIR(HQHORUL¿FLRUHGRQGRHQ
ODVXSHU¿FLHGHOFXHUSRSULQFLSDO$
77
Llave inglesa de
[PP