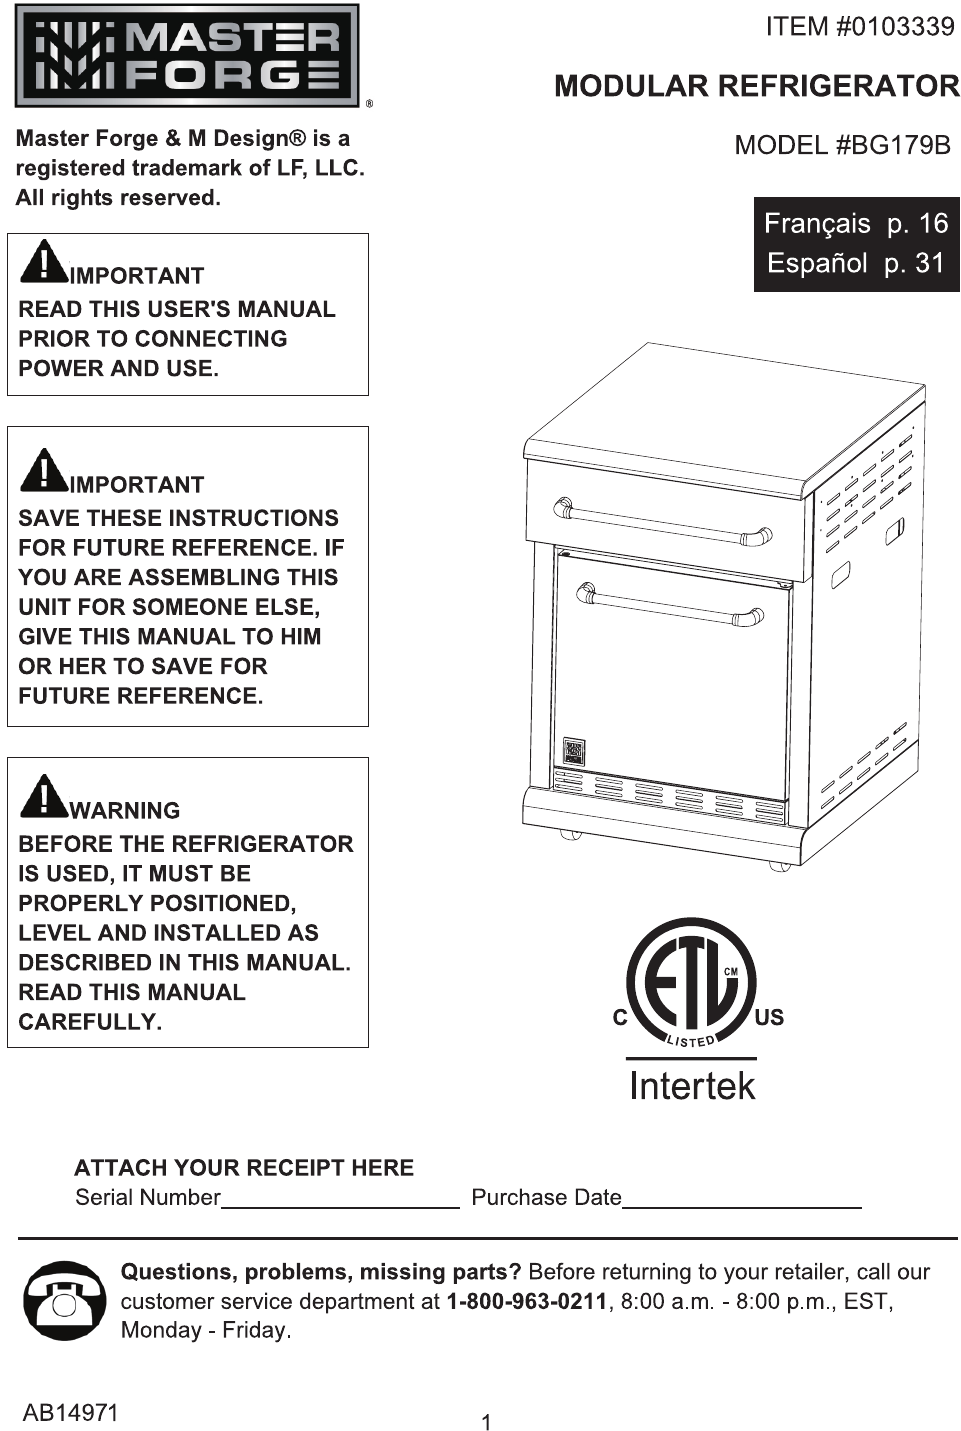
TABLE OF CONTENTS Safety Information…………………………………….………...….……………………..………...3 Installation Instructions………......……………………………....……………………................4 Reverse Refrigerator Door ……………..……......………….…………………………................5 Care and Maintenance……………………………….………………………………………...……9 Troubleshooting …………………………………………………………………..….……….….11 Technical Data and Wiring Diagram…………………………….………………………..……13 Warranty……………………………………………………………………………………………...
SAFETY INFORMATION To reduce the electrical shock or injury when using the refrigerator, follow basic precautions including the following: Remove all packaging before using this unit. • Plug into a grounded 3-prong GFI outlet. Do not remove grounding prong, do not use an adaptor, and do not use an extension cord. • It is recommended the refrigerator be plugged into it's own circuit. Use receptacles that cannot be turned off by a switch or pull chain. • Never clean refrigerator parts with flammable fluids.
INSTALLATION INSTRUCTIONS Before Using Your Unit • Remove the exterior and interior packing. • Before connecting the unit to the power source, let it stand upright for approximately 2 hours. This will reduce the possibility of a malfunction in the cooling system from handling during transportation. • Clean the interior surface with lukewarm water using a soft cloth. Setting the Temperature Control • Your unit has only one control for regulating the temperature in the compartment.
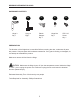
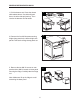
REVERSE REFRIGERATOR DOOR HARDWARE CONTENTS AA BB CC DD Hinge 3 Qty. 1 Hinge 4 Qty. 1 Plastic Stopper Qty. 1 Hinge Nut Qty. 1 EE ST4.2*10 Screw Qty. 1 PREPARATION The direction of the fridge door is reversible. Before reversing the door, make sure all parts are present. Compare parts with hardware contents list. If any part is missing or damaged, do not attempt to assemble the product. Make sure remove all food from the fridge.
REVERSE REFRIGERATOR DOOR 1. Pull the drawers out. Press the drawer slide release levers. One side will push down, the other side pull push up. Then remove the drawers and set aside. 1 2 2. Remove the four M4*8 screws securing fridge clamp panel to the left and right side panels. Take out the fridge clamp panel out. 3. Remove the two M6*12 screws on rear panel and two M6*16 screws on base panel securing the fridge. Carefully take the fridge out.
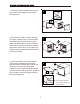
4. Unscrew the door spindle screw from top right corner of the fridge then carry down the fridge door. 4 5. Remove the six M4*12 screws securing the hinge 1 and the hinge 2 on the top right and bottom right corners. Set the hinges aside and reinstall the six screws. Remove the six M4*12 screws on top left and bottom left corners. Secure hinge 3 (AA) and hinge 4 (BB) to the top left and bottom left corners with the six screws. 5 AA M4*12 BB 6.
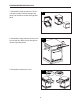
REVERSE REFRIGERATOR DOOR 7. Reinstall the fridge and secure it to the unit with two M6*12 screws through rear panel and two M6*16 screws through base panel. 7 8. Reinstall the fridge clamp and secure it to the unit with four M4*8 screws through the left and right side panels. 8 9. Reinstall the drawer to the unit.
CARE AND MAINTENANCE Cleaning Your Unit • Turn the temperature control to "0," unplug the unit, and remove the food and shelf. • Wash the inside surfaces with a warm water and baking soda solution. The solution should be about 2 tablespoons of baking soda to one quart of water. • Wash the shelf and tray with a mild detergent solution. • The outside of the unit should be cleaned with mild detergent and warm water.
CARE AND MAINTENANCE Energy Saving tips • Let hot foods cool to room temperature before placing in the unit. Overloading the unit forces the compressor to run longer. • Be sure to wrap foods properly and wipe containers dry before placing them in the unit. This cuts down on frost build up inside the unit. • Unit wire rack should not be lined with aluminum foil, wax paper or paper towels. Liners interfere with cold air circulation, making the unit less efficient.
EST, Monday - Friday. 8:00 a.m. - 8:00 p.m.
TROUBLESHOOTING PROBLEM POSSIBLE CAUSE The door will not 1. The unit is not level. close properly. 2. The gasket is dirty or bent. 3. The food are out of position. 12 CORRECTIVE ACTION 1. Check to assure that the unit is level. 2. Clean gaskets and the surface that they touch. Rub a thin paraffin wax on the gaskets after cleaning. 3. Check for anything blocking the door. Remove any food that may be preventing the door from closing.
8:00 a.m. - 8:00 p.m., EST, Monday - Friday.
8:00 a.m. - 8:00 p.m., EST, Monday - Friday.