
User Manual

Product No. 043-1016-6 | Contact us: 1-855-803-9313
4
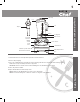
Description and Assembly of Parts
1. Filler Cap - Insert Cap into Lid by aligning tabs and slots. Turn clockwise to lock. Turn counter-clockwise to remove.
2. Lid – Push Lid onto Jar until upper Lid ledge is flush with upper lip of Jar. Ensure that the Lid is securely
positioned before operating the Blender. Extra care must be taken especially when handling hot liquids.
3. Jar – 2 Litre/Quart Jar made from durable BPA free Triton with Cup and milliliter markings. Place Jar on Centering
Platform, ensuring that it is well seated.
4. Blades – 8 stainless steel blades provide multi-purpose and consistent blending.
5. Centering Platform – Pad which holds the Jar in place on the Blender Base. It can be removed for cleaning but
must be repositioned before using the Blender.
6. Locking Nut – Fastens Blades securely to Jar.
7. Drive Socket – Hardened metal socket where Jar connects with Motor Base to turn the Blades.
8. Blender Base – Powerful motor housed in a durable plastic container that contains the control panel.
9. On/Off Switch – The Blender is off when the Switch is in the down position (O). With the Speed Control turned to
the lowest setting and the Jar/Lid properly installed, toggle the ON/OFF Switch up to the (I) position to operate the
Blender.
10. Pulse Switch – With the Jar/Lid properly installed, press down on this Switch to operate the Blender
momentarily at the highest speed. The Blender will run at this speed as long as the Pulse Switch is held down.
The Pulse function can be used when the ON/OFF Switch is in either the (I) or (O) position. The Blender will return
to its previous speed or stop when the Pulse Switch is released.
11. Variable Speed Control – Control the rotational speed of the Blades by turning the Speed Control, clockwise to
increase and counter clockwise to decrease.
12. Power Cord – Grounded (3 prong) 120 volt cord.
13. Feet – 4 rubber anti-slip feet.
14. Tamper – Designed specifically for this Blender, the Tamper will help to safely move blocked ingredients without
contacting the Blades. It is intended to be used only when the Lid is in position and food stops circulating in the
Jar. Remove the Cap and Insert the Tamper up to the stopper. Hold the Jar handle with one hand and with the
other move the Tamper in both a circular and up/down motion to unblock the contents of the Jar.
15. Cord Wrap Retainer - flexible Cord Wrap Retainers hold the excess power cord in position. Unwind the Power
Cord to the desired length leaving the unused portion stored under the Blender Base.
16. Overload Reset Button – To protect the motor of your Blender from overheating during exceptional situations, the
Blender will automatically shut off. If this happens return the ON/OFF Switch to Off (O) position, remove the Jar
and wait for the motor to cool. Aer approximately 5-20 minutes the Blender will reset automatically. If not,
press this Button under the Blender Base.