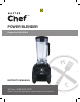
TM POWER BLENDER Product no. 085-3137-6/G45323 Product No.
Important Safeguards Table of Contents Product No. 043-1016-6 | Contact us: 1-855-803-9313 Important Safeguards 2-3 Description and Assembly of Parts 4-5 Before First Use 5 General Use 6-7 Helpful Hints 8 Care and Cleaning 8-9 Troubleshooting 10 Recipes 11-18 Warranty 19 When using electrical appliances, basic safety precautions should always be followed including the following: 1. Read all instructions before using your Blender. 2.
DO NOT fill the Jar to maximum capacity. Always begin processing at the lowest speed setting. Keep hands and other exposed skin away from the Lid. Use extreme caution when moving a Jar containing hot liquids. Always allow the Blender and Jar to cool before taking off parts and before cleaning. 11. The use of accessories or attachments, including canning jars, not authorized or sold by the manufacturer may cause fire, electric shock or injury. 12.
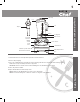
Description and Assembly of Parts Product No. 043-1016-6 | Contact us: 1-855-803-9313 1. Filler Cap - Insert Cap into Lid by aligning tabs and slots. Turn clockwise to lock. Turn counter-clockwise to remove. 2. Lid – Push Lid onto Jar until upper Lid ledge is flush with upper lip of Jar. Ensure that the Lid is securely positioned before operating the Blender. Extra care must be taken especially when handling hot liquids. 3.
Filler Cap Lid Jar Tamper Blades Centering Platform On/Off Switch Power Cord Variable Speed Control Overload Reset Button Locking Nut Drive Socket Pulse Switch Blender Base Description and Assembly of Parts TM Cord Wrap Retainer Feet Before First Use 1. Read all instructions carefully and keep them for future reference. 2. Remove all packaging. 3. Place Jar on Blender Base and wash the Jar by following the directions in the Care and Cleaning Section.
Product No. 043-1016-6 | Contact us: 1-855-803-9313 General Use 1. Place the Blender on a clean, flat, dry and level surface. 2. NEVER run the Blender when the Jar is empty. 3. Add ingredients to Jar and push Lid securely in place before positioning on Blender Base. Unless instructed otherwise, load first with wet ingredients and then dry ingredients. Always add ice and larger, harder ingredients last. Make sure that the Cap is locked in position by turning it clockwise in the Lid.
TM Blending Dry Ingredients 2. DO NOT operate the Blender continuously for more than 90 seconds when processing dry ingredients. 3. When chopping nuts or other dry mixtures, ensure even chopping by adding more than enough ingredients to cover the Blades 4. With Jar in place on Blender Base turn the Speed Control counter-clockwise to the minimum setting. Flip the On/Off Switch to On position (I). Then slowly increase the speed to the appropriate level. Take care to not overprocess. 5.
Product No. 043-1016-6 | Contact us: 1-855-803-9313 Helpful Hints 1. While the motor is running, ingredients can be added, with care, through the Filler Cap opening in the center of the Lid. When processing hot ingredients do not add ingredients through the Filler Cap. 2. To crush ice, place the ice cubes into the Jar. Close the Lid and place on the Blender Base. Press and release the Pulse Switch. Repeat until the desired consistency is reached.
TM Periodic Jar Sanitizing 1. To sanitize, fill the Jar with hot water. 2. Add 1 tablespoon (15 ml) of liquid chlorine bleach. 3. DO NOT turn Blender on. Use spoon to gently and carefully stir for 10 seconds. Let mixture stand in Jar for ten minutes. 4. Empty water/bleach mixture. Without rinsing, set Jar aside to air dry. Then place onto Blender Base ready for next use. NOTE: The Jar is dishwasher safe on the top rack ONLY.
Product No. 043-1016-6 | Contact us: 1-855-803-9313 Blender does not operate (no power) 1. Ensure the cord is plugged into a grounded 120V outlet. Check the circuit breaker or fuse. 2. Unplug the Base, remove the Jar and press the Overload Reset Button under the Base. Troubleshooting My Blender stops while blending 1. Your Blender is equipped with an overload protector that will prevent it from overheating during exceptional situations such as when blending thick contents for extended periods of time.
TM ACORN SQUASH AND PEAR SOUP SERVES 4 DIRECTIONS 1. Place all ingredients in the blender jar in the order listed above. 2. Secure the lid. 3. Set the speed control to the lowest speed and turn the blender on. 4. Slowly increase the speed to the highest setting and blend for about 7 minutes or until steam escapes from the lid. 5. If a thinner consistency is desired, add a little more broth and blend for another 2 minutes.
Product No. 043-1016-6 | Contact us: 1-855-803-9313 BUTTERMILK RANCH DRESSING MAKES 2 CUPS (500 ML) Recipes INGREDIENTS 1 cup (250 ml) 1 cup (250 ml) 1 1 tbsp (15 ml) 1 tbsp (15 ml) 1 tbsp (15 ml) 1/2 tsp (3 ml) buttermilk mayonnaise garlic clove sugar dried parsley dried chives salt DIRECTIONS 1. Place all ingredients in the blender jar in the order listed above. 2. Secure the lid. 3. Set the speed control to the lowest speed and turn the blender on. 4.
TM RASPBERRY VINAIGRETTE MAKES 2 CUPS (500 ML) fresh raspberries olive oil grapeseed oil white vinegar sugar lemon juice salt DIRECTIONS 1. Place all ingredients in the blender jar in the order listed above. 2. Secure the lid. 3. Set the speed control to the lowest speed and turn the blender on. 4. Slowly increase the speed to the middle setting and blend for about 1 minute. 5. Keep in the fridge until ready to use.
Product No. 043-1016-6 | Contact us: 1-855-803-9313 SRIRACHA AIOLI MAKES 1 1/2 CUPS (375 ML) Recipes INGREDIENTS 3 3 tbsp (45 ml) 2 tbsp (30 ml) 1 1 tsp (5 ml) 1 cup (250 ml) egg yolks lemon juice sriracha hot sauce garlic clove salt olive oil DIRECTIONS 1. Place all ingredients, except the oil, in the blender jar in the order listed above. 2. Secure the lid. 3. Set the speed control to the lowest speed and turn the blender on. 4.
TM CHOCOLATE HAZELNUT SPREAD MAKES 1 1/2 CUPS (375 ML) water toasted hazelnuts sugar cocoa powder oil DIRECTIONS 1. Remove the skin from the hazelnuts. 2. Place all the ingredients in the blender jar in the order listed above. 3. Secure the lid. 4. Set the speed control to the lowest speed and turn the blender on. 5. Slowly increase the speed to the highest setting, using the tamper to push the nuts into the blades. 6. Continue to blend until texture reaches a creamy consistency.
Product No. 043-1016-6 | Contact us: 1-855-803-9313 ROASTED RED PEPPER HUMMUS SERVES 4 Recipes INGREDIENTS 3 cups (750 ml) 3 tbsp (45 ml) 2 2 tbsp (30 ml) 2 tbsp (30 ml) 1 1 tsp (5 ml) 1 (250 ml) canned chick peas, drained tahini roasted red peppers lemon juice olive oil garlic clove salt water DIRECTIONS 1. Place all ingredients in the blender jar in the order listed above. 2. Secure the lid. 3. Set the speed control to the lowest speed and turn the blender on. 4.
TM PEANUT BUTTER PANCAKES SERVES 4 DIRECTIONS 1. Place all ingredients, except the baking powder and flour, in the blender jar in the order listed above. 2. Secure the lid. 3. Set the speed control to the lowest speed and turn the blender on. 4. Slowly increase the speed to the middle setting and blend for about 15-30 seconds. 5. Add the flour and baking powder. Secure the lid. 6. Turn the blender on and run on the middle speed setting for about 15-30 seconds. 7.
Product No. 043-1016-6 | Contact us: 1-855-803-9313 VERY BERRY POPSICLE MAKES 12 POPSICLES water fresh strawberries fresh raspberries fresh blueberries sugar lime juice DIRECTIONS 1. Place all ingredients in the blender jar in the order listed above. 2. Secure the lid. 3. Set the speed control to the lowest speed and turn the blender on. 4. Slowly increase the speed to the highest setting and blend for about 1 minute. 5. Pour the mixture into popsicle molds. 6. Freeze until solid, about 2 hours.
TM 1-YEAR LIMITED WARRANTY Warranty Warranty This MASTERCHEF™ product carries a one (1) year warranty against defects in workmanship and materials. Trileaf Distribution agrees to replace the defective product free of charge within the stated warranty period, when returned by the original purchaser with proof of purchase. This product is not guaranteed against wear or breakage due to misuse and/or abuse.
Master Chef Canada Toronto, Canada M4S 2B8