
Technical information


186
186
c. Connect the power cord back into the printer while pressing the “#” and “6″ keys on the
keypads of your printer.
d. Wait until the screen turns black before release the keys. Your printer should turn ON by itself. If
not, press the power button to turn ON the printer.
e. The printer should now start to do the a Semi-Full Reset on your printer. Wait until it finishes
the whole process and settles down.
HP OJ6500A/7500A Printer Reset:
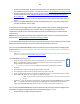
a. At Touchscreen, using two fingers, quickly press the 'OK' & 'Return' buttons in a quick
alternating method (refer to video link below which ‘generally’ illustrates how to perform this):
b. After a few seconds the Support Menu should be displayed.
c. Navigate to Semi-Full (or Full Reset) and reset the printer.
d. Send Test Page to test.
REFERENCE ONLY [ HP PS C4600 - Tap 41 Diagnostic Procedure – REFER TO 3rd video]:
http://inkjet411.com/?page_id=434
HP Officejet 7000 Printer Reset:
http://h20000.www2.hp.com/bizsupport/TechSupport/Document.jsp?lang=en&cc=us&taskId=110&pro
dSeriesId=3882903&prodTypeId=18972&objectID=c01759607
a. Press the Power button to turn the product off.
b. Disconnect the power cord from the back of the product.
c. Wait 30 seconds.
d. Reconnect the power cord to the back of the product.
e. Press the Power button to turn the product on.
4) For more severe HP 920 cartridge error messages which prevent printing [i.e. "Incompatible
Printhead", "The printhead is missing or damaged and printing cannot occur refer to printer
documentation" or "Ink System Failure"] is typical of failed micro-electronics within the PRINTHEAD
assembly*. To verify PRINTHEAD electrical function, conduct the ‘Tap 41’ diagnostic test (NOTE:
procedure may vary slightly by printer model - you may need to navigate around for each command if
not initially displayed)
a. Load Letter/A4-size paper into paper feed tray.
b. Press the * and # keys simultaneously.
c. Enter 124 (or 123) at keypad. The ‘Underware’ menu should be displayed.
d. Use the arrow keys to navigate to the System Menu. Select Ok.
e. The 'print-mech button tap' menu should be displayed.
f. Select Ok. Screen should display “code = 0”.
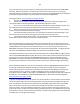
g. Use the arrow keys to enter “code = 41” (or just enter 41 on keypad). Select Ok. The Tap 41
diagnostic test pattern prints.
NOTE: The Tap 10 self-test print may also be initiated via ‘code = 10’ (use to verify ink nozzle
performance)
---- Check the 4th line at the top of the printed report; an electrically good/stable PRINTHEAD will state
“Pen Status: Pen OK”………if any other message is displayed then the PRINTHEAD may have failed and
may need to be replaced.