
Technical information


170
170
Printhead" procedure 2 or 3 times. Please watch the video on the HP 564 support page which describes
some of the issues you could encounter: http://inkjet411.com/?page_id=1983
To verify the lines are clear and working correctly, print the “INK RECOVERY TEST PRINT” from our Test
Prints page (or the Print Quality Report from your printer's Tools menu): http://inkjet411.
com/?page_id=146
3) If the problem persists, then you'll need to review the steps outlined on our support page, including
printhead removal/printer cleaning and service station cleaning. It is suggested you refer to printer
manufacturer instructions first as the Inkjet411 procedures are provided for general guidance
purposes only.
4) If this does not remedy the problem, then you may have an unseated PRINTHEAD or dirty
PRINTHEAD electrical contacts (connects to the carriage assembly); it is suggested to thoroughly
clean Printhead electrical contacts and carriage contacts (inside printer):
http://inkjet411.com/?page_id=1925
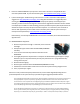
a. Remove all 4 (or 5) ink cartridges, then remove the internal PRINTHEAD and thoroughly
clean rear electrical contacts and carriage electrical contacts.
b. Inspect ink foam ports to see if they are ‘wet with ink’…this will confirm whether ink is
being pulled into the PRINTHEAD or not.
c. If the ink foam ports are completely dry (no significant amount of ink present when
blotted with a paper towel, etc.), then the PRINTHEAD is likely considered too dry to
support proper ink flow and subsequent printing ope rations. Refer to PRINTHEAD
removal process at HP.com (link down below) or at the following Inkjet411 link to
provide general guidance: http://inkjet411.com/?page_id=1451
d. Re-install PRINTHEAD* and Retest.
5) If the missing colors/poor image quality problem still cannot be corrected, then the PRINTHEAD
may be completely/partially dry and may need to be flushed with warm water (if removable!) – see
video here: http://inkjet411.com/?page_id=2412
Removable PRINTHEAD Flushing Steps: http://inkjet411.com/?page_id=2412
a. Remove all ink cartridges from the printer.
b. Remove the printhead – in most cases you will need to pull up on the lever at right side of
carriage assembly to unlock the printhead. Lift printhead straight up to remove.
c. Over a sink, run warm tap water directly into the 4 (or 5) ink ports for approximately 2 minutes –
this will effectively saturate the foam ports and blow ink out/thru the nozzle plate bottom.
d. Using a lint-free towel, remove water from rear/bottom electrical contacts. Ensure printhead
electrical contacts and exposed surfaces are fully dry.
e. Install the printhead into the printer. You may observe a “Replace Printhead message” so you
will need to cycle printer power by turning printer off and then on to clear the error.