
Operating Manual

10
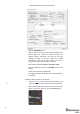
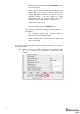
4.1.11 Write down the beacon’s address for future use or change the
address at your convenience as shown here
4.1.12 Press the RESET button on your beacons and modem after
programming
4.1.13 After programming devices with the latest software, the modem and
beacons are ready for use
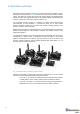
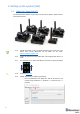
4.1.14 Place the stationary beacons high on the walls vertically in a way
that will provide optimal ultrasonic coverage. Write down the
beacon’s height for future change in the settings. The help video on
installation can be found here - https://youtu.be/WY0HkLzmjys
4.1.15 Connect the modem/router via USB to a Windows PC with the
Dashboard installed
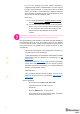
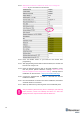
4.1.16 Run the Dashboard. In the left corner of the Dashboard, the modem
should be shown as connected
4.1.17 Wake up all beacons by selecting them on the Dashboard panel
Only 4 stationary beacons may be in 1 submap. If you wake up
more beacons, create new submap for them or it won’t be
displayed on the map and in the table of distances.