
Operation Manual

89
9.6 Calibration of the accelerometer
To calibrate an accelerometer on your beacon with IMU, you can do following steps:
- Connect the mobile beacon via USB to the Dashboard
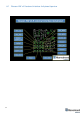
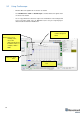
- Make sure that the beacon has IMU on board: open View / Accelerometer menu
and view / gyro data. In the presence of IMU graphics in these windows should
display the angular velocity and acceleration when moving the mobile beacon
(turn it in hands).
Close the window of the accelerometer and gyro data
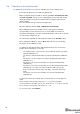
- Open the calibration window: View / calibrate the accelerometer
- When calibrating, it measures the data of the free fall (gravity of the Earth)
corresponding to each of the three axes X, Y, Z. The initial ones from these
calculations remember the correction shifts indicated in the table as "Zero" and the
correction factors indicated as "K"
- The switch at the right bottom of the window should be in the AutoFill position
- Before starting the calibration, click the Reset button at the top of the window -
zeroing the current calibration results
- To calibrate: slowly, without jerking, manually turn the beacon in each of the 6
positions and keep it still for 1-2 seconds:
- The starting position - the beacon lies on the table; the antenna is pointing
upwards (calibration Z +)
- The beacon is turned upside down, the antenna pointing down (calibration
Z-)
- The beacon is on the end, the sensor RX1 is pointing towards the table
(calibration Y +)
- The beacon rests on the end, the RX3 sensor points toward the table
(calibration Y-)
- The beacon rests on the end, the RX2 sensor is directed towards the table
(calibration X +). In order not to interfere with the USB connector, the
beacon can be placed on the edge of the table, so that the cable hangs
down
- The beacon rests on the end, the RX5 sensor points toward the table
(calibration X-)
- In each measurement, the readings of the accelerometer are corrected by Zero
and K.
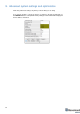
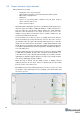
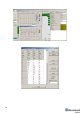
At the end of the measurement of 6 points 7.1 ... 7.6, in the serviceable
accelerometer Zero should be close to zero, and K close to 1, see the screenshot.
If not - check if you forgot any of the points 7.1 ... 7.6.
- To save the results, click Calibrate.