
Owners Guide
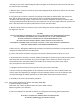
sha, while applying the channel lock pliers to the glides foot to prevent rotaon. When each nut is suf-
ciently loose, simply spin it o, using the other hand to hold the glides foot.
i. Discard the old damaged glides, but set the nuts aside for later reassembly.
j. Assembly is the reverse of the above procedures.
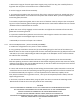
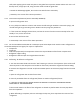
3-14. Freezer Door Replacement (Service Assembly 42240576)
a. Open the refrigerator door.
b. Use a phillips screwdriver to loosen and remove the le and right shoulder screws with springs, and
the le and right hinge mounng screws. Noce how the springs are posioned.
c. If the screws are damaged, discard them, and use the screws from the service assembly kit for reas-
sembly. If not, use the old screws.
d. Discard the old freezer door.
e. Reassembly is the reverse of the above procedure.
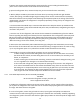
3-15. For the assemblies listed below do not aempt repair below depot level. Send the enre refrigerator to
the authorized depot level agency for repair or replacement.
• Compressor
• Condenser
• Cold Plate (evaporator) The evaporator encloses the top and boom of the freezer compartment.
• Refrigerant copper tubing
• Refrigerator cabinet and/or the hinged cabinet handles.
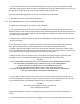
3-16 Defrosng. To defrost the refrigerator.
a. Turn the thermostat knob such that the “OFF” leering is at the 12 o’clock posion. (This will shut o
electrical power to the compressor and condenser fan motor.) Record the original thermostat seng.
b. Remove the refrigerators 115 VAC and/or the 230 VAC power cord electrical plugs from the electrical
outlet.
c. Open the refrigerator door and the freezer door.
d. Place all perishables from the refrigerator/freezer to another refrigerator/freezer .
e. CAUTION: DO NOT USE ANY SHARP OBJECTS TO REMOVE ICE FROM THE EVAPORATOR OR ANY
OTHER PART OF THE REFRIGERATOR.
f. Place a small towel in the oor of the refrigerator to absorb any defrost water that may drip down
from the evaporator.
g. When defrosng is complete, take out and empty the drip tray, then wipe down the interior of the
refrigerator.
25