
Owners Guide
c. Use the combinaon wrench to break loose and turn the nut securing each front glides threaded
sha, while applying the channel lock pliers to the glides foot to prevent rotaon. When each nut is suf-
ciently loose, simply spin it o, using the other hand to hold the glides foot.
d. Discard the old damaged glides, but set the nuts aside for later reassembly.
e. Assembly is the reverse of the above procedures.
3-13. Rear Glide Replacement. (Service Assembly 42241281).
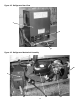
a. Posion the refrigerator for easy access to front and back.
b. Using a phillips screwdriver remove the (2) screws holding the grill to the front of the cabinet just
below the door. Set the screws and grille aside for later reassembly. Remove the (4) phillips head screws
and washers (2 on each side) holding the cabinet wrapper to the base plate. Set the screws and wash-
ers aside for later reassembly.
c. With the 5/16” nut driver remove the (9) screws holding the back shield to the cabinet and set aside
for later reassembly.
d. Using the 5/16” nut driver, remove the mounng screws from the cabinet back, and remove the
back. Put the back and the 14 screws aside for later re-assembly. Recessed into the foam
insulaon, both the large copper sucon return line from the evaporator and the thin capillary tube
carrying cold liquid from the lter/dryer to the evaporator run up to the upper le corner. Under these
lines is the thin aluminum capillary tube/sensor line from the thermostat.
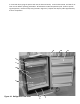
e. With the 5/16” nut driver remove the (2) screws holding the cabinet wrapper to the base plate.
See Figure 3-1 item 16. Pull the base plate and mechanical assembly out a few inches.
CAUTION
THE 32-LB MECHANICAL ASSEMBLY IS STILL FULLY ATTACHED TO THE REFRIGERATION SYSTEM
YOU CAN MOVE THE ASSEMBLY ONLY A FEW INCHES OUT OF THE COMPARTMENT
WITHOUT DANGER OF DAMAGING THE COPPER REFRIGERANT LINES
BE SURE THAT YOUR WORK SURFACE IS WIDE ENOUGH TO SUPPORT THE
MECHANICAL ASSEMBLY WHEN YOU HAVE IT PULLED 4” TO 6” BACK FROM ITS OPERATIONAL
POSITION, AND ROTATED A FEW DEGREES HORIZONTALLY...
f. Use the 3/8” nut driver to loosen and remove from the front and back side of the transformer the
three nuts holding the transformer in place. Set the nuts aside for later reassembly. You can now push
the transformer/ power cord forward and away from the rear glide nut assembly.
CAUTION
Be sure that the refrigerator is empty, and that you
have it supported at all mes.
g. Move the refrigerator so that the rear glides project over the end of the work surface about six
inches.
h. Use the combinaon wrench to break loose and turn the nut securing each front glides threaded
24