
Owners Guide
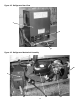
f. Remove the stainless steel backshield by removing the ve screws holding the backshield in
place. Put the shield and ve screws aside for later reassembly.
g. Open the refrigerator door, remove the drip tray, and set it aside for later reassembly.
h. With a phillips screwdriver, dismount the freezer door by removing the le and right shoulder
screws, with springs, and le and right hinge mounng screws. Set the screws aside for reassembly
later. Now remove the three phillips screws aaching the evaporator plate to the ceiling of the freezer
compartment. This allows the refrigerator’s cold plate (evaporator) to hang free by the refrigerant line
copper tubing harness.
i. The thermostat thermobulb loop is now accessible behind the cold plate. Reach up and behind the
cold plate (evaporator), grasp the thermobulb and pull it away and downward, straightening the loop in
the tube in the process.
j. Go to the rear of the refrigerator, and remove the thermostats thermobulb tubing from the cabinet
interior by pulling the tubing out and away from the exposed back of the refrigerator. (There will prob-
ably be two secons of refrigerator puy applied around the tubing at the top and boom of the re-
frigerator back. Remove this puy and replace the puy during reassembly, to maintain insulaon).
When the tubing is clear of the cabinet, let it hang free.
k. Remove the thermostat body and its aached tubing by pulling the thermostat body out and away
from the front of the cabinet. Be sure that the thermostat tubing is straight and does not catch or hang
up on any refrigerator parts as it is pulled free. Discard the old thermostat and its tubing.
l. Reassembly is the reverse of the above procedure. Be sure to do the following:
1. When roung the thermostat tubing back to the evaporator be sure that there are no kinks,
that all bends are smooth, that the tubing does not rest on the condenser, fan assembly, trans-
former, or compressor.
2. When removing the old thermostat and tubing, noce the method of roung the tubing, and
use it as a guideline for roung the new thermostat and tubing.
3. Also reseal with refrigerator puy and protect all openings and cut-outs in the refrigerator.
4. For ease of installaon with the thermostat thermobulb clamp, form the end of the thermo-
stat tubing into a J-shaped loop about 3 to 4 inches long by 3/8 inch to 1/2 inch wide, no wider
than the clamp. This provides the best contact between the sensor area and the evaporator
shell, to give the most accurate temperature feedback to the thermostat.
3-12 Front Glide Replacement (Service Assembly 42241281)
CAUTION
Be sure that the refrigerator is empty, and that you
have it supported at all mes.
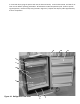
a. Posion the refrigerator to allow easy access to front and back, and on a work surface that allows
you to place the refrigerator with either the front or the back end projecng about six inches beyond
the edge. This allows access to the glides.
b. For the front glides, remove the grill under the door, by using the small phillips screwdriver to
remove the two screws retaining the grill. Set the parts aside for later reassembly. Carefully supporng
the refrigerator, push it forward so that the front glides project about six inches beyond the edge of the
work surface.
23