
Owners Guide
c. Remove the hinge-pin from the upper door hinge by using a 1/8” hex key, then carefully li the re-
frigerator door and place it front down on the cardboard surface.
d. Set the hinge pin aside for later assembly.
e. To remove the old gasket, start at one corner of the door, using your hands only, steadily pull the ar-
rowhead shaped retainer cross-secon from the plasc door channel. When you have completely re-
moved the gasket, discard it.
f. To install the replacement gasket, start at one corner of the door channel, and press the correspond-
ing corner of the new door gasket retaining arrowhead into the channel with sucient force to seat the
shoulders of the arrowhead into the channel.
g. When the corner is fully engaged, use the hand roller to roll/push the remainder of the new door
gasket into the retaining channel.
h. Inspect the installed door gasket to ensure that the enre length is seated in the retainer channel,
and that the gasket is undamaged. Adjust as necessary.
i. Reassembly is the reverse of steps 3-10 a-e above.
3-11 Thermostat Replacement. (Service Assembly 42240589).
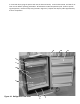
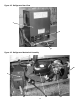
a. Posion the refrigerator for easy access to front and back.
b. Using a phillips screwdriver remove the (2) screws holding the grill to the front of the cabinet just
below the door. Set the screws and grille aside for later reassembly. Remove the (4) phillips head screws
and washers (2 on each side) holding the cabinet wrapper to the baseplate. Set the screws and wash-
ers aside for later reassembly.
c. The thermostat is located behind the le corner of the grill. It aaches to the harness assembly
with two spade lug connectors. Reach behind the thermostat and gently pull the two connectors o by
pulling them straight to the rear. DO NOT pull directly on the wires. When the wire/connectors are free
of the thermostat body, let them fall free.
d. Loosen and remove the two phillips screws holding the thermostat in place. Discard the screws (use
screws from the service kit for reassembly) and pull the green ground wire free of the thermostat. Let
the old thermostat body to hang free. It is now suspended from its aluminum capillary sensor
tube, which runs back to the right lower corner , then up to the evaporator/freezer secon, with the
copper refrigerant lines.
e. At the rear, remove the cabinet back, using the 5/16” nut driver to remove the mounng screws.
Take the back o and set the screws (14) aside for later reassembly.
CAUTION
THE 32-LB MECHANICAL ASSEMBLY IS STILL FULLY ATTACHED TO THE REFRIGERATION SYSTEM
YOU CAN MOVE THE ASSEMBLY ONLY A FEW INCHES OUT OF THE COMPARTMENT
WITHOUT DANGER OF DAMAGING THE COPPER REFRIGERANT LINES
BE SURE THAT YOUR WORK SURFACE IS WIDE ENOUGH TO SUPPORT THE
MECHANICAL ASSEMBLY WHEN YOU HAVE IT PULLED 4” TO 6” BACK FROM ITS OPERATIONAL
POSITION, AND ROTATED A FEW DEGREES HORIZONTALLY...
22