
Owners Guide


10
d. Packaging and Preservaon Refrigerators that have been uncartoned and used in service re-
quire that the following procedures be done to them before they are made inacve and placed in
storage.
1. Turn the thermostat knob to the “OFF” posion to deacvate the refrigerator and before
removing the electrical plug(s) from the electrical supply outlet(s). The “OFF” posion on the
thermostat knob is achieved when the “OFF” marking on the knob is at the twelve o’clock
posion.
2. Remove the refrigerator electrical plug(s) from the electrical supply outlet(s). Roll up each
power-cord in an approximate one foot diameter coil. Secure each power cord to the back of
the refrigerator with the use of the plasc holding straps on the back of the refrigerator. Snap
the strap over its plasc prong unl it clips in place.
3. Open the refrigerator door, remove all commodies from the refrigerator, freezer, and door
shelves. Empty and dry any ice trays in the freezer compartment.
4. Allow the freezer compartment and its cold plate to completely defrost. You may leave the
cabinet and freezer door open to facilitate defrosng. Also, a heat source such as a pan of hot
water or a hair dryer may be used to speed up defrosng. NEVER use an ice pick or sharp instru-
ment to chip or break the ice away from the cold plate. Doing so may rupture the aluminum
tubes in the cold plate, allowing the refrigerant to escape and causing the system to fail. Escap-
ing refrigerant may cause injury to skin, due to frostbite or blindness to eyes due to contact with
the supercold refrigerant liquid/gas.
5. Aer all ice and frost have been removed from the refrigerator and freezer, thoroughly dry all
interior surfaces and parts. Place dried out ice trays in drip tray of refrigerator and the Opera-
on and Maintenance Manual in a 9” x 12” plasc bag. Place bag and manual on the cabinet
shelf.
6. Close the cabinet door and snap the plasc door latch onto the buon of the top le side of
the cabinet door.
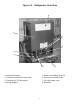
7. Remove any dust or dirt that may be on the condenser coils and ns. The condenser is locat-
ed on the back of the cabinet on the lower right side as you look at the back, just inside the rect-
angular 5-1/4” x 2-1/4” opening on the stainless steel motor guard. A small vacuum cleaner
brush aachment works well in removing any dust or dirt that may exist.
8. Examine the cabinet and door outer painted surfaces. If any nicks or scratches exist in the
painted surface, use matching appliance touch up paint to cover and seal any nicks or
scratches.
9. The refrigerator is ready for uncartoned storage. See par. 2.3.b. for details.
10. If the refrigerator is to be re-cartoned and placed in storage, obtain a carton service assem-
bly kit from Marvel. Re-carton the unit as specied in the instrucons included with the kit.
The refrigerator, once re-cartoned, is ready for cartoned storage. See par.2.3.b. for details.