Installation Operation and Maintenance Instructions Scientific Freezer and Refrigerator with External Temperature Display and Control 4CAFX 6CARFX
CONTENTS Important Safety Instructions Unpacking your appliance ...................................................3 Remove packaging ........................................................3 Warranty registration .....................................................3 Installing your appliance .................. ...................................4 Select location ...............................................................4 Cabinet clearance ..........................................................
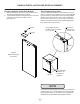
UNPACKING YOUR APPLIANCE ! Warranty Registration WARNING It is important you send in your warranty registration card immediately after taking delivery of your appliance. EXCESSIVE WEIGHT HAZARD The following information will be required when registering your unit. Model Number Serial Number Date of Purchase Dealer’s name and address Use two or more people to move product. Failure to do so can result in back or other injury.
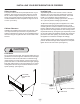
INSTALLING YOUR REFRIGERATOR OR FREEZER Select Location Leveling Legs The proper location will ensure peak performance of your appliance. We recommend a location where the unit will be out of direct sunlight and away from heat sources. To ensure your product performs to specifications the recommended installation location temperature range is from 55 to 100°F (13 to 38°C).
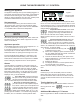
GROUNDING METHOD AND ELECTRICAL REQUIREMENTS ! Grounding Method WARNING This product is factory equipped with a power supply cord that has a three-pronged, grounded plug. It must be plugged into a mating grounding type receptacle in accordance with the National Electrical Code and applicable local codes and ordinances (see Figure 4). If the circuit does not have a grounding type receptacle, it is the responsibility and obligation of the customer to provide the proper power supply.
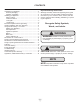
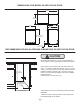
HANDLE INSTALLATION AND DOOR ALIGNMENT Handle Installation (Solid Door Models) Door Alignment Procedure 1. Remove the handle, (2) screws, and 5⁄32” allen wrench from the bag shipped inside the cabinet. 2. Locate handle opposite the hinges and secure in place using the (2) screws and the allen wrench. (See Figure 5). The door should be parallel to the sides and top of the appliance.
USING THE MICROSENTRY II ™ CONTROL Starting your appliance Alarm The appliance will begin start up when initially plugged in or when power resumes after a power outage. If the appliance has been turned off during use, “OFF” will appear on the display. To start the appliance from the “OFF” position press and hold the ON/OFF button for three seconds.
DIMENSIONS FOR MODEL 4CAFX SOLID DOOR 47 3⁄32" (119.6cm) 24 7⁄8" (63.2cm) 23 7⁄8" (60.7cm) 25 11⁄32" (64.4cm) 24 ⁄32" (61.2cm) 3 33 3⁄4" to 34 3⁄4" (85.7 to 88.3cm) 22" (55.9cm) 3" to 4" (7.6 to 10.2cm) RECOMMENDED ROUGH IN OPENING DIMENSIONS, 4CAFX SOLID DOOR ! CAUTION Electrical Requirements: A 115 volt, 15 amp dedicated circuit is required. A 3 prong grounded receptacle is required. Power outlet can be located in the back wall behind unit. Add 11⁄4” (31.
DIMENSIONS FOR MODEL 6CARFX SOLID DOOR 46 3⁄8" (117.8cm) 25 19⁄32" (65.0cm) 24 3⁄4" (62.9cm) 23 7⁄8" (60.7cm) 23 5⁄8" (60.0cm) 33 3⁄4" to 34 3⁄4" (85.7 to 88.3cm) 21 1⁄2" (54.6cm) 3" to 4" (7.6 to 10.2cm) RECOMMENDED ROUGH IN OPENING DIMENSIONS, 6CARFX SOLID DOOR ! CAUTION Electrical Requirements: A 115 volt, 15 amp dedicated circuit is required. A 3 prong grounded receptacle is required. Power outlet can be located in the back wall behind unit. Add 11⁄4” (31.
FEATURES 4 CAFX features There is one wire shelf. 6CARFX features There are three adjustable shelves for flexibility of content storage. The shelves can move up or down to accommodate various content sizes. Probe Port (optional) The optional probe port is a hole from the inside to the outside of the unit, which is located on the back of the unit. (See Figure 8).
CARE AND CLEANING AND ENERGY SAVING TIPS Care and Cleaning Front Grille Periodically brush and vacuum the front grille area to maintain proper air flow through the condenser coil. See page 4, Figure 2. Cabinet The painted cabinet can be washed with mild soap and water and thoroughly rinsed with clear water. NEVER use abrasive scouring cleaners. Interior Wash interior compartment with mild soap and water. DO NOT use an abrasive cleaner, solvent, polish cleaner or undiluted detergent.
TROUBLESHOOTING Before You Call for Service If the unit appears to be malfunctioning, read through this manual first. If the problem persists, check the troubleshooting guide below. Locate the problem in the guide and refer to the cause and its remedy before calling for service. The problem may be something very simple that can be solved without a service call. However, it may be required to contact your dealer or a qualified service technician.
OBTAINING SERVICE If Service is Required: • If the product is within the first year warranty period please contact your dealer or call Marvel Customer Service at 800.223.3900 for directions on how to obtain warranty coverage in your area. • If the product is outside the first year warranty period, Marvel Customer Service can provide recommendations of independent qualified servicers in your area. A listing of independent qualified servicers is also available at www.marvelrefrigeration.
COMMERCIAL PRODUCT WARRANTY Marvel Refrigeration (Marvel) Limited Warranty ONE YEAR LIMITED PARTS & LABOR WARRANTY For one year from the date of original purchase, this warranty covers all parts and labor to repair or replace any part of the product that proves to be defective in materials or workmanship. For products installed and used for normal residential use, material cosmetic defects are included in this warranty, with coverage limited to 60 days from the date of original purchase.
APPENDIX A, ADDITIONAL MICROSENTRY II ™ FEATURES Information Menu / Lockout Key 5) Total Operating Time of the Condenser Since the Last Cleaning (cnd): The operating time of the condenser since the last cleaning. The control monitors the operating time of the condenser fan to determine when the condenser is in need of being cleaned. While cnd is displayed on the screen, press and hold SET key to view the value of cnd. The value shown is the number of weeks the condenser has been operating.
www.marvelrefrigeration.com Marvel Refrigeration 1260 E. VanDeinse St. Greenville MI 48838 800.223.3900 41013020 Rev E 1/15/20 All specifications and product designs subject to change without notice. Such revisions do not entitle the buyer to corresponding changes, improvements, additions, replacements or compensation for previously purchased products.
Instructions d’installation, d’utilisation et d’entretien Congélateur et réfrigérateur scientifique avec affichage et contrôle de température extérieurs 4CAFX 6CARFX
CONTENU Importantes instructions de sécurité Déballage de votre appareil ................................................3 Enlèvement de l’emballage ..............................................3 Enregistrement de la garantie ..........................................3 Installation de votre appareil ...............................................4 Choix de l’emplacement ...................................................4 Écartements par rapport à l’armoire..................................
DÉBALLAGE DE VOTRE APPAREIL ! Enregistrement de la garantie AVERTISSEMENT Il est important que vous postiez votre carte de garantie immédiatement après avoir pris livraison de votre appareil. RISQUE DE POIDS EXCESSIF Utilisez deux personnes ou plus pour bouger le produit. Sinon vous pourriez souffrir du dos ou d’une autre blessure.
INSTALLATION DE VOTRE APPAREIL Choix de l’emplacement Pieds de mise à niveau Un bon emplacement assurera une performance de pointe pour votre appareil. Nous recommandons un endroit où l’unité ne sera pas exposée directement au rayonnement solaire et restera écartée de sources de chauffage. Pour assurer que les performances de votre produit soient au niveau de ses spécifications, la plage de températures recommandée au lieu d’installation sera de 65 à 90°F (18 à 32 °C).
RACCORDEMENT ÉLECTRIQUE ! Raccordement électrique AVERTISSEMENT Un circuit secteur dédié en 115 V supportant 15 A est nécessaire. Ce produit est équipé en usine d’un cordon secteur comportant une fiche avec terre à trois broches. Il faut la brancher dans une prise secteur correspondante avec terre, en conformité avec la norme électrique américaine et les normes et réglementations locales applicables (Voir la Figure 4).
INSTRUCTIONS D’INSTALLATION DE PANNEAU DE REVÊTEMENT COMPLET Vérification de l’alignement de porte Installation de poignées Vérifiez que la porte est correctement alignée par rapport à l’armoire avant de fabriquer le panneau sur mesures. Sinon cela peut amener un mauvais alignement du panneau sur mesures avec le support de charnière. La porte doit être parallèle avec les côtés et le dessus de l’armoire.
UTILISATION DE VOTRE CONTRÔLE Démarrage de votre appareil L’appareil commencera à fonctionner à son branchement initial, ou quand l’alimentation revient après une coupure de secteur. Si l’appareil a été mis sur l’arrêt pendant son utilisation, “OFF” va être visible à l’affichage. Pour redémarrer l’appareil depuis cette position “OFF”, appuyez sur le bouton M/A (ON/OFF) et maintenez-le enfoncé pendant trois secondes.
UTILISATION DE VOTRE CONTRÔLE Mise en sourdine de l’alarme Actionnez n’importe quelle touche pour mettre en sourdine la partie audible d’une alerte. REMARQUE Cette action ne fera que rendre muette l’alerte. Si la condition qui a causé l’alerte persiste, le code de cette alerte va continuer de clignoter et se manifestera malgré tout de façon sonore pendant 20 secondes toutes les 60 minutes.
DIMENSIONS POUR LE MODÈLE 4CAFX PORTE SOLIDE 47 3⁄32" (119,6cm) 24 7⁄8" (63,2cm) 25 11⁄32" (64,4cm) 23 7⁄8" (60,7cm) 24 3⁄32" (61,2cm) 33 3⁄4" to 34 3⁄4" (85,7 to 88,3cm) 22" (55,9cm) 3" to 4" (7,6 to 10,2cm) RECOMMANDATION BRUTS EN DIMENSIONS DE L’OUVERTURE, LE MODÈLE 4CAFX PORTE SOLIDE ! ATTENTION Besoins électriques : Un circuit secteur dédié en 115 V supportant 15 A est nécessaire. Une prise avec protection GFCI peut être nécessaire avec les modèles pour extérieur.
DIMENSIONS POUR LE MODÈLE 6CARFX PORTE SOLIDE 46 3⁄8" (117,8cm) 25 19⁄32" (65,0cm) 24 3⁄4" (62,9cm) 23 7⁄8" (60,7cm) 23 5⁄8" (60,0cm) 33 3⁄4" to 34 3⁄4" (85,7 to 88,3cm) 21 1⁄2" (54,6cm) 3" to 4" (7,6 to 10,2cm) RECOMMANDATION BRUTS EN DIMENSIONS DE L’OUVERTURE, LE MODÈLE 6CARFX PORTE SOLIDE ! ATTENTION Besoins électriques : Un circuit secteur dédié en 115 V supportant 15 A est nécessaire. Une prise avec protection GFCI peut être nécessaire avec les modèles pour extérieur. **34” à 35” (86.
CARACTÉRISTIQUES Caractéristiques du 4 CAFX Il contient une clayette en treillis métallique. Caractéristiques du 6CARFX Il contient trois clayettes à position réglable pour la flexibilité de rangement du contenu. Elles peuvent être déplacées vers le haut ou le bas pour s’adapter à différentes tailles de contenu. Port pour sonde (optionnel) Ce port pour sonde optionnel est un trou permettant de passer de l’extérieur à l’intérieur de l’appareil, il est situé sur son dos (Voyez la Figure 8).
ENTRETIEN ET NETTOYAGE, CONSEILS POUR LES ÉCONOMIES D’ÉNERGIE Entretien et Nettoyage Assurez-vous que rien n’obstrue les ouvertures pour flux d’air requises à l’avant de l’armoire Au moins une à deux fois par an chassez par brossage ou par aspiration les peluches et les saletés dans la zone de la grille avant (Voir en page 4). Armoire L’armoire peinte peut se laver avec une solution savonneuse douce, puis soigneusement se rincer à l’eau potable. N’utilisez JAMAIS de produits nettoyants abrasifs.
DÉPANNAGE DE VOTRE APPAREIL ET OBTENTION DE SERVICE Avant d’appeler pour du service Pour vos archives Si l’appareil semble présenter un dysfonctionnement, commencez par bien relire son manuel. Si le problème persiste, consultez le guide de dépannage qui suit. Identifiez le problème dans ce guide et consultez les colonnes de causes et de remèdes avant d’appeler pour du service. Le problème peut être quelque chose de très simple qui peut se résoudre sans demander une intervention de service.
GARANTIE SUR LES PRODUITS COMMERCIAUX DE RÉFRIGÉRATION Garantie limitée de Marvel Refrigeration (Marvel) GARANTIE LIMITÉE DE UN AN SUR PIÈCES ET MAIN-D’OEUVRE Pendant un an à compter de l’achat d’origine, cette garantie couvre toutes les pièces et la main-d’œuvre nécessaires pour réparer ou remplacer toute partie du produit qui s’avérerait défectueuse du fait de matériaux ou d’exécution.
ANNEXE A: CARACTÉRISTIQUES SUPPLÉMENTAIRES DE MICROSENTRY™ Touche de Menu d’informations / Verrouillage Pour accéder au menu d’informations, appuyez sur la touche SET et relâchez-la aussitôt. Dans ce menu d’informations, un code à 2 ou 3 caractères sera affiché pour représenter chaque rubrique dans ce menu. Le premier code affiché sera t1.
www.marvelrefrigeration.com Marvel Refrigeration 1260 E. VanDeinse St. Greenville MI 48838 800.223.3900 41013020-FR Rev E 1/15/20 Toutes les spécifications et les conceptions des produits sont sujettes à des changements sans préavis. De telles révisions ne donnent aucun droit pour l’acheteur de produits antérieurs à bénéficier de ces changements, améliorations, ajouts, remplacements, ni de recevoir une compensation.