
Installation, Operation And Maintenance Instructions

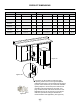


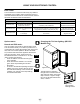


Table Of Contents

19
CARE AND CLEANING AND ENERGY SAVING TIPS
OBTAINING SERVICE
Front Grille
Be sure that nothing obstructs the required air ow openings
in front of the cabinet. At least once or twice a year, brush or
vacuum lint and dirt from the front grille area (see page 4).
SHOCK HAZARD: Disconnect electrical power from the
appliance before cleaning with soap and water.
Cabinet
The painted cabinet can be washed with either a mild soap
and water and thoroughly rinsed with clear water. NEVER
use abrasive scouring cleaners.
Cleaning
Routine cleaning of the stainless steel surfaces will serve
to greatly extend the life of your product by removing
contaminants. This is especially important in coastal areas
which can expose the stainless to sever contaminants such
as halide salts (sodium chloride).
It is strongly recommended to periodically inspect and
thoroughly clean crevices, weld points, under gaskets,
rivets, bolt heads, and any locations where small amounts
of liquid could collect, become stagnant, and concentrate
contaminants. Additionally, any mounting hardware that is
showing signs of corrosion should be replaced.
Interior
Wash interior compartment with mild soap and water. Do
NOT use an abrasive cleaner, solvent, polish cleaner,
undiluted detergent or chlorine based cleaners.
Care of Appliance
1. Avoid leaning on the door, you may bend the door
hinges or tip the appliance.
2. Exercise caution when sweeping, vacuuming or
mopping near the front of the appliance. Damage to the
grille can occur.
3. Periodically clean the interior of the appliance as
needed.
4. Periodically check and/or clean the front grille as
needed.
In the Event of a Power Failure
If a power failure occurs, try to correct it as soon as
possible. Minimize the number of door openings while the
power is off so as not to adversely affect the appliance's
temperature.
Light assembly replacement
All models use LED lamps to illuminate the interior of the
appliance. This component is very reliable, but should one
fail, contact a qualied service technician for replacement
of the LED.
!
CAUTION
Energy Saving Tips
The following suggestions will minimize the
cost of operating your ice machine appliance.
1. Do not install your appliance next to a hot appliance,
(stove, dishwasher, etc.). heating air duct, or other heat
sources.
2. Install product out of direct sunlight.
3. Assure the front grille vents at front of the ice machine
beneath the door are not obstructed and kept clean to
allow ventilation for the refrigeration system to expel
heat.
4. Plug your appliance into a dedicated power circuit. (Not
shared with other appliances).
5. Minimize door openings and duration of door openings.
6. Set the control to the “off” position if accessing the
interior to spot clean or remove large quantities of ice
requires the door to be open for an extended period of
time.
7. Use ECO mode if maximum ice production quantities
are not required.
8. Use the delay start function if the ice machine will not
be used for long periods of time.
If Service is Required:
• If the product is within the rst year warranty period
please contact your dealer or call Marvel Customer
Service at 800.223.3900 for directions on how to obtain
warranty coverage in your area.
• If the product is outside the rst year warranty
period, Marvel Customer Service can provide
recommendations of service centers in your area. A
listing of authorized service centers is also available
at www.marvelrefrigeration.com under the service and
support section.
• In all correspondence regarding service, be sure to
give the service number, serial number, and proof of
purchase.
• Try to have information or description of nature of the
problem, how long the appliance has been running, the
room temperature, and any additional information that
may be helpful in quickly solving the problem.
• Table "C" is provided for recording pertinent information
regarding your product for future reference.
For Your Records
Date of Purchase
Dealer’s name
Dealer’s Address
Dealer’s City
Dealer’s State
Dealer’s Zip Code
Appliance Serial Number
Appliance Service Number
Date Warranty Card Sent (Must be
within 10 days of purchase).
Table C