EN Installation, Operation and Maintenance Instructions FR Instructions d’installation, d’utilisation et d’entretien Wine Cellars Celliers ML15WSG0** ML24WSG0** Note: Wine Cellars are designed exclusively for the storage of wine. Wine Cellars cannot attain storage temperatures suitable for fresh food storage. Remarque : Les celliers sont conçues exclusivement pour y garder des vins. Elles ne peuvent pas atteindre des températures de conservation convenant à l’entreposage d’aliments frais.
CONTENTS Important Safety Instructions Contents: Warnings and safety instructions appearing in this guide are not meant to cover all possible conditions and situations that may occur. Common sense, caution, and care must be exercised when installing, maintaining, or operating this appliance. Safety information ...............................................................2 Unpacking your appliance ..................................................3 Warranty registration .................................
UNPACKING YOUR APPLIANCE ! Warranty Registration WARNING It is important you send in your warranty registration card immediately after taking delivery of your appliance or you can register online at www.marvelrefrigeration.com. EXCESSIVE WEIGHT HAZARD Use two or more people to move product. Failure to do so can result in personal injury. The following information will be required when registering your appliance.
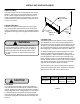
INSTALLING YOUR APPLIANCE Select Location The proper location will ensure peak performance of your appliance. We recommend a location where the unit will be out of direct sunlight and away from heat sources. To ensure your product performs to specifications, the recommended installation location temperature range is from 55 to 100°F (13 to 38°C). Front Grille, keep this area open. Cabinet Clearance Ventilation is required from the bottom front of the appliance.
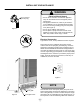
INSTALLING YOUR APPLIANCE ! WARNING Electrical Shock Hazard Do not remove ground prong • Do not use an extension cord with this appliance. They can be hazardous and can degrade product performance. • This appliance should not, under any circumstances, be installed to an un-grounded electrical supply. • Do not remove the grounding prong from the power cord. (See Figure 3). • Do not use an adapter. See Figure 4). • Do not splash or spray water from a hose on the appliance.
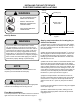
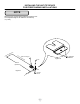
INSTALLING THE ANTI TIP DEVICE FOR FREESTANDING INSTALLATIONS Anti-Tip Bracket WARNING ! • ALL APPLIANCES CAN TIP RESULTING IN INJURY. • INSTALL THE ANTI-TIP BRACKET PACKED WITH THE APPLIANCE. • FOLLOW THE INSTRUCTIONS BELOW 211⁄2" (54.6 cm) Leveling Leg Bottom View of Wine Cellar Front of cabinet Anti-Tip Device ! Figure 7 Step by step instructions for locating the position of the bracket: WARNING 1) Decide where you want to place the wine cellar.
INSTALLING THE ANTI TIP DEVICE FOR FREESTANDING INSTALLATIONS NOTE When the floor mounted anti-tip bracket is used the minimum adjusted height of the cabinet is increased by 3 ⁄8" (9 mm). nt o Fro net bi f ca line Sid eo f c Rear Leveling leg ab ine t li ne Figure 8a Screw 211⁄2" (54.
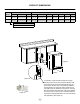
PRODUCT DIMENSIONS ROUGH-IN OPENING DIMENSIONS CABINET DIMENSIONS MODEL "A" "B" "C" "D" "E" "F" "G" "H" "J" "K" ML15WSG 15" (38.1 cm) **34" to 35" (86.4 to 88.9 cm) 24" (61 cm) 147⁄8" (37.8 cm) 333⁄4" to 343⁄4" (85.7 to 88.3 cm) 239⁄32" (59.1 cm) 257⁄32" (64.1 cm) 37" (94 cm) 169⁄16" (39.5 cm) 213⁄16" (53.8 cm) ML24WSG 24" (61 cm) **34" to 35" (86.4 to 88.9 cm) 24" (61 cm) 237⁄8" (60.7 cm) 333⁄4" to 343⁄4" (85.7 to 88.3 cm) 241⁄16" (61.1 cm) 26" (66 cm) 47" (119.
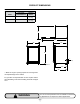
PRODUCT DIMENSIONS PRODUCT DATA MODEL ELECTRICAL REQUIREMENTS # PRODUCT WEIGHT ML15WSG 115V/60Hz/15A 100 lbs (45.4 kg) ML24WSG 115V/60Hz/15A 130 lbs (59.1 kg) "J" "H" "D" "G" "E" 1" (2.5 cm) Figure 11 "K" "F" ** Minimum rough-in opening required is to be larger than the adjusted height of the cabinet. # A grounded 15 amp dedicated circuit is required. Follow all local building codes when installing electrical and appliance.
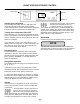
USING YOUR ELECTRONIC CONTROL Door Switch Control Figure 12 Starting your refrigerator Plug the refrigerator power cord into a wall outlet. Your refrigerator will begin cooling after power is applied. If your refrigerator does not start, check that the refrigerator is turned on and the set temperature is cold enough. Turning your refrigerator ON or OFF If the refrigerator is on, the refrigerator temperature will be shown on the display.
SHELVING CONFIGURATION ML15WSG Insert Wine Bottles The five (5) pull-out shelves each hold four (4) bottles. See Figure 13 for typical wine bottle spacing. Care should be taken when storing extra tall bottles in the wine cradle at the bottom of the compartment because they may prevent the door from closing.
SHELVING CONFIGURATION ML24WSG Insert Wine Bottles The four (4) pull-out shelves each hold eight (8) bottles. See Figure 16 for typical wine bottle spacing. Care should be taken when storing extra tall bottles in the wine cradle at the bottom of the compartment because they may prevent the door from closing. Front Bottles (Necks Facing Rear) Rear Bottles (Necks Facing Front) Loading Tips and Suggestions Two (2) magnums can be placed in the bottle cradle as long as they are positioned horizontally.
CARE AND CLEANING Front Grille Be sure that nothing obstructs the required air flow openings in front of the cabinet. At least once or twice a year, brush or vacuum lint and dirt from the front grille area (see page 4). ! Light bulb replacement ! DISCONNECT THE POWER CORD BEFORE ATTEMPTING LIGHT BULB REPLACEMENT. Failure to do so may result in an electrical shock that could severely injure you. CAUTION SHOCK HAZARD: Disconnect electrical power from the appliance before cleaning with soap and water.
ENERGY SAVING TIPS AND OBTAINING SERVICE The following suggestions will minimize the cost of operating your refrigeration appliance. 1. Do not install your appliance next to a hot appliance (cooker, dishwasher, etc.), heating air duct, or other heat sources. 2. Install product out of direct sunlight. 3. Ensure the front grille vents at front of appliance beneath door are not obstructed and kept clean to allow ventilation for the refrigeration system to expel heat. 4.
TROUBLESHOOTING Before You Call for Service If the appliance appears to be malfunctioning, read through this manual first. If the problem persists, check the troubleshooting guide below. Locate the problem in the guide and refer to the cause and its remedy before calling for service. The problem may be something very simple that can be solved without a service call. However, it may be required to contact your dealer or a qualified service technician.
HOUSEHOLD PRODUCT WARRANTY Marvel Refrigeration Limited Warranty REGISTER YOUR PRODUCT To register your product in our warranty system submit online at marvelrefrigeration.com. Keep your receipt, delivery slip, or some other appropriate payment record to establish the warranty period should service be required. If service is performed, it is in your best interest to obtain and keep all receipts.
www.marvelrefrigeration.com Marvel Refrigeration 1260 E. Van Deinse St. Greenville MI 48838 800.223.3900 41014822-EN Rev D 4/18/19 All specifications and product designs subject to change without notice. Such revisions do not entitle the buyer to corresponding changes, improvements, additions, replacements or compensation for previously purchased products.
EN Installation, Operation and Maintenance Instructions FR Instructions d’installation, d’utilisation et d’entretien Wine Cellars Celliers ML15WSG0** ML24WSG0** Note: Wine Cellars are designed exclusively for the storage of wine. Wine Cellars cannot attain storage temperatures suitable for fresh food storage. Remarque : Les celliers sont conçues exclusivement pour y garder des vins. Elles ne peuvent pas atteindre des températures de conservation convenant à l’entreposage d’aliments frais.
CONTENU Importantes instructions de sécurité Contenu : Les avertissements et les instructions de sécurité qui apparaissent dans ce guide n’ont pas la prétention de couvrir toutes les conditions et situations possibles pouvant arriver. Il faut faire preuve de bon sens, de précautions et de soins, pour installer, utiliser ou entretenir cet appareil. Informations de sécurité.......................................................2 Déballage de votre appareil ..................................................
DÉBALLAGE DE VOTRE APPAREIL Enregistrement de la garantie AVERTISSEMENT ! Il est important que vous postiez votre carte d’enregistrement de garantie immédiatement après avoir reçu la livraison de votre celliers, vous pouvez aussi l’enregistrer en ligne sur le site www.marvelrefrigeration. com. AVERTISSEMENT RISQUE DE POIDS EXCESSIF Utilisez deux personnes ou plus pour déplacer le produit. Sinon vous pourriez vous blesser.
INSTALLATION DE VOTRE APPAREIL Choix de l’emplacement Un bon emplacement assurera une performance de pointe pour votre appareil. Nous recommandons un endroit où l’appareil ne sera pas exposé directement au rayonnement solaire et restera écarté de sources de chauffage. Pour assurer que les performances de votre produit soient au niveau de ses spécifications, la plage de températures recommandée au lieu d’installation sera de 55 à 100°F (13 à 38 °C). Grille frontale, gardez cette zone dégagée.
INSTALLATION DE VOTRE APPAREIL ! AVERTISSEMENT Risque de commotion électrique N’enlevez pas la borne de terre de la fiche du cordon secteur. • N’utilisez pas de rallonge secteur avec cet appareil. Cela peut être dangereux et peut affecter la performance du produit. • Cet appareil ne doit sous aucun prétexte être installé sur une alimentation électrique sans liaison de terre. • N’enlevez pas la borne de terre de la fiche du cordon secteur. (Voyez la Figure 3).
INSTALLATION DU DISPOSITIF ANTI-BASCULEMENT POUR DES INSTALLATIONS AUTONOMES ! Dispositif anti-basculement AVERTISSEMENT • TOUS LES APPAREILS PEUVENT BASCULER.
INSTALLATION DU DISPOSITIF ANTI-BASCULEMENT POUR DES INSTALLATIONS AUTONOMES REMARQUE Quand la ferrure anti-basculement fixée au sol est utilisée, la hauteur minimale ajustée de l’armoire est augmentée de 3 ⁄8 po (9 mm).
DIMENSIONS DU PRODUIT DIMENSIONS D’OUVERTURE BRUTE DIMENSIONS D’ARMOIRE MODÈLE «A» «B» «C» «D» «E» «F» «G» «H» «J» «K» ML15WSG 15 po (38,1 cm) **34 po to 35 po (86,4 to 88,9 cm) 24 po (61 cm) 147⁄8 po (37,8 cm) 333⁄4 po to 343⁄4 po (85,7 to 88,3 cm) 239⁄32 po (59,1 cm) 257⁄32 po (64,1 cm) 37 po (94 cm) 169⁄16 po (39,5 cm) 213⁄16 po (53,8 cm) ML24WSG 24 po (61 cm) **34 po to 35 po (86,4 to 88,9 cm) 24 po (61 cm) 237⁄8 po (60,7 cm) 333⁄4 po to 343⁄4 po (85,7 to 88,3 cm) 241⁄16 p
DIMENSIONS DU PRODUIT DONNÉES DE PRODUIT MODÈLE BESOINS ÉLECTRIQUES # POIDS DU PRODUIT ML15WSG 115V/60Hz/15A 100 lbs (45,4 kg) ML24WSG 115V/60Hz/15A 130 lbs (59,1 kg) «J» «H» «D» «G» «E» 1 po (2,5 cm) Figure 11 «K» «F» ** L’ouverture brute minimale nécessaire doit être supérieure à la hauteur ajustée de l’armoire. # Un circuit secteur dédié avec liaison de terre supportant 15 A est nécessaire.
USING YOUR ELECTRONIC CONTROL Interrupteur de porte Tableau de commande Figure 12 Démarrage de votre réfrigérateur Branchez la prise du cordon d’alimentation du réfrigérateur dans une prise murale. Votre réfrigérateur commencera à refroidir une fois qu’il est sous tension. Si votre réfrigérateur ne démarre pas, vérifiez qu’il est bien en marche (ON) et que la consigne de température est suffisamment basse.
CONFIGURATIONS DE ÉTAGÈRES ML15WSG Bouteilles à l’avant (Goulots vers l’arrière) Insertion des bouteilles de vin Les cinq (5) tablettes coulissantes peuvent porter chacune quatre (4) bouteilles. Voyez la Figure 13 pour une disposition type des bouteilles de vin. Il faut faire attention pour l’entreposage de bouteilles très grosses dans le panier à vin en bas du compartiment car elles pourraient empêcher la fermeture de la porte.
CONFIGURATIONS DE ÉTAGÈRES ML24WSG Insertion des bouteilles de vin Les quatre (4) tablettes coulissantes peuvent porter chacune huit (8) bouteilles. Voyez la Figure 16 pour une disposition type des bouteilles de vin. Il faut faire attention pour l’entreposage de bouteilles très grosses dans le panier à vin en bas du compartiment car elles pourraient empêcher la fermeture de la porte.
L’ENTRETIEN ET LE NETTOYAGE Grille frontale Assurez-vous que rien n’obstrue les ouvertures pour flux d’air requises à l’avant de l’armoire. Au moins une à deux fois par an, chassez par brossage ou par aspiration les peluches et les saletés dans la zone de la grille avant (Voyez en page 4). ! ATTENTION RISQUE DE COMMOTION ÉLECTRIQUE : Débranchez l’alimentation secteur de l’appareil avant de le nettoyer à l’eau savonneuse.
CONSEILS POUR L’ÉCONOMIE D’ÉNERGIE, OBTENTION DE SERVICE Les suggestions suivantes vont minimiser le coût de fonctionnement de votre appareil de refroidissement. Si du service est nécessaire : 1. • 2. 3. 4. 5. 6. 7. 8. 9. 10. 11. 12. 13. N’installez pas votre appareil près d’un autre appareil chaud (cuisinière, lave-vaisselle, etc.), d’une conduite d’air chaud, ou d’autres sources de chaleur. Placez l’appareil à l’abri du rayonnement solaire direct.
DÉPANNAGE Avant d’appeler pour du service Si l’appareil semble présenter un dysfonctionnement, commencez par bien relire son manuel. Si le problème persiste, consultez le guide de dépannage qui suit. Identifiez le problème dans ce guide et consultez les colonnes de causes et de remèdes avant d’appeler pour du service. Le problème peut être quelque chose de très simple qui peut se résoudre sans demander une intervention de service.
GARANTIE DE PRODUIT À USAGE DOMESTIQUE Garantie limitée de Marvel Refrigeration ENREGISTREMENT DE VOTRE PRODUIT Pour enregistrer votre produit dans notre système de garantie, soumettez en ligne sur le site marvelrefrigeration.com. Conservez votre reçu, bon de livraison ou autre document approprié attestant du paiement afin d’établir la période de garantie si une intervention s’avérait nécessaire. En cas d’intervention, il est de votre intérêt d’obtenir et de conserver tous les reçus.
17
www.marvelrefrigeration.com Marvel Refrigeration 1260 E. Van Deinse St. Greenville MI 48838 800.223.3900 41014822-FR Rev D 4/18/19 Toutes les spécifications et les conceptions des produits sont sujet à des changements sans préavis. De telles révisions ne donnent aucun droit pour l’acheteur de produits antérieurs à bénéficier de ces changements, améliorations, ajouts, remplacements, ni de recevoir une compensation.