
Use and Care Guide


NOTE
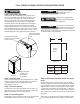
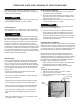
4. Remove the drain plug at the bottom of the reservoir to
drain any remaining water and then reinstall.
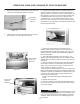
5. Allow the ice to fall from the evaporator, remove and
discard slab of ice. (See gures 20 and 21).
6. Determine the proper amount of cleaner from the ice
machine cleaner manufacturer’s mixture ratio based on
3
⁄4
gallon (2.81 liters) of water (refer to the manufacturer’s mix
ratio directions). Check to be sure the reservoir drain plug
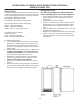
is installed that was removed in step 4. Add the recom-
mended amount of concentrated cleaning solution to the
reservoir of the ice machine. This can be done by pouring
the solution on the evaporator, which will ow down into the
reservoir. (See gure 22).
7. Switch the selector switch on the grille of the ice
machine to the "CLEAN" position. The ice machine will
automatically start and stop the cleaning cycle and ¾ of a
gallon (2.81 liters) of water will automatically be added to
the cleaning solution.
8. The total cleaning time will end in 49 minutes. The
cleaning cycle will automatically rinse the evaporator plate
and also drain the cleaning solution and rinse the reservoir
with water.
9. After the cleaning cycle has ended check that the build-
up has been removed. The evaporator plate should be
clean, shiny, and smooth to the touch. If build-up is still
visible, repeat the cleaning cycle above.
10. Clean the ice machine’s interior, ice scoop, interior door
panel, plastic splash shield and door gasket with mild soap
and water. Using two (2) tablespoons of baking soda in one
(1) quart of warm water while cleaning will help remove
odors. Rinse with fresh water.
DO NOT USE ANY ABRASIVE CLEANING PROD-
UCTS.
11. Replace the front panel.
12. Your ice machine is now clean and sanitized and may
be put back into operation by switching the selector switch
to the "ON" position.
Drain plug
in bottom of
reservoir.
Figure 19
Figure 22
Discard the rst batch of ice. In
the unlikely event a power interrupt occurs during the clean
cycle, you need to start over from the beginning to assure
complete cleaning and rinsing of the cleaning agent from
the machine.
18
OPERATION, CARE, AND CLEANING OF YOUR ICE MACHINE
Figure 20
Allow ice slab
to fall on to
grid cutter
Figure 21
Remove ice
slab and
discard