
User guide


Service and maintenance 15
Lamp life
Monitor lamp hours using the resettable LAMP ON TIME counter in the INFORMATION control menu. To
reduce the risk of explosion, replace the lamp when it reaches the limit of its average service life, i.e. when
usage reaches 750 hours. Never exceed the lamp’s average service life by more than 10%. Replace the
lamp immediately if it is deformed or in any way defective.
For maximum service life:
• Avoid powering the lamp off until it has warmed up for at least 5 minutes.
• Before shutting down power completely, douse the lamp but leave power applied for a few minutes so that
cooling fans can prevent any momentary lamp temperature increase caused by heat from surrounding
components.
Lamp replacement
Warning! Wear safety glasses and gloves when handling lamps. The clear lamp bulb is integral with
the ceramic lamp base. Do not try to separate the bulb from the base.
Important! The lamp can be a stiff fit in its holder. Twist the lamp base a full 45° clockwise when
installing to ensure that the lamp contacts are fully engaged.
Replacement lamps are available from Martin™ by ordering P/N 97010346.
The clear bulb must be perfectly clean. Do not touch it with
your fingers. Clean the lamp with an alcohol wipe and polish
it with a clean, dry lint-free cloth before installing,
particularly if you accidentally touch the bulb.
To replace the lamp:
1. Douse the lamp but leave power applied for at least 30
minutes so that cooling fans continue to run, then
disconnect the fixture from power.
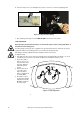
2. Tilt the head so that the text around the lamp access
cover is facing the right way up and the cover is easy to
reach.
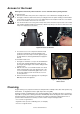
3. See Figure 8. Release the Torx 20 cover screw A and
open the cover.
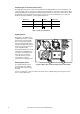
4. See Figure 9. Grasp the ceramic lamp
base, twist it 45° counterclockwise to
release it, then remove the lamp gently from
the fixture.
5. See Figure 10. Hold the replacement lamp
so that the external wire B is facing up
towards the top of the head (towards the
vertical and horizontal alignment screws C
and D) and line up the contacts on the lamp
base with the slots in the lampholder. Slide
the lamp into the fixture until the contacts
are fully inserted in the slots, then twist the
lamp base a full 45° clockwise until it locks
into position with a noticeable click. The
lamp is a stiff fit and trying to strike a lamp
that is not correctly installed can cause
damage that is not covered by the product
warranty, so ensure that the lamp is
correctly locked into position.
OPEN
LOCKED
Figure 8: Lamp access
A
Figure 9: Lamp lock / unlock